Unity Health Bar Explained

The following are the steps that I used for creating a health bar using the Unity UI system for my Shark Food game.  Many of the settings for the size and images can obviously modified to meet specific needs.

First, create two images for the background and foreground.  This can be done in Gimp, using the dimensions 512×64.  For the meter fill,  use the Filter > Render > Clouds > Difference Clouds.  Then use Colors > Colorize to make the bar red (hue value 0) and increase the saturation and lightness.  Create the background by simply filling the entire image with black (Edit > Fill With BG Color).   Set the opacity for the layer for the background image to 50%.

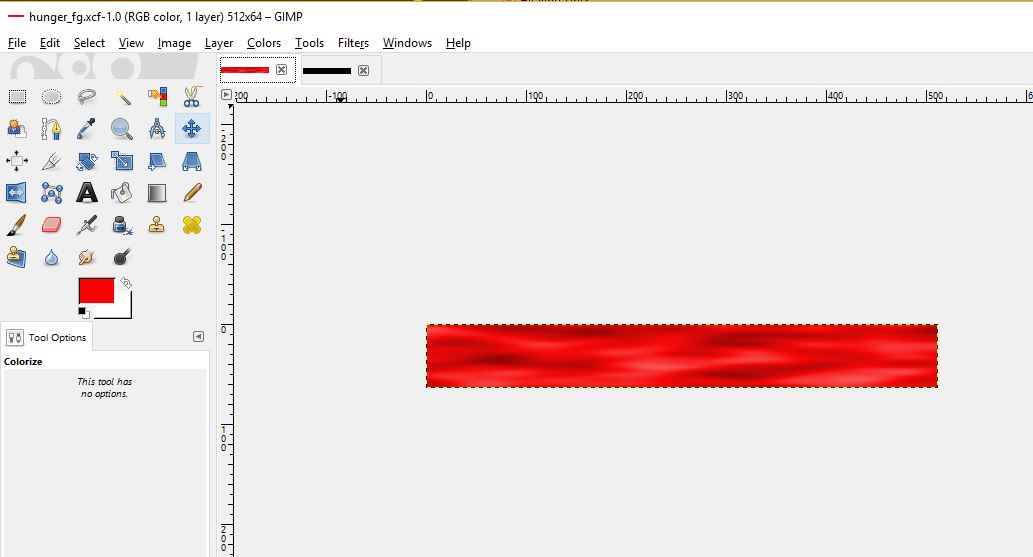
Export both of these images to PNG format.  Save the image files in a folder named Sprites in the Assets folder of the Unity project.  Select both images and set Texture Type to Sprite (2D and UI) and press Apply


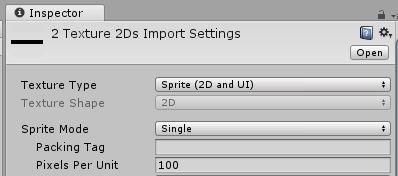
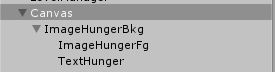
Create a new Canvas object.  I recommend setting Canvas Scaler to Scale with Screen Size and set Reference Resolution to 1920×1080.

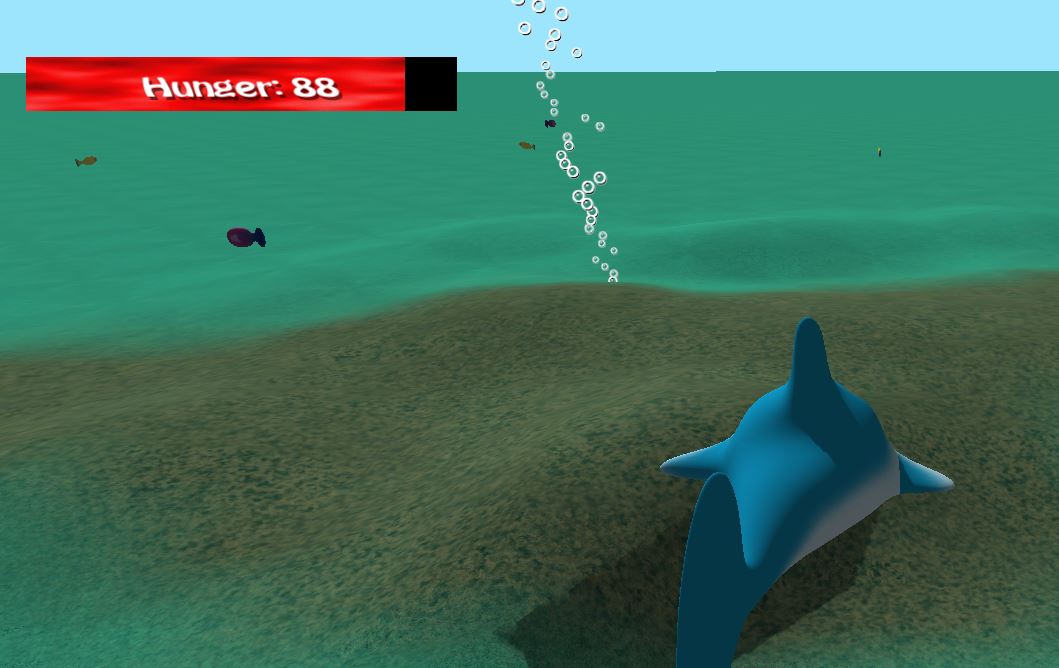
In my Shark Food game, the health is stored in a float variable in my custom Shark class called fHunger.  This value ranges from 0 to 100, which is ensured by using the Mathf.Clamp function after it has been set.

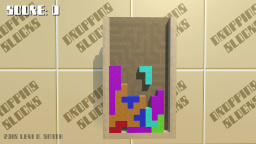
Under the Canvas object in the Unity Hierarchy, create two new UI > Image objects.  Ensure that the image with and height match the same dimensions of the health bar image.  Assign the background image to the first one and the foreground image to the second one.  A Text > UI object can also be created to display the value on the health bar.  Parent the foreground Image and Text object to the background image object.

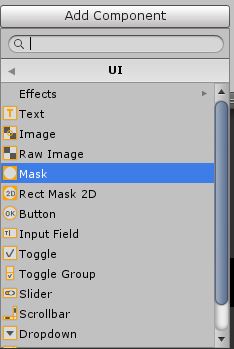
Add a new UI > Mask component to the background image.  Ensure that Show Mask Graphic is selected.

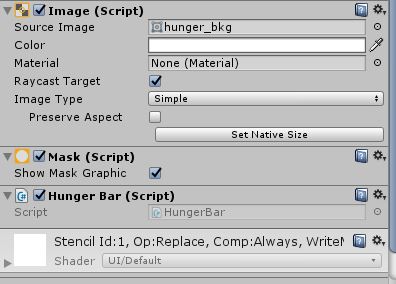
Create a new custom C# script for the health bar.  I called mine HungerBar.  Attach this script to the background image object.  Open the health bar script in an editor (I used Visual Studio) and add a line of code in the Update method to set the position property of the foreground image.  Use Find on the transform to get the foreground image.  Alternatively, create an Image instance variable and assign the foreground Image in the Inspector.  Use GetComponent<RectTransform> to get the localPosition property of the foreground Image.  Declare a float instance variable for the x position.  Set the localPosition property to a new Vector3 with the x property set to the instance variable and y property set to zero.

Create a setValue  method, which sets the instance variable to the passed in value times the health bar width in pixels, minus the health bar width.

Whenever the health value is updated, call setValue and pass in a value from 0 to 1.  This was in the updateHunger method of my Shark class, which gets called on every Update.

The health bar object can be returned with GameObject.FindObjectOfType<HealthBar>(), assuming that you only have one health bar in the scene.  Since my hunger value was a float from 0 to 100, I divided by that value by 100f before passing it to the setValue method.  The text can also be set by using GameObject.Find and setting GetComponent<Text>().text Be sure to import UnityEngine.UI, because it doesn’t get added by default.  If the intellisense doesn’t work for the Text object, it’s usually because of the missing import statement.

That’s all there’s to getting a health bar working.  It’s fairly simple once you know the steps and settings.

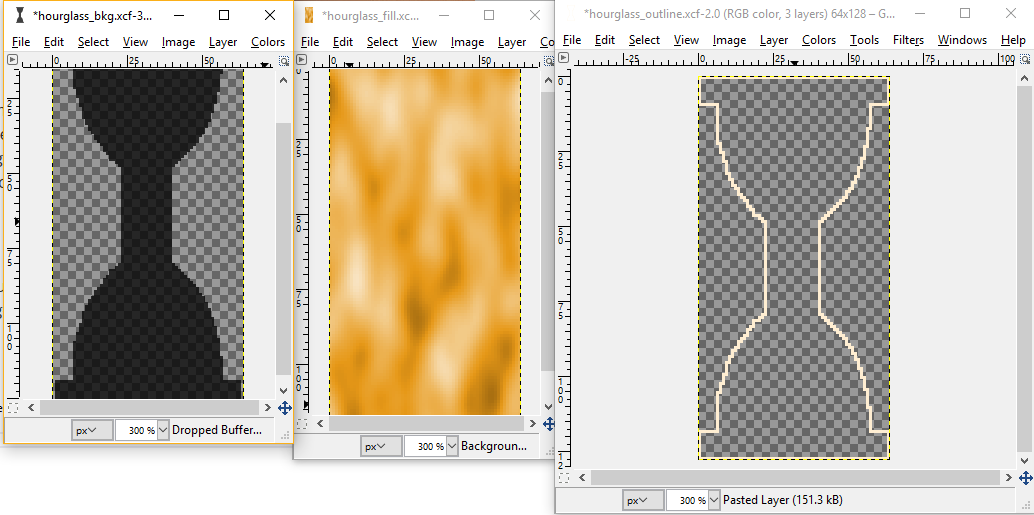
Another example is the time bar that I created for my Archaeology game.  For this bar, I modified the background image, so that it is in the shape of an hourglass.

Then I created a new image, selected the background image shape and filled with an outline color.  Then I shrank the selection by one pixel, then cleared the selection to make a one pixel outline.  I created a new Sprite in Unity, and used the outline image for this new image.  It is important that the outline is not parented to the background image (since it would be affected by the mask).  Instead, it should be placed at the same level as the background image, but it is important for it to come after the background image in the heirarachy, otherwise it will not display.

I made a function that returns the amount of time remaining in the game as a float from 0f to 1f.  For the position code, I multiply the percentage float by the negative height of the image (128 pixels).  So as time progresses, the foreground image will gradually move downward, until it reaches the bottom of the image.

UltraShot

I developed UltraShot for the GM48 24th game development competition from October 13 – 15, 2017. The theme was “One Shot”.

Screenshots


Description

Use the UltraShot cannon to blast the ball to the goal container. Other
cannons will assist in directing the ball along the way. Avoid hitting
the wall or blocks in the ball’s path.

The UltraShot cannon is the red cannon, which can be moved vertically.

Aim the UltraShot cannon using up and down (or W/S keys) and fire using
space or the left mouse button.
The green cannons will propel and redirect the ball. Some green cannons
will also spin, so aim carefully!
Blue blocks will move in a linear motion and bounce off walls. Avoid
them!
Red blocks will move in random directions. Watch out!
The checkered circle is the goal area, which is your target.

Videos


Released

TV World

TV World
Play online


Make your way through the nine channels of the TV World!

Official Videos


Post Mortem

For each Ludum Dare, I like to change genres to keep things interesting. This time, I decided to create a classic shoot-em-up (aka shmup), since I’ve never developed one before. Since the theme was “Everything on One Screen”, I decided to make a television screen the protagonist of the game. I made the entire game based on adventuring through various television channels. I don’t believe anyone has ever done a television themed game before.

I started with the weather channel, which included snowmen as enemies, since the “Unicode Snowman” seemed to be a lock for the Ludum Dare 31 theme. Then after defeating the last snowman boss, you get a gray remote which takes you to the next channel, which is the “Sportsmania” sports channel. In this channel you must blast the numerous footballs which approach you. Defeating the mega sized football at the end grants another gray remote which takes you to the next channel. In the classic movie channel, it is entirely black and white themed and movie reels are the hazard. Along with the classic look, there is also classical styled music that plays in the background. The remaining channels are the 24 Hour News, Kids Club, Out of this World (sci-fi), American Pickers (country music), Ultimate Chef (cooking), and Furry Buddies (animals and pets). Each channel has its appropriate enemy types, which include dollar bills, lollipops, UFOs, cowboy boots, pizza slices, and kitties.

There are two power-ups in the game, which can be acquired by defeating enemies. The red remote will increase the player’s fire rate. This ability can be upgraded five times. The magenta remote will increase the player’s fire spread, which can be upgraded twice so that three projectiles are fired at once.

What Went Right

This was the first time I used the Playmaker addon for Unity for an official Ludum Dare entry. I did use Playmaker to create my Bag Boy warm-up entry, which I think turned out quite well for the amount of time that I spent on it. There is a steep learning curve to using Playmaker, but once you know how to use it, creating a game becomes much easier (especially 3D games). I didn’t write a single line of code for this game, which really makes the game development process less stressful. I was able to spend more time coming up with ideas, and implementing those ideas took much less time than if I was writing code. Managing the game engine is much simpler by creating the FSM diagrams and adding the appropriate actions. I used Taron’s Verve Painter again for creating the background, but I applied a pixel filter in Gimp to make to appear more television-like.

This time I also used an online tool called Trello, which was recommended in one of our local Knoxville Game Design meetings. It provides an efficient interface for recording tasks and ideas, and it allows you to mark which features have been implemented and completed. I think it’s more targeted towards team development, but I found it to be a useful tool while working solo.

I did a webcast to Twitch during the entire game development process. I am really happy with the results of my time-lapse video. My development desktop is on the left, with the current date and time below. On the right side, you can see me on the webcam and the IRC chatroom of my Twitch channel. I think displaying the chat room in the stream encourages people to comment on the status of my game.

What Went Wrong

The night before the competition started, I upgraded my Unity development environment to the latest version. This new version had a completely new UI system added, so I wasted a few hours trying to figure out how to get it to work. Then I discovered that the old GUIText and TextMesh components weren’t easily accessible, and the new UI components were not compatible with Playmaker. Therefore, I wasted even more time downgrading my Unity development environment to the previous version.

After that happened, things were going fairly smoothly. I did have a small problem getting the scrolling background working, because I forgot that the background plane size is 10×10 units. However, I had done a scrolling background for one of my previous games, so I was eventually able to figure it out.

Getting the bullets shooting correctly also took more time that I had anticipated. The bullets were shooting into the screen. Eventually, I took the approach where I set the initial rotation of a bullet, and then just translated it forward in the bullet’s local Z-coordinate.

I left all of the modeling for the last few hours of the competition. Honestly, I was proud of the number of models (the television model for the player and nine different enemies) that I was able to churn out in two to three hours. However, none of the models were animated.

The enemy AI is probably the most glaring flaw in the game. The enemies just basically go from right to left on the screen at a constant rate. I could have easily made the enemies move at different speeds. Making the enemies movie in different patterns, and having the enemies shoot back are definitely features I would like to add in an upcoming release.

The power-up system was completely unbalanced as well. I used a simple random variable to determine if an enemy would drop a power-up. This meant that sometimes you could go long stretches without getting a power-up, and then other times you may get multiple power-ups in a row. Additionally, after maxing out your power-ups, you would complete the game by simply holding down the spacebar. For the next competition, I will try to devote a little more time towards balancing the game.

I liked the music that I made for the game, however I could have spent more time on it. I basically combined various Apple loops in Garage Band, while also modifying the speed and pitch. I read the Ludum Dare rules and this is apparently acceptable, but I really like to be the one entering the notes for it to feel like my own.

How Did I Do?

I don’t know. After Ludum Dare 27 I quit checking my rankings. I check the top 100 winners list, so if I’m not on there it really doesn’t matter to me.

Where to Go From Here

I think I’ve developed a solid shoot-em-up engine, so I just need to add new power-ups, more enemies, smarter artificial intelligence, and increase the length of the channels (levels). I would like to add a money system to the game so that the player can buy new power-ups and abilities.

Earlier this month, I released One Gunman, another one of my Ludum Dare games, on the Windows Store. That’s definitely a platform I would consider releasing TV World. I already know the process for putting a Unity game on the Windows Store, which isn’t too difficult. However, I found that it is really easy to get lost in the shuffle on that platform and getting sales can be tough.

I would definitely like to release the game on the XBox One, since the XBox Live Indie Game (XBLIG) marketplace is pretty much dead. However, getting approved to develop for the XBox One is much more cumbersome than XBLIG, since you’ve got to pitch your idea and go through a lengthy approval process to get a development kit. However, I’m hoping that my experience with publishing to the Windows Store will prove useful for publishing on the XBox One, since they are supposedly based on similar operating systems.

There’s always mobile platforms, such as iOS and Android. I’ve made a simple build for my Nexus Android tablet, but the controls really need some work, which requires more time. I created some simple virtual buttons, since obviously a tablet doesn’t have a keyboard. However, virtual buttons work differently than a mouse, keyboard, or joystick because they are touch based.

I know others have had success with publishing games to the Playstation Vita, so that is another paltform I may give a try. There’s also other less popular consoles like the Ouya, but the cost of the developer’s license is usually my deciding factor.

Then there’s always ad revenue sharing sites like Game Jolt and Kongregate. These web sites are fine, but I’ve never made any serious profit from them. Thefore, I’ll probably release the compo version on those sites, and save the improved version for other platforms.

I am also considering Desura, since the cost to publish on their service is low or free if I remember correctly. I would consider submitting to Steam Greenlight, but honestly 100 dollars is a lot to invest if there’s no guarantee that your game will ever get published on the service. However, that money is supposed to go to charity, so I wouldn’t feel to bad about making that investment.

You can play the compo version of TV World from my itch.io page.


Released