Old Timer Peg Game – Developer Log

This is my (at least) 26th time doing a 48 hour game jam, and the first game for the newly rebranded Knox Game Jam.  The rebranding was needed since other jams were no longer community events, with trademarked names, and overall becoming corporate with sponsors making money off of the free games that the community created with no compensation.  Overall, I am happy with the new direction, having our own rules and free from any edicts from people not associated with Knox Game Design.  Sorry to rant, but I thought it was necessary for people to know the reasons behind the change.

Anyway, this is the old classic peg game.  I think others have created video game versions of this before, but I have not noticed any 3D versions with options like peg color.  To fit the theme, I made the user complete a jump every 10 seconds or he will lose.  It keeps the game flowing so that the player can’t take forever to make a move.

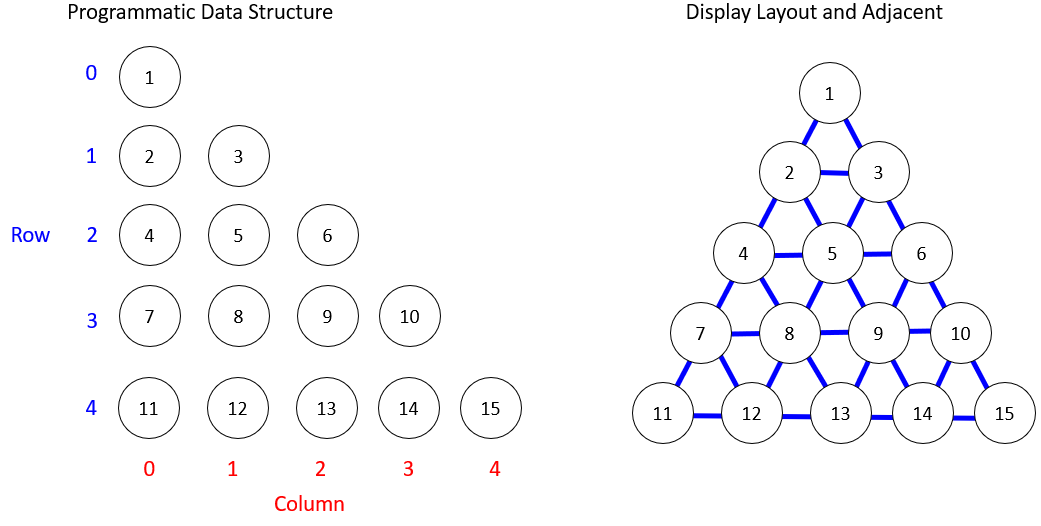
Basically the holes are laid out in rows and columns programmatically.  Row 0 column 0 is the first hole.  Row 1 column 0 is the second hole.  Row 1 column 1 is  the third hole and so on.  Actually, the hole “number” doesn’t matter and is not stored, but each hole does “know” its row and column.  Each hole has a reference to the peg that it holds, or null if the hole does not currently contain a peg.  Based on the row, column, and offset, I was able to calculate if the selected destination was valid (hole peg is null) and the if the hole between contains a peg.  If those conditions are met, then the hopped peg is destroyed, the destination hole’s peg is set to the moved peg, and the source hole’s peg is set to null.  It’s important to remember that for every hole, there are six possible adjacent holes to check.  While programmatically the holes are stored in rows and columns, when laid out visually the holes are shifted and may not be adjacent based on its row and column index.  For instance, peg 8 is adjacent to pegs (4,5,7,9,12, 13) but not (6,11) based on the row/column positioning.

Old Timer Peg Game - data structure and display layoutDetermining the end condition isn’t much more difficult.  For each of the remaining pegs, determine if two holes away in a straight line is empty, and if one hole in the same line away contains a peg.  If that condition is not met at least once for any of the pegs, then the game is over (no valid moves left).  If the game is over and only one peg remains (just by simply checking if the number of remaining pegs equals 1) then the player has won, based on the traditional win state of the peg game.

The biggest challenge was determining which hops were valid.  I came up with a big if/then mess for determining whether a hop was valid.  For the end game state, I cleaned up the checks some by adding a list of 2D int arrays for all of the checks.  Using the list allowed me to do the checks based on row and column offsets.  For example, [-1,0] checks if the previous row, same column has a peg.  [1, 1] checks if the next row, next column has a peg.  For the empty hole check the indexes are multiplied by 2, so [-1,0] checks two rows above, same column is empty.

By the way, I never mentioned that all of this was implemented in C# and Unity (does anyone remember when Boo used to be a scripting option in Unity?).  Therefore, this algorithm could be applied to any programming language.  This may not be the best algorithm either, but it’s what I came up with for a 48 hour game jam.

Old Timer Peg Game - day one build
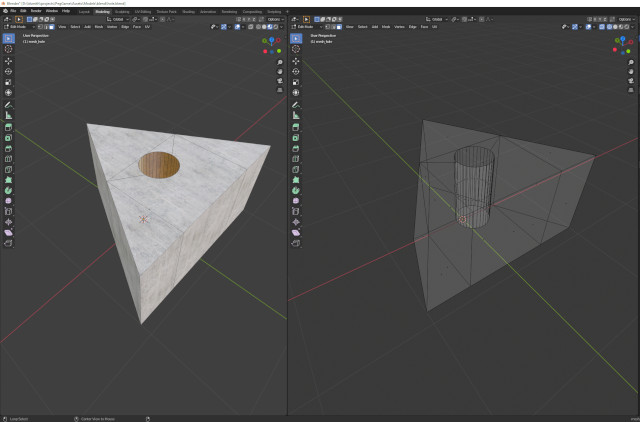
The models for the holes were not too difficult.  I started with a simple cube in Blender and then merged the top vertices on Y to make a triangle.  Then I used a new cylinder object and boolean modifier in Blender to make the hole.  After exporting to FBX and importing into Unity, I realized that this was not a true equilateral triangle with sides of equal length.  Therefore, I had to go back into Blender and reposition the vertices (in overhead view) to make the sides equal length and reposition the peg hole.  By the way, I also used the same cylinder dimensions for the hole, but I did find a reference picture of a golf tee to make the rest of the peg.  Now the newly created triangles with holes lined up in Unity.  Next I needed to fill in the empty spaces.  I did this by adding inverted triangles for each row below the hole triangles, excluding the final row.  Unfortunately, inverted triangles did not line up correctly either.  This was because the triangles were not centered around the center of mass, so I had to go back and do some high school geometry and trigonometry to determine the correct X and Z positions for all of the vertices so that the center of mass is centered at 0,0.  For those wondering, the triangle mesh on X  goes from -1 to 1, and on Z the triangle mesh goes from -0.8660 to 0.8660, which I vaguely remember being one of those magic numbers that we are always supposed to know from math class.  Equilateral triangles have all angles of 60 degrees, and the sine of 60 in degrees is 0.8660.  For what it’s worth, 60 degrees in radians is PI/3.  We can also verify that all side lengths are 2 units using the Pythagorean theorem.  I even checked it on my TI-85 calculator!

  • (-1, -0.8660) to (1, -0.8660) = ((-1 – 1)^2 +(-0.8660 – (-0.8660))^2)^(1/2) = 2
  • (-1, -0.8660) to (0, 0.8660) = ((-1 – 0)^2 + ((-.8660) – 0.8660)^2)^(1/2) = 2
  • (0, 0.8660) to (1, -0.8660) = ((0 – 1)^2 + (0.8660 – (-0.8660))^2)^(1/2) = 2

Old Timer Peg Game - making triangle and hole in Blender

I used GarageBand again for making the music.  I tried going for a classic country and western theme, but GarageBand is really limited with those types of instruments.  I’ve been using an alternating high low background tone in my games recently, which seems to work well, but worried that it may create some sort of hypnotic state in people.  I don’t have any proof of that, but it could be similar to flashing lights for visual hypnosis.  The main melody is spread lengthier over the up and down tones.  Then I add a drummer track, which is definitely the most automatically generated part of the song, however I do choose the soft/loud/simple/complex siders and which parts of the drum set to include at each section.

Old Timer Peg Game - popping soundThe most humorous part of the jam was creating the popping effects for the pegs.  It took me a few minutes to find something that made a good popping sound, but eventually I came across my can of shaving cream which made the perfect sound when the lid was popped off!  I recorded a few pops in Audacity, cropped and exported the good parts to WAV files, and it was ready to be imported into Unity.

Some of the things I would like to add are an overall timer, so it lets the player know how long it took him to know to win.  I would also like to add a leaderboard, but unfortunately the solution to the peg game is easily found online, so the only real challenge would be to see who can run through the steps the fastest.  Setting the initial start hole to random would add some randomness, but someone could keep restarting until it matched the steps in his solution.

I would also like to add additional challenges such as “leave 8” pegs with no valid moves, which appears to slightly more difficult.  However again, the solutions are easily found online.

Running my games on NES (Nintendo Entertainment System) hardware using PowerPak


Note – This is not an installation guide.  This is the process I went through to setup the PowerPak to play my custom developed NES games.

I recently ordered a PowerPak from RetroUSB, which allows classic 8-bit NES (Nintendo Entertainment System) games to be played on actual NES hardware. This is a description of the steps that I followed to play the two NES games that I created (Space Dude and Prez) using the RetroUSB cart.

PowerPak

The first thing to know is that he PowerPak uses a CompactFlash (CF) card to store the NES game files.  CompactFlash cards appear to be frequently used with digital cameras, and are about 1.5 inches wide and tall.  A CompactFlash card does not come with the PowerPak, which is noted on the item page, but I overlooked that when I ordered the PowerPak.  Additionally, a CompactFlash card reader is also required to copy the NES game files to the Compact Flash card.  The card will cost around $20 to $100 depending on the size of the card (as of the time this is being written).  A simple Compact Flash card reader will cost around $15.

I ordered the Unitek USB card reader as well as SanDisk Ultra 16GB and SanDisk Extreme 128GB CompactFlash cards.  The RetroUSB site notes that larger CompactFlash cards with higher write speeds may not work with the PowerPak, which is why I ordered the 16GB card just in case the 128GB card didn’t work.  The 128GB card actually came with a nice small carrying case.

Compact Flash (CF) cards and reader

I plugged the card reader into the USB 3 port on my desktop computer, inserted the 128GB CompactFlash card, and it automatically detected the device, created an E: drive, and opened a folder for the CompactFlash card.  I copied my two NES game files to the new folder.

CompactFlash (CF) card in reader Custom developed NES game files

Next, I pulled the CompactFlash card out of the reader and put face up into the top of the PowerPak.  The card has to be pressed in completely so that the card is flush with the top of the cartridge.  Then press down on the tab to lock it into place.  To eject the card, push the tab back up then press down.

CompactFLash (CF) card in PowerPak Compact Flash (CF) card inserted into PowerPak PowerPak tab pressed down

The moment of truth is actually inserting the PowerPak into an actual Nintendo Entertainment System from the 1980s and pressing the power button.  Unfortunately, on the first try it returned “PowerPak file not found”.  However, it did at least detect the PowerPak and display a message.

Inserting PowerPak into NES (Nintendo Entertainment System) console PowerPak in NES (Nintendo Entertainment System) console NES (Nintendo Entertainment System) console powered on with PowerPak PowerPak missing Mappers POWERPAK directory


Looking at the online PowerPak user manual, the first check is to see if the CompactFlash card is using either FAT16 or FAT32 file system.  This can be checked by putting the card in the card reader, right clicking the card reader drive (such as E:), and checking the file system.  In my case, it was using FAT32.  If not, right clicking the drive should bring up an option to format the card.  On my system, there was only an exFAT option, which doesn’t appear to be exactly the same as FAT16 or FAT32.  If that is the case, then other options (Linux?) may be required to correctly format the CompactFlash card.  I didn’t look into it since my card was already formatted as FAT32 

Checking FAT file system

Next I tried the 16GB CompactFlash drive and copied my NES files using the same process, and got the same “PowerPak file not found” messsage.  I went back to the manual and noticed that the “POWERPAK directory” needed to be downloaded from the RetroUSB website, decompressed, and copied to the CompactFlash drive.  Going back to the PowerPak page, this appears to be what is referred to as the “Mappers” file.  I downloaded the PowerPak Mappers v1.34 file, extracted to a folder on my desktop, and then copied it to the 128GB CompactFlash card.

Copying POWERPAK folder to CompactFlash (CF) card

Making some progress.  Now I was able to see the PowerPak logo on the title screen.  Pressing start brings up a screen to enter Game Genie codes.  Pressing start again allowed me to select one of the two NES games that I copied to the CompactFlash drive.  The display was cut off some on the top of the screen on the television, but I could still determine which game it was.  Pressing start again started the load process.  Unfortunately, the game never loaded.  After waiting about a minute I tried pressing reset on the console deck but it returned an error.  Then I turned the power on and off, which displayed the title screen and code entry screens again, but did not let me select one of my games.  It just went directly to the game loading screen that hangs.  I also adjusted the television picture and brightness to make the photos look not as blurry.

PowerPak title screen (Press A to choose a game file) PowerPak Game Genie code entry screen PowerPak game selection screen PowerPak loading game

Going back to the manual again, I learned that pressing start on the title menu loads the last loaded game.  To get the game selection screen, the A button needs to be pressed on the title screen.  Then select your game.  Important – On the Game Genie code entry screen, it should display the filename of the game you just selected.  I was wondering why it showed TETRIS.NES, which wasn’t even on my CompactFlash card.  So again, press the A button (not start) on the title screen, then select your game, then select Start Game.  When in doubt, press the A button instead of the start button.

After making that correction, my games loaded successfully!  My Prez game looked great, and looked just like it does on the emulator.  Except that it’s actually running on an original Nintendo console!  The Space Dude game ran as well, but some of the colors were off, such as the ship being colored black.  Resolving that may require going back and looking at the original 6502 code that I wrote and modifying the colors.

PowerPak correctly selected PREZ.NES game Space Dude running on NES (Nintendo Entertainment System) hardware using PowerPak PREZ running on NES (Nintendo Entertainment System) hardware using PowerPak PREZ running on NES (Nintendo Entertainment System) hardware using PowerPak PREZ running on NES (Nintendo Entertainment System) hardware using PowerPak

By the way, it worked correctly on the 128 GB CompactFlash card.  For some reason, I got copy failures when copying the POWERPAK Mappers folder to the 16 GB card.  Since it is working for the 128 GB card, I haven’t went back to look at the problem with the 16 GB card.  Maybe it needs to be reformatted.  I think I got impatient waiting for the files to copy and pulled it out of the reader as it was estimating copy space.

Overall, I am happy with the PowerPak and thrilled to see my games running on an actual NES and playing with an NES controller.  I won’t say that it’s easy enough for the average Joe to setup without spending some time.  It took me about 3 hours to figure everything out, while also writing and taking pictures for this post.  If I were to give one of these to somebody as a Christmas present, I would probably go ahead and setup the CompactFlash card with everything, because most people probably don’t own CompactFlash card readers.  I hadn’t even heard of CompactFlash card until I bought the PowerPak and noticed that the card slot was for something I hadn’t used before.  I would also definitely let anyone using it know to press the A button on the title screen to load a game, because most people just assume that the A button and start button do the same thing, and the start button was usually the default for starting most NES games.


Chester Servesalot, Waiter Extraordinaire – Developer Log

Chester Servesalot Waiter Extraordinaire was my twenty-fourth game created over a weekend in 48 hours.

The most notable new feature that I tried using for this entry was using the Unity Animator for changing between the player animations (standing and walking).  There were basically just two states and a animation float variable called velocity, which is set on each update from the player using Animator.SetFloat.  The key things to remember are to uncheck Has Exit Time on each transition and add a condition using the velocity variable.  Otherwise, the character will slowly transition from standing to walking, instead of immediately walking when a move button is pressed.  It’s also important to remember to create an Animator Controller by setting the Avatar Definition to Create From This Model on the Rig tab of the model.  The Root node also has to be set to the body bone (root/bone_body) of the model.  It seems like a lot more work, but I definitely needed to get out of the habit of using the Legacy animation for imported Blender models.  I also got in the habit of exporting my Blender models to FBX instead of using the default Unity importer, since it seems to be broken in the latest versions of Unity and Blender.  There was also a sitting animation for the player model, which was just used to pose the customers (which used the same model, but a different texture).

Another feature I used that I didn’t have much experience with is the Character Controller.  It does make moving the player easier than using the standard capsule collider and rigidbody.  However, you have to handle the gravity code yourself.  The collisions are also different, and one major drawback is that there is no OnCollisionEnter type method for a CharacterConroller.  You only get whether it is collided on each frame.  One thing that needs to be reworked is the collision code, because there are some checks that are done on each frame (such as collision with an enemy or table), which should only be done when it is first collided.  Since this was a game jam, I just left the extra checks and assumed that any slowdown would be negligible, but I did notice significant slowdown when I tried playing the game on MacOS and Linux.

I wish I could have spent a little more time on the enemy AI.  There are three different types of mouse enemies (all inherit from one base Enemy class).  The first two (green and purple) mice are fairly easy to avoid.  Looking back, if I had more time I would have like to add navigation points throughout the stage, and have the enemies patrol between those points, similar to the ghosts in Pac-Man.  The third enemy is much more difficult to avoid, since it moves to the player’s position if the player is within a certain range.  I made sure to make the player slightly faster than this enemy, so it is possible to run away to get it to stop chasing the player.  One modification I should have made is to limit how far left this mouse could move, because it shouldn’t be allowed to move all the way to the refill table.  That sometimes ends up in a loop where the player is continuously colliding in both the refill table and mouse, which can generate numerous glasses all at once.  It’s actually pretty cool to watch, but does make the game look buggy.

I played through the game numerous times for testing.  One time I noticed on the third stage the player was not colliding with one of the middle tables, and therefore not able to deliver the glasses making the stage impossible to complete.  That bug really had me stumped, and I haven’t been able to reproduce it again.

Another feature I wanted to add is resizing the room as the level increases.  I basically just modeled a room big enough for all levels.  However, the room should be much smaller for the earlier levels, since there are fewer tables.  I think one way to solve this is by adding divider meshes, similar to how large conference auditoriums are divided into smaller conference rooms at conventions.  That change probably wouldn’t take too long to implement, but at the time my brain felt like mush and didn’t implement it.

I think implementation of the glasses went well.  I will admit that most of the local positions of the glasses on the tray are “hard coded”, but there is probably a nice formula that can lay out objects in a triangle more elegantly.  Delivering the glass instances from the player to the customers worked well.  If the customer had a glass instance assigned, then their “served” boolean value was set to true.  Each table had assigned a random number of customers (2 to 6), and I used some simple trigonometry to space them evenly around the tables.  Adding some randomization for the customer textures would not be hard to implement.  However, I do sort of like the customers looking the same, since the attention should be on the player, not the customers.  I would have also liked to add a different animation once the customer is served a glass (cheering or something like that).

The glasses falling when the player hits a mouse worked as I had envisioned.  The key is to set the Is Kinematic property on the rigidbody for each glass to true, until the collision occurs, then the property is set to false allowing the physics interactions to occur.  I used AddForce and AddTorque with random values to make the glass collision a little more hectic.  My original idea was to make the game test the player’s ability to balance the glasses on the tray, but I thought that would be too difficult and not very fun.

Another “issue” with the game is that the player is always facing towards the camera.  At first I thought it looked awkward, but as I played more I started to like it.  I reminded me of old 1980s arcade games where the character is always looking forward.  I probably could have made the rotation “correct” if I spent some time on it, but I didn’t think it was worth the effort.  Plus, having the player quickly spin with the tray of stacked glasses would seem really unrealistic, even for an action style game.  There is some noticeable clipping between the tray and customers, but I just left it as-is for now.  I could have added capsule colliders for the customers, but that would have made colliding with the table (to serve the glasses) much more difficult.  One solution would be to make the player serve glasses if they collide with the table OR a customer at the table, but that would take more time to implement.

I definitely think there is much more that can be added to this game, especially more than three levels.  However, I try to keep my game jam games to be completed in five minutes or less, since most people will be playing 20+ games.  I know I appreciate games that are quick to start and easy to figure out how to play.  This game could add different configurations of the tables, or make specific deliveries to based on each of the customers.  I forgot to mention earlier that the glass delivery system was based on games like Paperboy (and my 3D “clone” called Delivery Kid).  Serving the tables was somewhat based on games like Diner Dash.  I even thought about having different levels of customers along with a satisfaction meters, similar to the cabaret mini-game in Yakuza Zero.