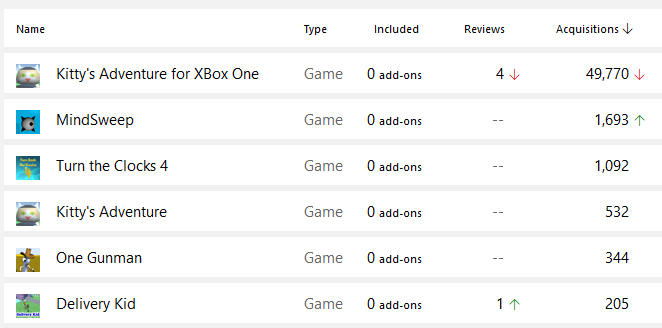
I checked my Microsoft developer dashboard today to see if the XBox One Creators Program was still running. I noticed that Kitty’s Adventure has now passed 50,000 acquisitions between XBox One and Windows Store. It is by far the most popular game that I’ve released to this day.
Also this month, we had a great turnout for the online Knoxville Game Design Meeting. This month’s topic was Java Game Development.
I spent some time updating my two college work pages for Georgia Tech and the University of Tennessee. Links to those two pages are now displayed on the main menu on my site under Education. I also found more of my old websites, which I uploaded and linked on my wiki page under Historical Pages. I uploaded the source code for some projects that were missing, such as the Predator database projects.
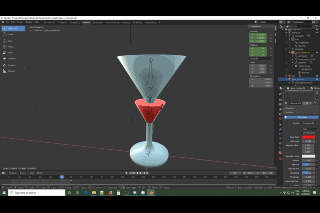
I finally resolved a problem that has plagued me for years, which is simulating liquid filling in a cocktail glass. It seems like this could be solved with a simple scale in the upward direction in Unity, but it’s a lot more complex. My cocktail glass model has two meshes, one for the glass which remains static and another for the fluid which increases in size as the glass is filled. The fluid mesh is an upsidedown cone with a flattened top. Simply scaling the fluid mesh will result in the fluid mesh not correctly filling the glass.
Simple scale of entire fluid mesh gives incorrect fill of cocktail glass
When I created the original fluid mesh in Blender , I believe I used the boolean difference modifier, but it’s been years since I created it so I could have possibly used some other method. For the animation, I used an armature in Blender with two bones. A bottom bone for controlling the ring of vertexes at the bottom of the fluid mesh and a top bone for controlling the ring of vertexes at the top of the mesh.
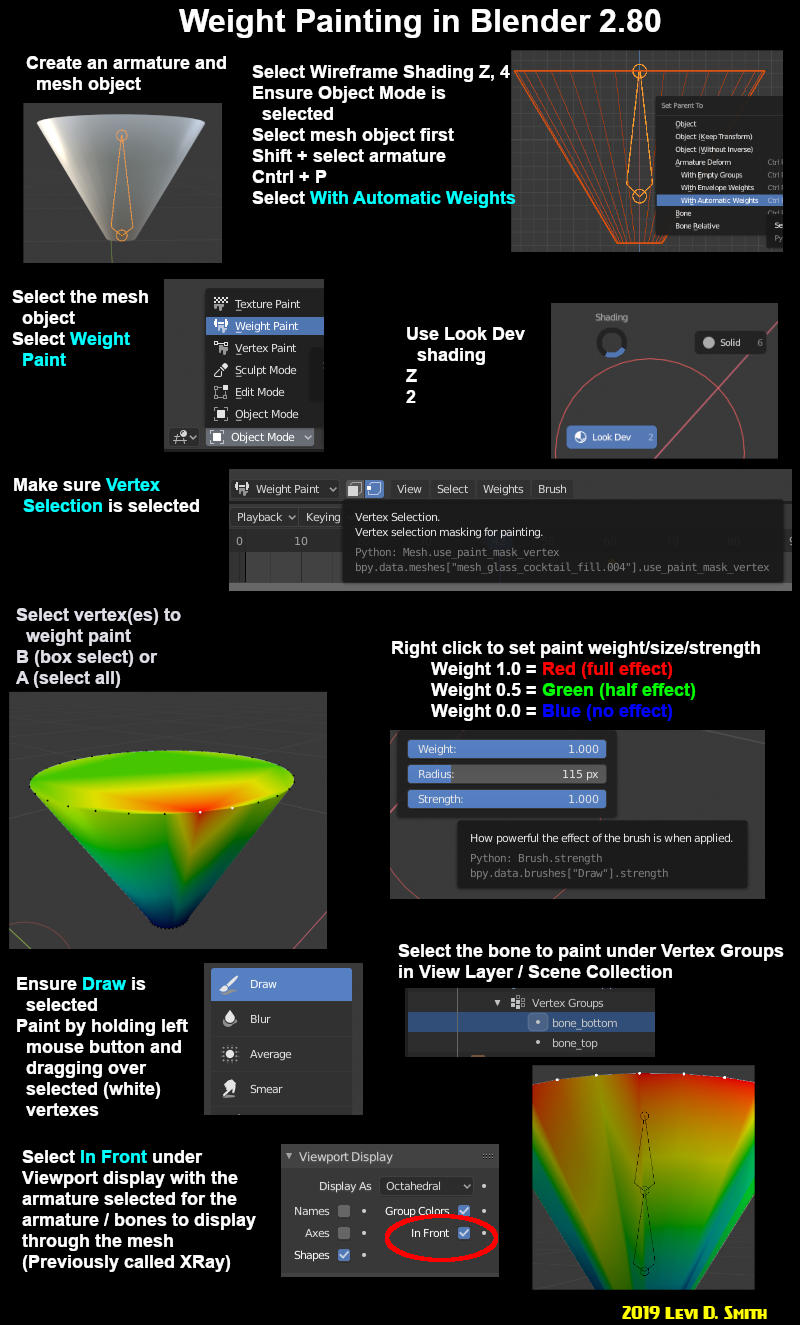
The new 2.80 version of Blender has significant changes for weight painting. I created the following infographic to show the process I use for weight painting a mesh. For my fuild mesh, I set full wieght of the top vertexes to the top bone, and the full weight of the bottom vertexes to the bottom bone.
To solve the liquid filling problem, the bottom set of vertexes must remain unchanged, while the top vertexes move upward and scale outward. The fluid mesh is modeled with the glass filled. Therefore, in Blender the default pose is the last frame in the animation. I used 60 frames for this animation, so I set the keyframe for the 60th frame with the default pose. It is important to set the keying mode to location, rotation, and scale. In most of my games, I only set the key mode to location and rotation, since game objects are rarely ever scaled.
To create the filling effect, in Animation mode I set the frame in the timeline to the first frame. Then I select the top bone and scale it inward (on the X and Y axes) so that it matches the same diameter as the bottom of the glass (and same diameter as the ring of bottom vertexes). Then I translate the top bone downward, until it exactly overlaps with the bottom ring of vertexes. Then I add a keyframe for the first frame. Pressing play will show the simulated liquid starting from the bottom of the glass and filling to the rim of the glass.
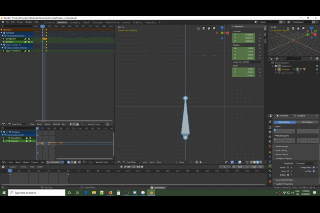
Correct cocktail glass fill animation using two armature bones
I plan to use this new liquid fill animation technique to update Bartender Game in the near future.
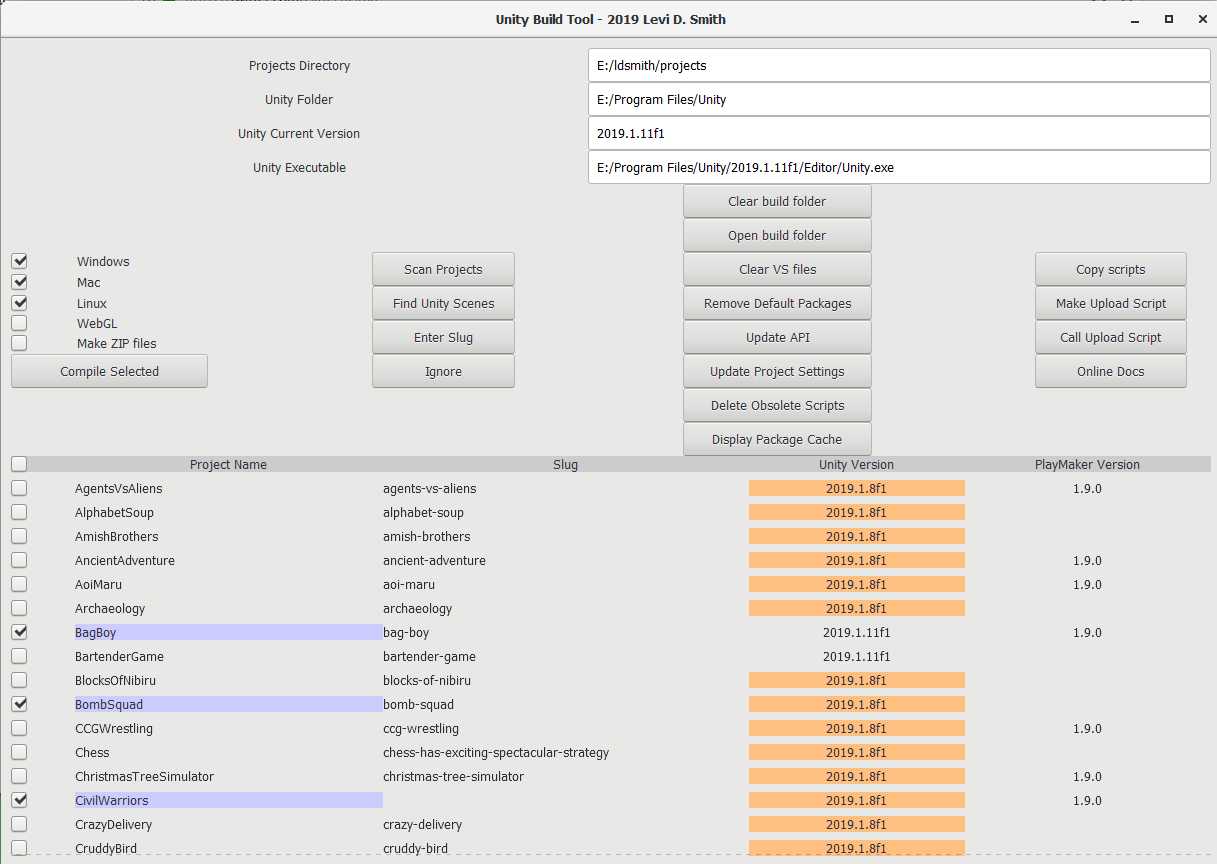
One of the biggest problems with having 59 Unity projects is keeping them all up to date. I knew many of my Unity projects were out of date and needed to be updated to the latest version of Unity, but I didn’t have a good method for detecting which ones. I had previously developed build and upload scripts in Ruby to create Windows BAT files to compile a project for Windows, MacOS and Linux and upload those builds to Itchio using Butler. However, those BAT files could not make Unity WebGL builds.
The Unity Version Tool that I developed solves these problems. It was developed in Ruby using the GTK+3 graphical libraries.
Pressing Scan Projects will check all subfolders in the specified project directory for Unity projects.
If a project does not match the current version of Unity or PlayMaker, then the project will be highlighted in red. Default version values can be set in the unity_version.config file. The version number of the project is checked from ProjectSettings/ProjectVersion.txt and files ending with the .csproj extension.
Pressing Update Version will attempt to read the current version of Unity installed on the system (<User Profile>/AppData/Local/Unity/Editor/Editor.log) and store it in the unity_version.config file. The PlayMaker version information is read from Assets/PlayMaker/Editor/PlayMakerWelcomeWindow.cs.
Individual projects can be selected by checking the boxes next to the project names, or all projects can be selected or deselected using the checkbox in the header row.
Builds for the selected projects can be compiled for Windows, MacOS, Linux, or WebGL.
WebGL builds require a script to be generated from the included template, which is embedded into the project for compilation, since there is not a Unity command line option for making WebGL builds. It uses the “-executeMethod” command line parameter to execute project script.
All builds for a project can be deleted by pressing Clear build folder.
By default, the Unity editor will start on compilation. I may add “-batchmode” as an option in the future to compile without starting the Unity editor, but I’ve noticed issues lately with using the “-batchmode” Unity parameter. If a project is compiled and it is not using the latest version, then Unity will prompt to update the project. Therefore, it is advisable to update the projects (which are highlighted in red) by opening them before selecting the compile option.
Note that while updating the Unity project to the latest version, there may be multiple .csproj files that still return an old version of Unity. I’ve found that the .csproj files (such as Assembly-CSharp.csproj, Assembly-CSharp-Editor.csproj, and <project>.csproj) can be safely deleted in most cases, and Unity should create new versions of those files the next time a script is accessed in the Unity editor. Hopefully, I will add an option to remove old .csproj files.
After updating a Unity project, it may be necessary to make a change (such as moving a GameObject in the Hierarchy and moving it back) in order for the ProjectSettings/ProjectVersion.txt to be updated. I don’t know if there are any drawbacks to manually updating the version number in that file, so I wouldn’t advise doing it.
Using this tool, it is possible to compile multiple project for a selected platform at once. This is a process that had previously taken me hours or days for WebGL projects, since each project would need to be opened, updated, platform setting changed, and then compiled. It still takes a long time, but at least now I can kick it off before going to bed and just let it run.