Stick a Fork in It

Title Safe

Noticed that the title safe area on the PC is the entire window, so things looked slightly off when it is running in  a window.   Went back and removed the device specific Title Safe Area rectangle, with my own that I calculate based on the size of the screen that I define, using 10% around the edges as the unsafe area.

Device Storage

The fast transition of the device selection screen on the XBox Slim was very noticeable, due to the bright yellow background color.  This screen is only displayed for a split second, since there is only one storage device which is automatically selected.  I’m not sure why it won’t let me select between the hard drive and cloud storage.  I removed the yellow screen and replaced it with the standard background color, but the “select storage device” message still flickered for a brief second, so I put in a counter to delay the display of the message for 60 frames.  Now, the message should only display if there is a problem.

I also need to go back and modify the “reset all data” functionality, so that it takes advantage of the new load storage screen.   I don’t have the time to fix this, so I went ahead and removed the “Delete All records” functionality from the level select screen.  I never liked the fact that there was no selector for it on the screen, and adding the functionality back using the new saving method will just be too much of a hassle at this point.  I can use that time to do better things.  Plus, I did learn previously that the player’s data can be deleted from the XBox system menu.

Four Controller Ports

Added code to hold the controller state for all four controller ports.  Apparently, I don’t need to check to see if a controller is actually active to get its state.  Added a parameter to Screen methods which handle button presses, so that now those take an int parameter which signifies which controller port pressed that button.

Updated the code so that it now allows the device selector to be opened and controlled by the controller port which started the game.  Added exceptions to handle a save after the user has signed out of their profile during the game.

Tried using the Guide message display API call to display a message to the user if the game was no longer being saved due to the user signing out, but it also has the problem of crashing if the guide is active, so I didn’t bother with it.

Marketplace

After reading threads about others who have failed peer review, I added a check to ensure that the logged in player can purchase content before the Marketplace screen is shown on the trial screen.  I’m thinking that 21 levels for the trial may be a bit too much.  I’m doubting that anyone can complete that many levels within 8 minutes, and my purchase screen is only displayed after those 21 levels are complted.  However, people can still buy the game through the main marketplace window.  The user can play the 8 minute trail multiple times, selecting the other levels (up to 21, 3-1) that they have not completed, so therefore it is possible to the player to complete all 21 trial levels to see the purchase screen.

I’m trying not to be like most other games which have “buy buy buy” plastered all of the game’s interface.  After all, if the player likes the game, then I’m sure they will know how to buy it from the marketplace menu.

Graphics Updates

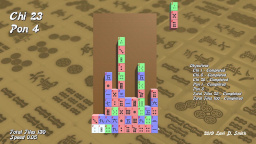
Updated the cell selector to use the a symbol representing a resistor.  Went back and made it a hand drawn anti-aliased line using the Gimp brush tool, with the middle cut out.  Added a slight green glowing effect to this selector sprite.

Also added another overlay to the filled light, which is a sprite of two white filled arcs.  This rotates for each filled light.  It looks much better than what the screenshot shows.


Minor Changes

On the title screen, I also changed “New Game” to “Start Game”.  I thought people may think that “New Game” will overwrite their existing record data, which isn’t the case.

After checking the Not So Evil Checklist again, the game won’t be failed for a Code 7 crash, which results from the account with the App Hub subscription signing out.  So I just needed to ensure that it is playable from any controller port.

Learned that I don’t have to recreate the XBox entry XNA Studio Device Center and re-enter the key after restarting the XBox.  I’ve just got to ensure that the XBox device for the active system is set as default.

Wrapping Up

At this point, I’m considering this game to be done.  I tested it using all of the checks on the Evil Checklist, and I believe it passes all of them now.  I will sleep on it overnight, and may play test some  more of the levels again tomorrow, since I have tomorrow off of work for Memorial Day.  Unless there is some major issue that must be fixed, I plan on submitting it to the contest tomorrow.  Thanks to everyone who has read my status updates.


SSL Certificate for levidsmith.com

Last night I purchased an SSL certificate for levidsmith.com, so my site can now be accessed via https.  It may take a while for search engines to update the links in their engines to use the https URLs.  It was a little more than $100 to have a certificate issued for 2 years.

I’m very familiar with CSRs (certificate signing requests) and installing signed certificates for web servers.  The price for my web certificate was fairly steep, but it did automate the signing and installation process.  Next time I may shop around and see if I can get a better deal.  It’s a fairly simple process, but for public websites you’re pretty much forced to use one of the root certification authorities (registrars) that are defined in the Windows certificate store (Internet Explorer, Opera, Chrome) or the FireFox certificate store.  I highly recommend looking through your certificate store, and removing any trusted root certificates that are questionable (such as CNNIC or the Hong Kong Post Office).

You can see the Windows certificate store by entering certmgr.msc in the run box.  Then open the Trusted Root Certification Authorities folder and select Certificates.  The FireFox certificate store can be found in the Privacy and Security settings under Certificates.

Windows Certificate Store

One thing that I had to fix, was updating the site URLs in WordPress under Settings > General.  There were a few other URLs in my functions.php file that had to be updated to use https.  My wiki also no longer worked, so I had to remove one outdated .htaccess file in the wiki directory, and I had to rearrange the rules in the main .htaccess file for my site.

It would be nice if my site automatically did a HTTP 301 redirection when using http, but from what I’ve read the optimal solution is to make a change at the web server configuration level, which I don’t have access.  I may try to do a mod_rewrite change to redirect to https, but I’m just happy that it’s working right now.  Clicking any of the links on my site will automatically transfer to the SSL encryption version.

After doing some research, I found that creating a few mod_rewrite rules is the correct way to do a 301 redirect for the secured version of the site if direct access to the web server configuration files is not available.

This may not make a huge difference since I’m not running a site with financial transactions (buy or selling), but it will add a bit of extra protection whenever logging into WordPress or MediaWiki, especially when logging in using public WiFi.  Having the SSL certificate also displays a lock next to the address in most browsers, and eliminates any browser notifications that my site is unsecure.

I found one more problem with my site.  All of the embedded images still use http:// instead of https://.  This causes a problem, because most browsers will show your site an insecure, if any of the images are not using https.  I found a site that gives the appropriate command to use to update all WordPress images to use https.  I had been doing this manually with a search and replace, but with so many pages, it would take a considerable amount of time to change them all.

UPDATE wp_posts SET `post_content` = REPLACE (`post_content`, src=”http://www.your-site.com, src=”https://www.your-site.com);

Spamming not Allowed

Cooldowns

Made another gameplay change today.  The fact that the player could pick a high level resistor and spam it to quickly complete the level was really bothering me.  Thefore, I added an array in the GameLevelScreen class which holds the cooldown value for each selectable piece.  When the piece is dropped, the cooldown value for that piece is set to 2 seconds (120 frames).  That value is decreased by one on each update until it reaches zero, then the user may place that resistor again.  So now the user can still use all resistors, but it will take a really long time to complete the stage, which solves the problem of the player winning the stage quickly if all resistors are used.  Using all resistors will also not give the player the best luminosity score.  I could put in a limit on how many times each resistor can be used, but I think that would over-complicate things.

Active Screen

A new abstract method has been defined in the Screen class, which is setActiveScreen.  This is a method that I already had in the TitleScreen class, but I thought it should be included in all Screen classes.  This method is called whenever the Screen gets set as the currentScreen.  Initialization that needs to be done whenever the screen gets control (such as setting pause values) can be set in this method.  This was going to be necessary for both the GameWinScreen and GameOverScreen, so I thought it was best to have it as a common abstract method.  Those two screens now have a pause instance variable that is set to the wait time in the setActiveScreen method, which prevents the player from bypassing the screen until that pause value hits zero.  This will also allow me to just call setActiveScreen on the currentScreen object once when control is passed, and I won’t have to call that method specifically for each Screen subclass instance.  I already had a setCurrentScreen method defined in the Screen class, but it is not abstract and its job is to set the next screen state to -1.  I think having the setActiveScreen abstract method handle the subclass specific code is best for now.

Title Screen Completed

Added a new background image for the currently select main menu item.  Used Gimp to create a free selection shape on top of one of the computer card images.  Used the color tools to make the image grayscale, and then increased the brightness twice.  Then I applied the bevel filter twice, and drop shadow filter once.  Also gave the currently selected item ‘s font a green color, and changed the font to Motorwerk.  Unless there is a good reason to change it again, I’m considering the title screen done.

 Loose Ends

Made a slight modification to the level complete sound effect, so the pitch gradually raises through the sound clip.

Added delay when an LED busts before moving to the Game Over screen.  The LED is now filled with red when it is busted (could use a cool breaking graphical effect later).