Slowbot

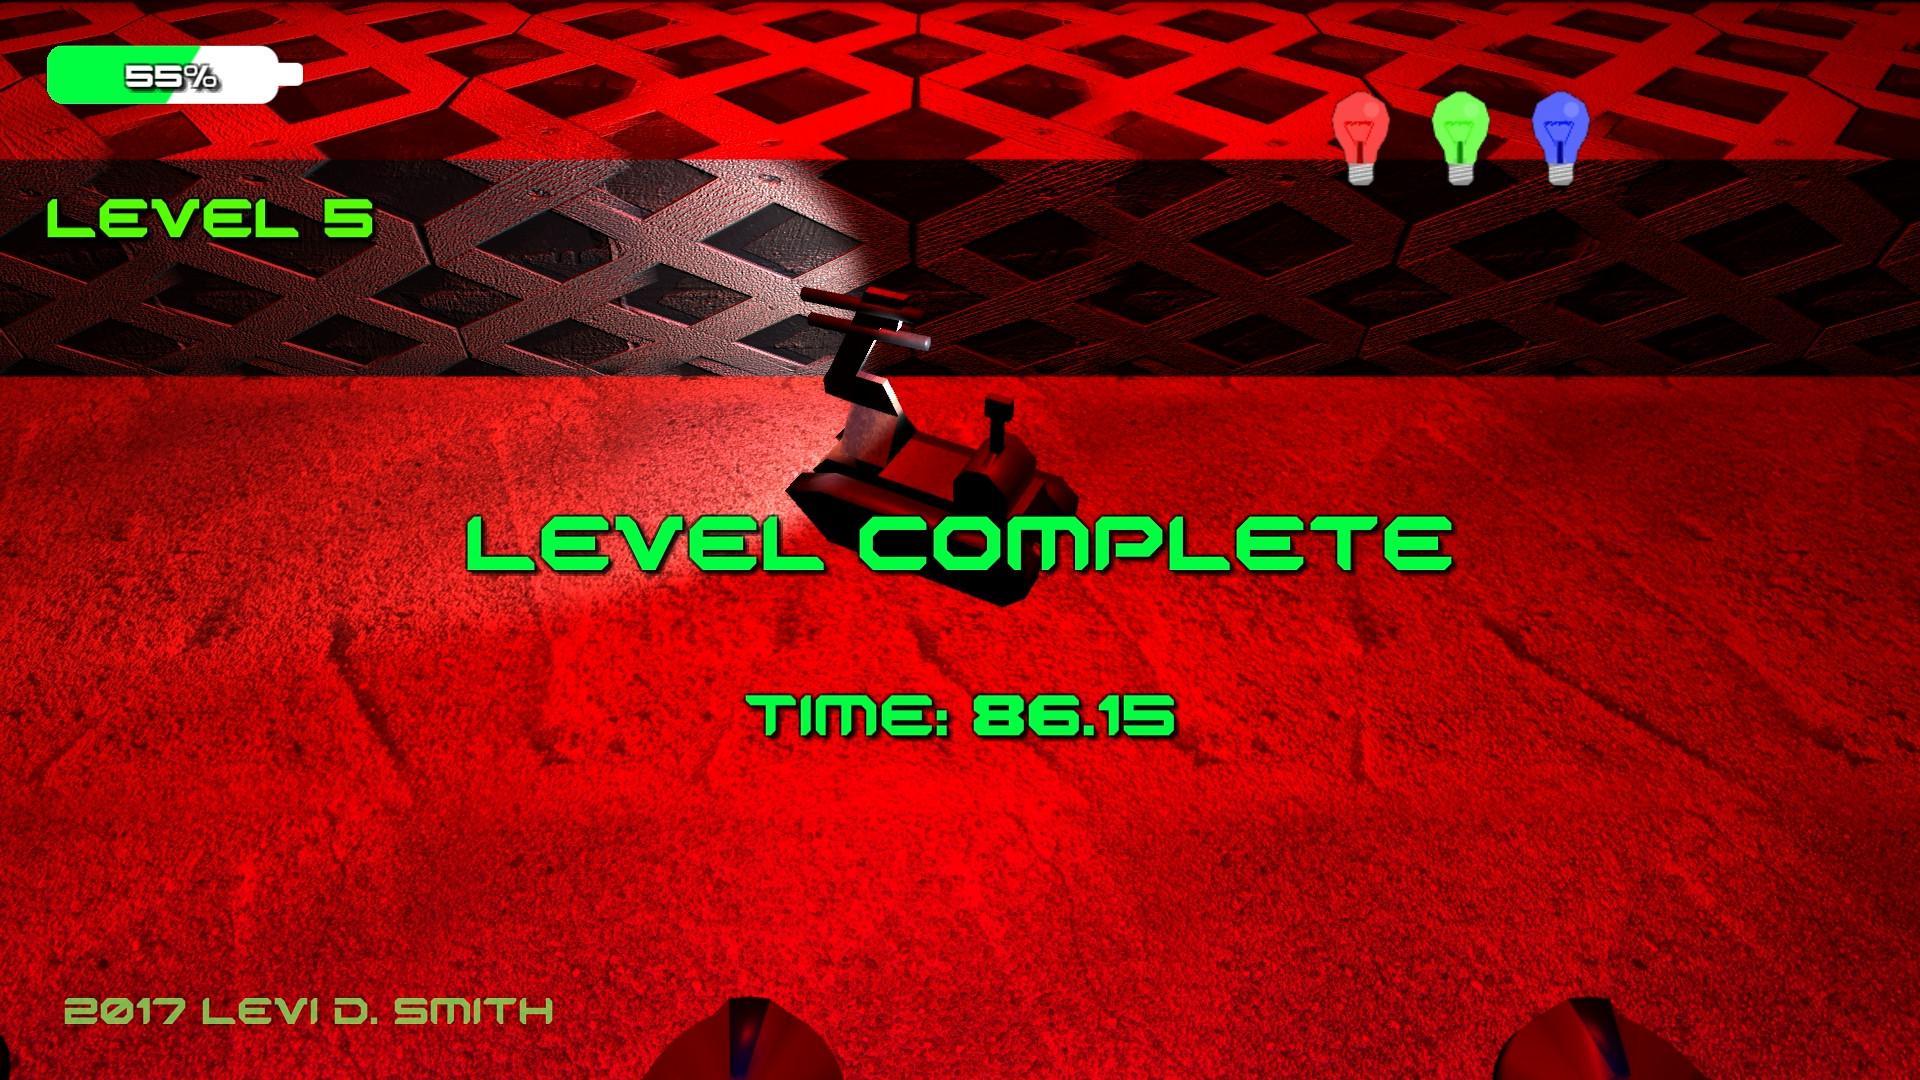
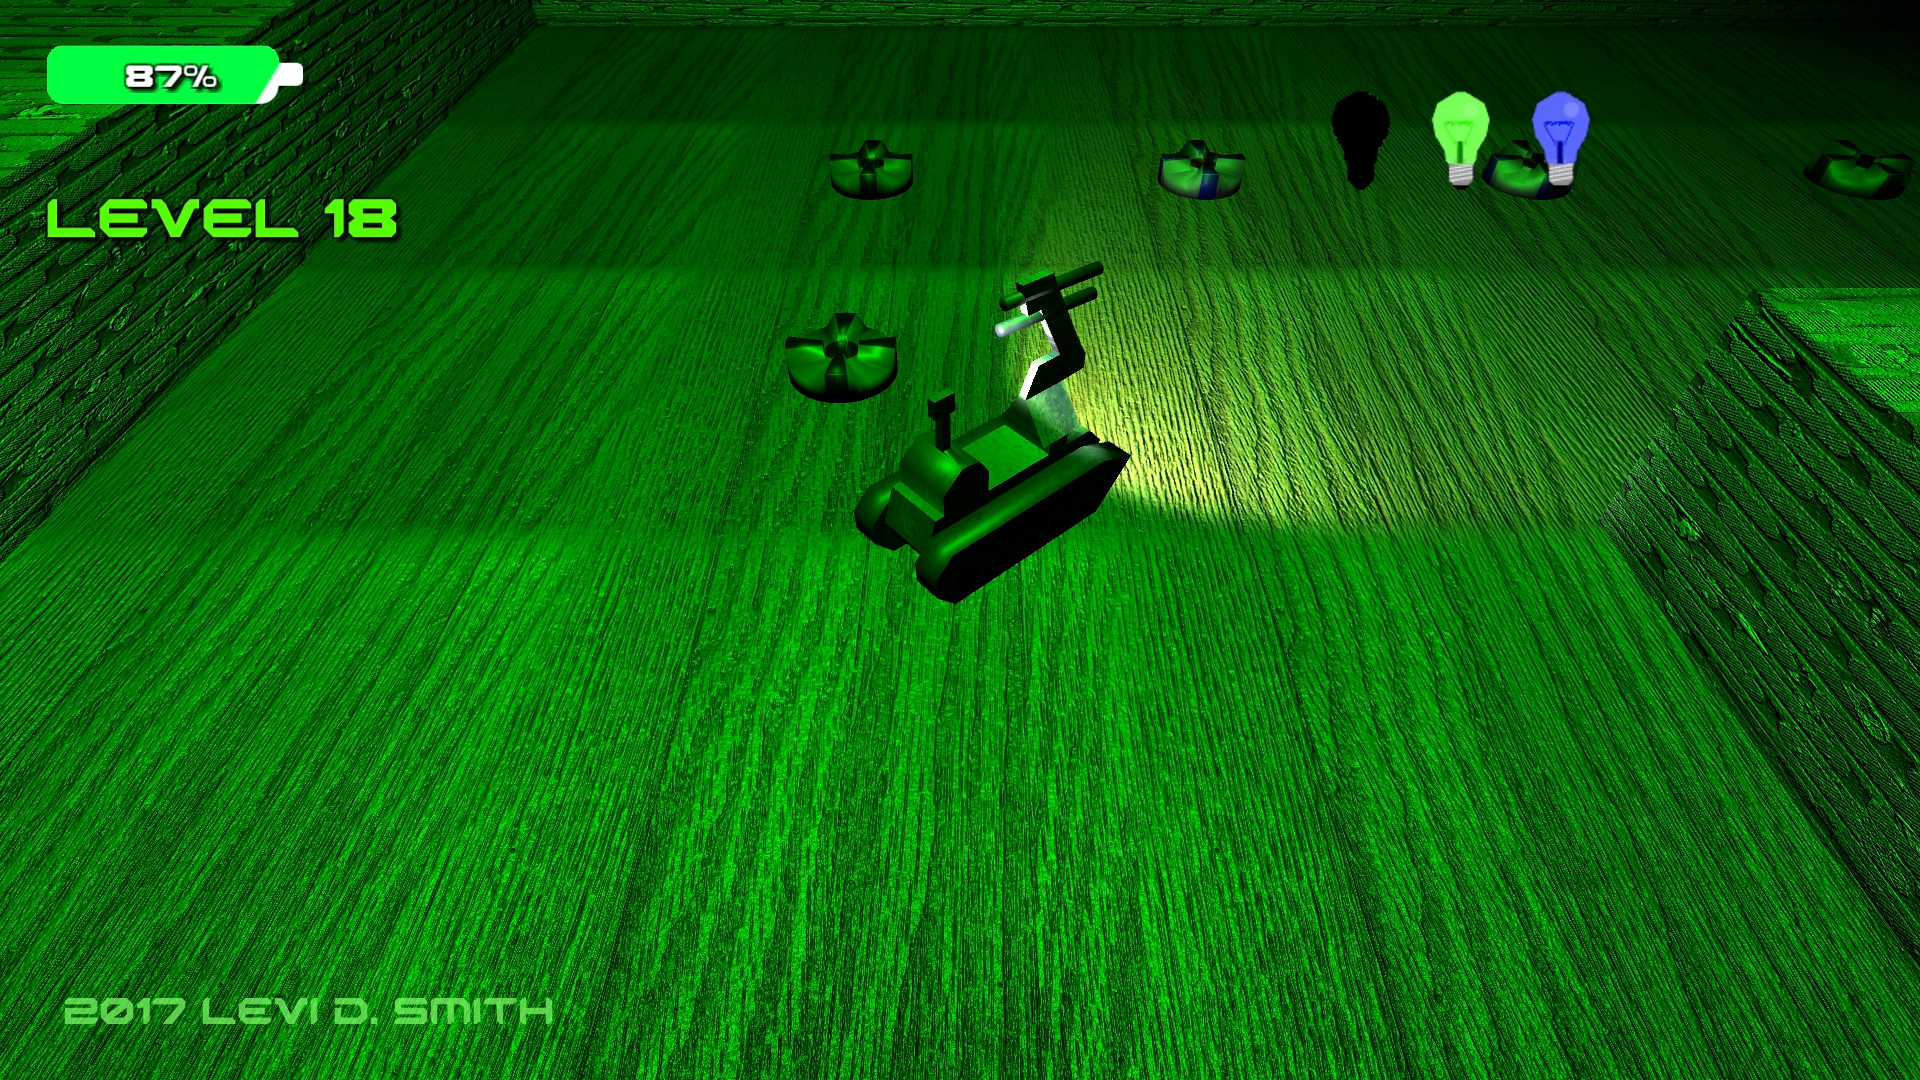
Help Slowbot activate the three lights in each level.
Slowbot’s power will gradually decrease over time.
Slowbot will become slower and headlight will dim as power decreases.
Moving makes Slowbot’s power decrease more rapidly.
Picking up a battery will restore some of Slowbot’s power.
Touching a mine will drastically lower Slowbot’s power.

20 levels total. What is your best time?


Post Mortem

One more Ludum Dare in the books.  Slowbot was my fourteenth consecutive entry in the 48 hour game development competition.

I’ve noticed that my ability to quickly make games in Unity has improved over the years.  What used to take two days to complete, I can now finish on the first day.  That leaves a lot of time left over to polish and add more levels.

The theme this time was Running out of Power.  Early on I had the idea of a robot that would get slower as its battery depleted, and the name Slowbot seemed catchy.

As with my previous entries, I made sure that the core gameplay was working first.  The objective of the game is fairly simplistic.  Collect the three colored lights to proceed to the next level.  Collecting a light originally made the entire room illuminate with the color of light collected, but I thought that gave too much away.  Therefore, I limited the size of the activated light.  The headlight provides some assistance in seeing nearby hazards, while the rest of the level remains dark.

I used a spotlight which projected forward from the player robot.  As the robot’s power declines, the luminosity of the light decreases.  Looking back, I probably would have set a minimum luminosity value greater than zero, because when the power gets below 10% it is too difficult to see anything, which does not seem fun.

The robot’s speed also decreases as the power decreases.  The pitch of the sound effect played as the robot moves is also lowered as it runs out of power.  Along with the headlight fading, it gives a realistic feeling of the robot running out of power.  The game is over when power reaches zero.  The only penalty for losing is having to restart the current level and reactivating the lights again.

There is only one hazard in the game, which are the mines.  The mines explode when you collide with them, which lowers the robot’s power by 25%.  I created an explosion prefab that briefly illuminates the area in orange, which gives the player feedback that they did something wrong.  I should have also added a particle effect to make it look like pieces of the ground were flying upwards, so maybe I will add that in a future release.  As I learned from developing previous games, it’s best to have the explosion as a separate prefab and not a child of the GameObject being destroyed.  That way you can go ahead remove the mine from the game world and not worry about the explosion being removed as well.  It is also important to set a lifetime variable for the explosion, and clean it up after a defined period of time so you don’t overload the game with numerous explosion objects hanging around.

By default, there are a few Unity settings which provide ambient lighting.  The Window > Lighting > Settings, Environmental Lighting value needs to be set to the color black.  Environmental Reflections also need to be set to None and Intensity Multiplier set to 0.  These settings had to be disabled, otherwise it would still be possible to see all of the walls and mines on the screen.  For this game, I really wanted the player to use the headlight like a real flashlight to search for mines and see the walls, which made having complete darkness a necessity.

Power can be restored by picking up batteries.  I used a picture of a standard AA battery as a guide when modeling it in Blender.  One difference I made was that I applied the texture that I created as the emissive material, so that the batteries can be seen in the dark.  I felt that not having the batteries always visible would make finding them too difficult.  It also allows me to use the batteries as a guide to show the player where to go, similar to how coins are sometimes used in Mario games.

One new technique I learned for this game jam was creating a meter for the UI.  For many of my previous games, I would just display health and things like that as a numerical value, which is not visually appealing.  Earlier in the week, I watched a tutorial on making health bars with different shapes using the sprite mask option.  This looked much better than the scaling approach that I had used in my other games.  I wish I had learned how to do the sprite mask technique a long time ago.

The level generation code that I wrote was similar to my Free the Frog and Ancient Adventure games, where I define the level layouts in text files, which are stored in the Resources folder and read as TextAsset objects.  Then I used a the Split method to read the lines which became the horizontal rows, and the ToCharArray method was used to get the character value of each cell.  Each type of object is represented by a unique ASCII character.  This made creating the levels really simple in my Notepad++ editor.  Walls are represented by # in the text file, and holes are represented by a period.  The player’s starting position is represented by @R, G, and B represent the three colors of lights.  Mines are represented by x.  A regular floor tile is just the space character.  I created twenty total levels using this format, each stored in its own text file.  The one trick of reading level data out of a text file is that you need to subtract the current row number from the total number of rows if you want the level laid out in the game like it is defined in the text file.  Otherwise, the first row will be closest to the camera and the last row will be furthest away from the camera.

There are drawbacks to using text files for defining a level.  Each cell can only contain one type of object.  For the lights, mines, and player position a floor object gets created as well.  There is no way to add additional information to an object in a cell, such as the initial direction an object is facing.  This could be resolved by using a format such as XML, but writing an XML parser takes up a lot of valuable time in a game jam.

I defined an empty Room GameObject, which holds all of the prefabs instantiated for the level.  This is done by using the SetParent method on the transform of the instantiated prefab.  I live dangerously and find the Room GameObject by using the Find method, but if for some reason the Room GameObject is inadvertently deleted, then the game will throw errors when it tries to set the parent to a null object.  The reason for using a Room is so that I can create method to reset the level, which is called when the player moves to the next level or when the player dies and everything needs to be reset.  The Room lets me loop through all of the child GameObjects and remove them all by calling Destroy on each.  If I didn’t have them setup this way, then I would have to check every object in the scene to see if it something that needs to be deleted when a level needs to be loaded.  For instance, the camera and LevelManager GameObjects are not deleted when a level is loaded.  One thing to look out for though is that you don’t just write a loop that keeps calling Destroy on the first index until the child count is zero, which will result in an infinite loop and crash Unity.  Actually, there’s a hacky way to get Unity out of an infinite loop, but I’m not going into that here.  Destory is actually a request to remove from the game and it isn’t actually gone until the next call of Update.  This has “bit” me in a few of my games, when I had expected a GameObject to be gone after calling Destroy, but something else was still able to reference it later in the code on the same call to Update.

I used a picture of a bomb diffusing robot as a guide when modeling the robot.  I made a freehand side outline in Gimp of the robot, using different colors for the tracks, body and arm.  Then I was able to use that outline in Blender as the background image guide.  I started with a plane and deleted all vertices except for one.  Then I kept extruding that vertex around the outline of the robot parts.  After the outline was complete, I joined all of the vertices to make a face.  Then I extruded that face for the body and tracks.  I duplicated the tracks so that there was one on each side of the body.  I used two cylinders for the arm, which I scaled and rotated until it matched my background image.  I took a picture of the metal on one of my shovels, which I used as the texture for the robot.

For the floor and wall textures, I took pictures around the house of concrete, bricks, fencing, and my hardwood floor.  I duplicated these and made normal maps from grayscale using the Unity texture options, while also modifying the bumpiness option.  By default, the texture looked too grainy in the light.  I did compare the lighting effects with and without the normal maps, I think it is a definite improvement, but I don’t think normal maps make it look that much better.  It would probably make more of a difference if I was using a normal map generated from a high-poly model, instead of just generating it from grayscale.  I’ve used normal maps before, but this is the first time I used them in a Ludum Dare competition.

The music for the game was composed in GarageBand on my MacBook Pro.  I used two electronic style instruments for the main melody.  Then I alternate between the two instruments, making slight modifications in the melody.  I used one of the electronic style drummers to generate the beat.  I really can’t say I did much different in the music composition process for this game, but I am happy with the results.  This time I used an A major scale, instead of the default C major scale.  According to some music sites, the A major scale has a more cheerful tone.  The music that I  composed does remind me of the victory melody of an old RPG.  I sort of feel like my music creation skill has maxed out, so I may need to look into new techniques.  Music seems to be one aspect of game development that has remained the same, at least since after the 16-bit era when real musical recording started being used.  I exported the mp3 and GarageBand project files  to my Windows system using the system connect in the Mac finder.  I’ve learned that it is important to transfer the music project files as well, so that I can check them into my source code repository, in case I need to change or regenerate the music files later.

For this game, I decided to play Foley artist again and create all of my own sound effects instead of using a program like BFXR.  The battery pickup sound was made with my power drill.  The moving sound of the robot was made with my electric can opener.  The mine blast was me crumpling paper with the pitch lowered in Audacity.  The light switch sound was actually an old battery powered remote light switch held up to my microphone.

As with my Expand-O-Ray game, I did a voice over to give tips and explanation of the game.  Each tip is about 5 seconds long, and they are played at the start of the game sequentially with a slight delay between tips.  This could be improved by only playing the tips when they are relevant.  For instance, play the tip about mines reducing power after the player actually hits a mine.  This would require an additional boolean for each tip to track if the tips has been played, to prevent the tip being played every time a mine is hit.

I added the level times in the last few hours of the competition.  The times are held in a List of floats, which is sized to match the numbers of levels.  I just kept adding Time.deltaTime to the current array index while the player is active.   This prevents the time from being increased during the “Level Complete” message and “Game Over” message, and much easier than trying to keep track of start and end times.  It also allows me to continue adding time to the current level after the player respawns.  After the player completes all twenty levels, all of the level times and the total time is displayed.  I tried displaying the total time while the game is playing, but looping over an array of twenty floats on every frame to get the sum caused a significant reduction in frame rate.  It probably wouldn’t be too difficult to save level times to a leaderboard, using my Unity/PHP/MySQL leaderboard system.

There are a few improvements I would like to make with the game.  I had originally planned on having a drone type enemy, which would patrol and chase the player when close.  The robot model needs a lot of work, so that the tracks and wheels look more realistic.  I would like to have different types of robots with different properties, along with purchasable upgrades.  I think it would be neat to also have a movable arm on the robot that the player would need to operate to diffuse bombs to pass.

I was happy with how this game plays and feels.  Some people have told me that it’s one of my better games.  If I  release this game on major platforms, I would probably change the name, because Slowbot (while catchy) doesn’t sound like a very exciting game.  There has been evidence of really good games not selling well just because they had a bad name.  I also want to do more research on how real bomb diffusing robots work, which may give me additional ideas for this game.  I think I would be neat if a game like this could be used to train people how to use real bomb diffusing robots.

Gameplay video


Released

World Fighter

Classic beat ’em up action. You must guide the planet and defeat the evil planets to save the universe!

Videos

Post Mortem

World Fighter, The Cosmic Warrior was my thirteenth game developed for the main 48 hour Ludum Dare game development competition.

Dylan, Joe, and myself got together at Panera on the Friday night before the competition for a Ludum Dare kickoff.  We speculated about what the theme would be.  In previous competitions, we could get an idea of what the final contenders would be based on voting in previous rounds.  However, those metrics are no longer available, so it was anyone’s guess.

My previous two games that I had developed over the past month were both collectible games.  Note Chomper was a 2.5D Pac-Man clone that I developed for the MiniLD #73.  Miner Madness was a platformer that I developed in GameMaker for GM48 where you avoid the bats and collect the gems.  I knew I wanted to develop something for this competition where you attack and blow things up.


One of the themes that caught my interest was “A Small World”.  As with some of my previous entries, such as One Gunman, I knew I could take the theme and make it the protagonist of the game.  I told our group that I was thinking that I could make a fighting game, with a character like Globey from Pee-Wee’s Playhouse as the main character.  He would fight other planets across the universe.

My original idea was a fighting game similar to Street Fighter II.  The title is a play on “Street Fighter, The World Warrior”.  At first, I thought about just switching the words “street” and “world”, but “The Street Warrior” really didn’t fit when I decided that the environment would be space, so I decided to go with “The Cosmic Warrior”.  I had never made a beat ’em up game, so I decided to make the game similar to classic arcade games like Final Fight or Double Dragon.

For the player’s character, I decided to make it green with blue for the facial features and hair.  I tried adding a nose to my character by modifying the mesh in Blender, but then it really didn’t look like planet so I kept the original sphere shape.  I think Joe was the one who suggested using moons for punching, which I think turned out well.  I modeled the planet character and animated the moon punching in Blender.  I tried keeping the planet and two moons as separate objects in Blender, but that caused problems when importing into Unity, so I combined the three meshes into one, with three bones in the armature.  I created an idle animation and a punching animation.  I assigned one capsule collider to the planet character, and then a sphere collider to the moon used for punching.  Unfortunately, this means that the moon “fist” collider has to be reassigned whenever the model is re-imported into Unity.  I haven’t found a good way around this yet.

The enemies are similar to the player’s character, except they have a different texture.  I tried making them look like Mars, with white hair to look like the northern ice cap of Mars.  I made it so that each enemy could be destroyed with one hit.  I had planned on having multiple enemies with varying levels of health, so that some would be more difficult to defeat than others.  I also hoped to have a boss planet character, that would need to be defeated in order to clear the level.  I ended up just having a counter for the total number of enemies and the player just needs to defeat all of the enemies to clear the level.  I also wanted to have life bars displayed for each of the enemies, but time ran out before I could add that feature.

The movements of the player and enemies were handled with Playmaker addon for Unity.  The enemies continually check to see if the player is a certain distance away.  Once the player is close enough, then the enemy will move to the player’s location.  When the enemy reaches the player’s location, it will start attacking.  After each attack, it will check to see if the player is still in range, and move toward the player again if the player has moved away.  Both the player and enemies bob up and down, which I think turned out well.  It gives a bit of liveliness to the characters.  I had to manually write the turning code myself, since the default rotation was not always in the direction that I wanted.  I always wanted the player to rotate with the front facing towards the camera, so I had to take that into consideration in my rotation code.

I used the Blender Cell Fracture plugin again for making the planets explode.  I put the explosion animation in a separate prefab.  When an enemy is defeated, the enemy GameObject is destroyed, then an enemy explosion prefab is instantiated which plays the death sound effect along with playing the cell fracture animation.  The one problem I still have with the Cell Fracture plugin is that you can’t define what the inner parts of the exploded object look like, so it just appears to be random parts of the texture.  There are lots of options for the plugin, so I probably just need to look into it some more.

I used Audacity again for the sound effects.  I didn’t try anything really experimental this time.  I used the pitch modification to lower my voice and added a little bit of an echo.  I used an envelope for the punch swipe sound.  The one thing that I find frustrating with Audacity is that I think it should make the folder of the file that you opened the default when saving or exporting the modified file, because it wastes a lot of time having to dig through the directory tree to find your sound effect folder each time.  However, it is a free tool so I can’t complain.  The Audacity source code is also on GitHub, so I could actually change this if I really wanted.

The music was composed in GarageBand on my MacBook Pro, as I have done in previous competitions.  Again, I used my regular process of making a couple of melodies, then I changed up the instruments and made slight modifications and mixed the melodies together.  I also made a slower version with fewer instruments for the title screen.

I made the starfield background using a tutorial that I found years ago when making my Earthball pinball game.  I changed it up a bit to suit my needs.  I left out the supernova stars to create a skybox background.  I learned that the skybox settings are hidden in the Window Lighting settings, and it is specific per scene.  I had to change the Environment Lighting Source to a solid color, since the starfield skybox source made everything too dark.  I put two stars down as a guide on the ground texture for the bounds for where the player can move.

The game world is composed of a number of “blocks”, similar to a street block.  Each block has three enemies, which are somewhat randomly placed.  There are two starport type objects, which I modeled and texture mapped in Blender at the last minute, which also form the bounding area of where the player can move.  I had envisioned that these would be destructible and produce items, similar to the trash cans in Final Fight.  The level could be improved by having an invisible wall that prevents the player from proceeding until all of the enemies on a block are defeated.  I have a case statement that does add an invisible wall before the first block and after the last block to prevent the player from falling off of the ground.

I am happy with the game that I made for this Ludum Dare competition, but I don’t feel like I learned or tried anything new.  There are definitely things that I want to fix and enhance in this game.  However, after three back-to-back game jams I’ve decided to take a break for a little while.  I think I want to try a new game engine or new modeling tool next time.


Released

Ichiban Sokoban

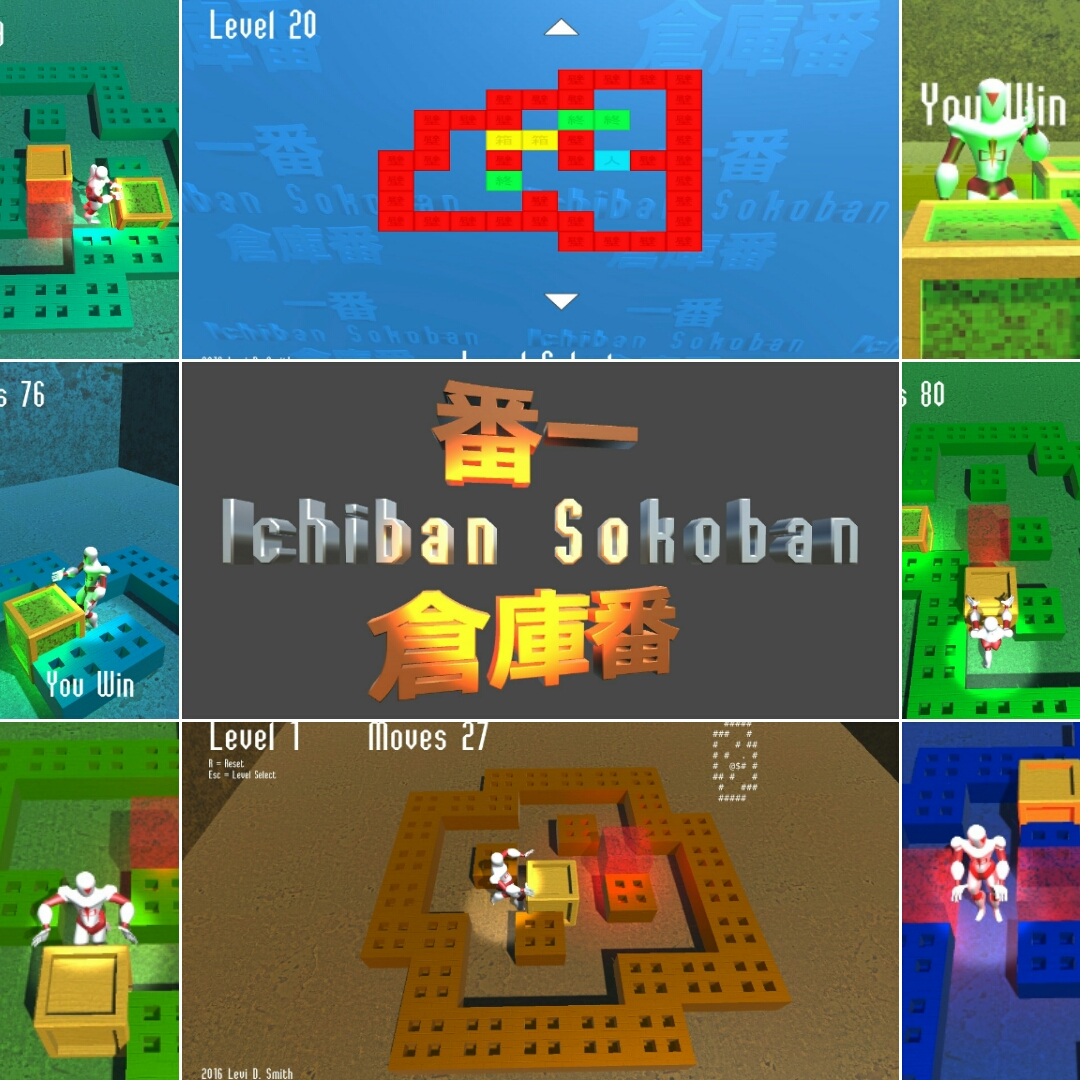
Ichiban Sokoban is a sokoban game that I developed in Unity.  Use the robot to push the crates into the goal areas.  Try to finish the levels in the lowest possible number of moves.  If you get stuck, you can reset the level and try again.

Ichiban Sokoban

Developer Log

I developed Ichiban Sokoban for the Mini LD #67, which had the Classic Mashmix theme.  One of the suggested games to remix was Sokoban.  I had developed a sokoban game years ago in Java for a college course.

I started developing the game by creating a simple Board class in C#, which basically just held the textual representation of the game (I changed the chars to ints for simplicity).  When the player presses an arrow key, it updates the Board, not the game world.

I created another class that actually handles instantiating all of the object in the game world.  When the Board object is updated, all of the GameObjects in the scene update their positions according to the board.  None of the GameObjects in the world have colliders.

The game can parse levels in the standard sokoban text format.  I’m hoping to write a file importer so that players can load their own levels.

I’ve been developing Ichiban Sokoban on the nights and weekends for about two weeks now.  I’m really happy with what I have developed.  The game seems to be received well on GameJolt, as it has quite a few downloads for a desktop game and some positive votes.

I got the file importer working, which reads out of the default application directory using the Application.dataPath variable, with “/maps” appended.  I had to write some extra code to verify the the file extension ends in “.txt”, otherwise it will try to read the “.meta” files that Unity adds by default.

For a Windows build, the “maps” folder must be placed  in the IchibanSokoban_Data folder.  For a Mac build, the “maps” folder must be placed in the “IchibanSokoban.app/Contents” folder.  On MacOS, you have to right click the folder and select to show contents.  Otherwise, double clicking the IchibanSokoban.app folder will start the game.  It is a hassle since on both platforms, the “maps” folder must be copied every time the package is built, since it deletes any folders that already exist there.  I should create a script that automatically copies the maps files after a build.

I am also in the process of adding a timer and best move and score values.

Videos

Links

Steam Greenlight


Released