Kitty’s Adventure

Kitty's Adventure collectible letters added

Kitty’s Adventure is a game developed in remembrance of Kitty.  Kitty is lost in the maze and only you can help her escape!  Guide Kitty to the exit of each maze.  Every level is a uniquely generated maze configuration.  As you complete the levels with Kitty, the maze complexity increases.

Development Process

Kitty's Adventure Texture Mapping

I began development by making a simple cat model in Blender.  Next, I textured mapped my model by UV unwrapping the model, by mostly using the “Project from View” operation while selecting specific faces of my model.  I exported the UV layout, and then I created the texture map in Gimp.  I used the dropper tool get the fur color from a real photo of Kitty.  I ended up adding a little more saturation to the colors, as the texture looked a little faded when mapped onto my model.  I used the reflect modifier, so that I only had to model and texture map the left side of the body.

Kitty's Adventure Blender animation

I created an armature for my model, with bones for the body, arms, legs, head, and tail.  Then I created three animations for my character, which are standing, walking, and jumping.

Kitty's Adventure Maze

Next, I created a simple maze in blender by scaling a plane object, and then subdividing it by 20.  Then I selected all of the faces that would be walls, and then extruded those upwards by about 1.5 units.  I downloaded a flower texture from CGTextures and mapped it as the wall texture.

In my Unity project, I imported my cat model and maze model.  I made a capsule game object for the player, and parented the cat model to the Player game object.  I used Playmaker for controlling the movement of Kitty with the Get Axis Vector and Translate actions, using “XZ” as the Map to Plane option.  It is important to add a mesh collider to the maze model, otherwise Kitty will walk through the walls.

I created four scenes for this game.  The “memory” splash screen shows a brief photo of Kitty that fades in and out.  The Camera Fade In and Camera Fade Out actions accomplished that effect.  However, I had to disable all of the GUIText and GUITexture objects after the fade out, otherwise you would see a flicker for a frame before the next scene is loaded.

I added the title screen last.  It just displays the game’s title and waits for the user to press a mouse button to start the game.  I added my Kitty model with the walk animation and I applied a constant rotation action to make Kitty spin.  It doesn’t look very natural, so I may go back and modify it later.

Kitty's Adventure Unity

The game scene is where the bulk of the gameplay occurs.  I added entrance and exit objects, which are just cubes with triggers.  The entrance really isn’t used now, but walking into the exit cube with transition the game to the final screen.  It took me a little while to get the perfect height for the maze walls.  If the walls are too tall, then you can’t see Kitty at times.  If the walls are too low, then it makes the maze too easy to solve and looks unnatural (why wouldn’t you just step over the walls?).

I also wanted to use controls similar to a Mario 64 style game.  Playmaker provides a Smooth Camera Follow action, but it makes the camera always stay behind the character, and only works well when using a control scheme where you press up to go forward, down to go backwards, and left and right to rotate.  The control scheme I wanted to use is pressing up to go into the screen, down to go to out of the screen, and left and right to go to the sides of the screen.  The camera would need to be set to the position of Kitty with an added offset and never rotate.  I couldn’t parent the camera to the player game object, because it would have the camera turn wildly whenever the player’s rotation changed.  When the walls were too tall, I would have problems of being able to see through some walls, since the camera was inside of the walls.  Ensuring that the camera was always positioned above the top of the walls resolved this problem.

After Kitty reaches the exit, then it transitions to the final game over screen.  I have a simple congratulations message with Kitty jumping up and down.  At first, the player could still control Kitty on this screen, so I disabled the movement FSMs when the scene is loaded.

Kitty's Adventure Prim's Algorithm

At this point, I had a working game, but it was not very complex and it used the same maze every time.  I did some research, and I found that Prim’s algorithm can be used to generate mazes.  I created a new test scene, just for programming the maze layout.  I created a new object and attached a new PrimsMaze script to it.  The script takes a game object (maze wall prefab) and the number of rows and columns to use in the maze.  I found a good video explaining how to make a maze using Prim’s algorithm, so I wrote a C# script using the method described in the video.

The maze generation works pretty well.  I set the exit to the last open space in the last row, although that really isn’t the most elegant solution and could result in problems if there are no open spots in the last row (my Unity editor crashed more than once due to not being able to find an open spot, resulting in losing all work since the last save).  One nice thing about Playmaker is that it will detect and break out of infinite loops, however infinite loops in a script will result in the entire Unity editor hanging.  There used to be a trick where you would attach the MonoDevelop editor to the Unity process and then change the variable causing the loop, but I couldn’t get that to work with the Visual Studio editor.

Now every time someone plays the game, they get a unique maze.  The maze complexity also increases as the player completes the levels.  I created a Playmaker global variable to hold the level number, which is incremented at the end of every stage.  I recently discovered that Playmaker global variables are accessible from any scene, which is really helpful to keep data (like level number) persistent across scenes.  I created a new function in my maze generation script, which has a switch statement that determines how many rows and columns to place in the maze based on the level number.  After level six, it uses the default row and column values.  I need to do some tests to see how many wall objects I can have before the game experiences slowdown.

There are a few more features I want to add to the Kitty’s Adventure game.  Obviously, I need to add music and sound effects.  I’ve also had the idea of adding paw prints on the ground as Kitty walks around the maze, which would be like breadcrumbs showing the areas where you have already been.  There are plenty of obstacles that could be added to the maze.  It would also be nice to have a timer showing how long it has taken to complete each maze.

Developer Commentary


Released

Christmas Tree Simulator


Experience all of the joy and excitement of the Christmas season with Christmas Tree Simulator.

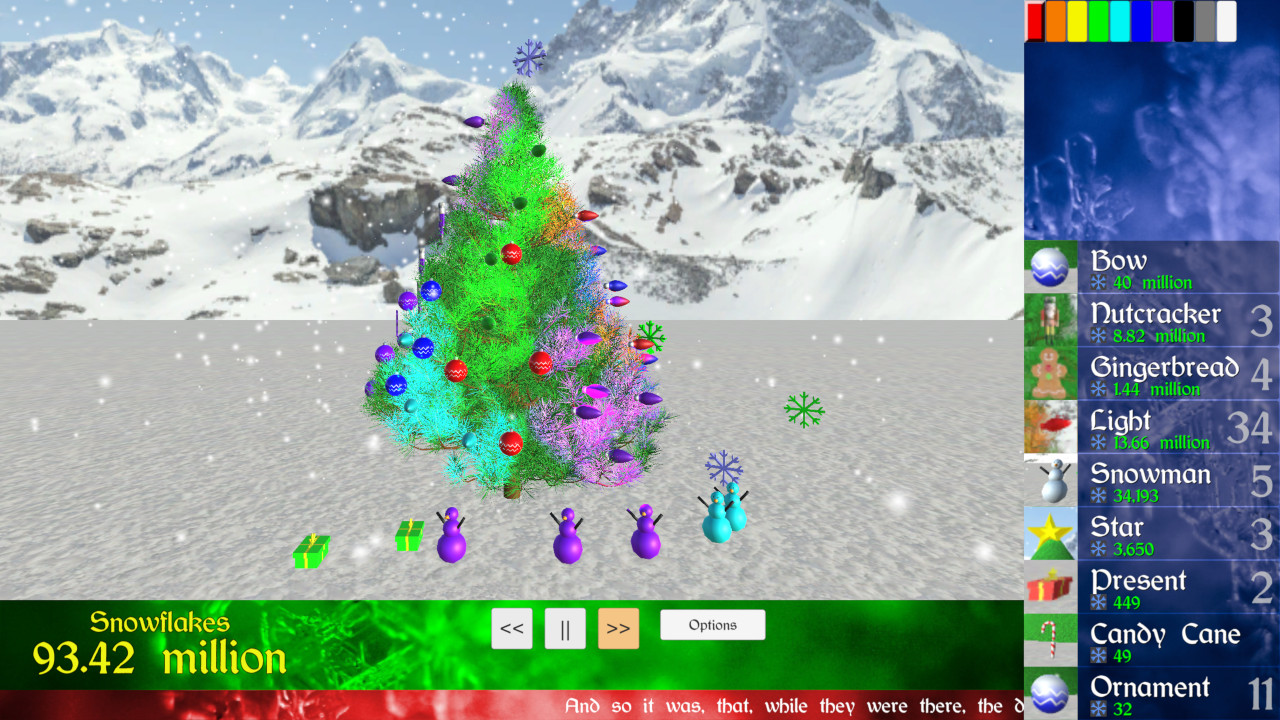
Snowflakes contain special Christmas magic! The more snowflakes you collect, the more decorations you will be able to put on your Christmas tree. Christmas tree decorations make everyone happy and bring joy to the world!

Below are the goodies that you can place on your tree by exchanging magic snowflakes!

  • Ornament, round and shiny!
  • Candy cane, sweet and will give your teeth cavities!
  • Presents, make children happy!
  • Star, twinkling and bright!
  • Snowman, a frosty friend!
  • And more!

Screenshots

Videos


Christmas Tree Simulator Let’s Play videos


Released

Crystal GridIron

Crystal GridIron is a game that I developed for the Mini Ludum Dare 63. The theme is to develop a game that fuses two different game types. Since I’ve never developed a football game before, I thought this would give me the opportunity to do so. However, this game will include fantasy RPG elements. Instead of football players, the team will be composed of mages, warriors, and rogues. I’m planning to make the ball a crystal. I also want to have powerups that are stored in treasure chests on the field, which will boost the player abilities with things like faster movement and more power.  One of the games I liked playing as a kid was Bill Lambeer’s combat basketball, which also had collectible powerups.  I also liked Tecmo Bowl for the original Nintendo Entertainment System, and I decided to use a similar side view of the field.

Tecmo Bowl Bill Lambeer

I was able to develop the basic core of the game using Unity and Playmaker. The players are currently capsules, and the ball is a sphere. Of course, I will end up replacing these will actual models that I will create in Blender. I created a script which instantiates all of the players on the field, using two ArrayLists for the Vector3 positions of all of the players on each team. When the game starts, I parent the ball of the player that the player is controlling. This way, the ball follows the human controlled player on the field. I also set the ball to “is kinematic true” so that it doesn’t move away from the player. There is one Playmaker FSM for controlling the actions of the player. If the player is human controlled, then I use the GetAxisVector action to get the input. Then the human controlled player is moved using the Translate action.

Crystal GridIron
Each player is assigned a team ID, which determines if the player should play offense or defense. I also set the material for the player based on their team ID, which makes the players red or blue. Currently, the defensive players just move toward the ball object. The offensive players will move based on the play type selected.
I created two cube objects for the two end zones. There is a trigger action on the ball, so that if it crosses into the end zone, then the scoring team gets 7 points added to their score. I am using the GUI Text object for displaying the score. The team scores are stored in two Playmaker global variables.
The camera moves by getting the X position of the ball, and then moves towards that X position (the Y and Z position of the camera remains the same). I set the camera movement speed to slightly less than the player, so that it makes it appear that the camera is catching up with the player that has control of the ball.

After a few days of development, I was able to implement a simple football game with basic artificial intelligence.  When the player makes it to the end zone with the crystal, they score seven points.  The player has four downs to gain ten yards to get to the yellow line.  Then, the player gets a fresh set of downs, otherwise the ball is turned over to the other team.  I made some simplistic models for the game, since I didn’t have enough time to model player characters.  I did get the crystal implemented, and I was able to make it go through all of the color hues.

I learned a few things from developing this game.  I got more experience using the Playmaker Ecosystem addon, which adds more actions to Playmaker.  I was able to import int modulo (for changing the integer of the active team between 0 and 1) and HSV color actions (for changing the color of the crystal).

Unfortunately, I wasn’t able to add many of the features that I had planned.  I would like to model better looking players in Blender or import humanoid models in MakeHuman.  The entire field needs to be redone, with yard marker lines.  The AI needs to be improved on offense (players just walk forward) and on defense (players just move towards the crystal).  I also thought about adding a “classic” mode for people who just want to play regular football.  I would also like to add controls for selecting a play formation, and have multiple formations for offense and defense.  A play editor would also be a nice feature.  The game also needs to have the ability to pass to team mates.  A game clock also needs to be added, as you currently just play forever and there is really not an ending to the game.  Finally, the game needs to have music and sound effects added as well.  However, I was impressed with what I was able to accomplish in just a few days.

Play on itch.io


Released