Adding Music
Used Mario Paint Composer to create simple title music and stage music. It really gives the game a classic feel, and it’s really easy to create great sounding tracks with the tool. I spent about 30 minutes trying to record the audio from the desktop (tried Fraps, then tried connecting the audio jack output to the mic input), but I couldn’t get Audacity to record even though I saw activity from the mic input in the Control Panel sound control. Finally, I just held my USB headset mic up against the PC speaker and recorded using Audacity. The sound is a little muffled, but it does the job for now. At first, I used Audacity export the music into MP3 format. I did some research to see what what other formats XNA accepts, because I don’t want to risk the possibility of paying royalties for using MP3.
I’ve never had a formal class in music writing, but I was in the band for many years in high school, so this will be my first attempt at writing music for a game. The GameBoy icon beeps make a nice sound, but I found that too many of them can get annoying, especially when the song is on a loop. The GameBoys should be using sparingly, like sprinkles on a cupcake. I found that the Piranha Plant, Coin, ShyGuy, and Boo make the most soothing sounds, so I’ll probably be using those the most. On my stage 1 song, I have an intro and four melodies. The intro has the most GameBoy beeps, then it is phased out in the later melodies. Using the Arranger in Mario Paint Composer, the sequence I used looks like this: Intro, Intro, Melody A, Melody A, Melody B (transition), Melody C, Melody C, Melody D, Melody D, Melody C, Melody D, Melody C, Melody D.


To be on the safe side, I went ahead and converted my raw music files to WAV using Audacity. I can convert them to WMA later if needed. I don’t want to run the risk of having to pay royalties by using the MP3 format. One trick is that in the IDE you have to change the ContentProcessor of the WAV resource to Song, otherwise it will default to SoundEffect which will cause the program crash when it is played as a Song object.
Adding Lights/LEDs
Created the GamePieceLight class which subclasses the GamePiece class. Currently, it just overrides the draw method, so that it draws a light (circle sprite) instead of a wire. The lights are not playable pieces, meaning that the user can not place lights on the game board. The lights are placed on the board at the start of the level. Learned that you can’t just simply override a method by redefining it like in Java. In order to override, the method in the superclass must be declared virtual, and the override keyword must be used when defining the method in the subclass. After fixing those, I was able to add the light pieces by using the setPiece method in the constructor of the GameLevel class, for each light to be placed on the board. The great thing about OO (object oriented) programming is that the light automatically inherits all of the properties of the GamePiece class, which was the basic wire. Therefore, it automatically fills the adjacent wires just as a regular wire does, and its isFilled property is automatically set when the FILL_MAX value is reached. In order to make these superclass instance variables accessible to the subclass, they must be declared protected instead of private. This makes the variables visible to subclasses, but not visible to other classes. Before the light is filled, I use White as the color parameter for drawing the light sprite. Yellow is used as the color parameter when it is filled. The maximum “bust” value for the light will be added later.

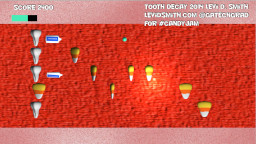
Adding Resistor Pieces
Added instance variables to the GameLevel class, which hold the currently selected piece and the maximum number of selectable pieces. The current selected piece is initialized to zero (wire) and the maximum number of pieces is set to two. In the future, I will just create a list or array of piece types, and derive the maximum value from the array length. I am currently incrementing the selected piece value when the user presses the action button (default X). If the selected piece value is greater than or equal to the number of pieces, then it is set back to zero. In the future, I may have one button specifically for laying wires and another button for placing other pieces like resistors. Changing the selected piece will also probably be handled by the shoulder buttons. I have displayed the selected piece index on the game screen for now. When the selected index is 1, then pressing the confirm button will lay down a 2-resistor. I made the Elex variable in the superclass protected, so that I can subtract 2 from its value. A method was created in the GamePiece called pieceFilled which is called when the piece’s fill value reaches the max value. This method is overridden in the GamePieceResistor subclass, calling base.pieceFilled() first to set the filled boolean values in the superclass. Then I subtract the Elex value in the sublcass, since that is specific to the GamePieceResistor subclass. When the resistor is not filled, I use the Gray as the third color value in the blit method, giving the resistor a faded appearance. When the resistor is filled, White is used as the color parameter which makes it appear brighter. Currently, there is no check to see if the resistor will lower the Elex value below zero. I could make it so that the flow stops when the flow gets to zero.

As the screenshot shows, the Elex value is lowered from 8 to 6 as it passes through the first resistor, because the 2-resistor lowers it by 2. When it passes through the second resistor, it lowers again to 4.