More Visual Effects

Crown Jewel

The one effect that I’ve neglected which I envisioned from the beginning was the actual filling animation of an individual wire in a cell.  I should be able to do this now, since I now know how to use a Rectangle object to determine which portion of the sprite to draw.  Filling just straight wires is not a problem, but it becomes more complex if a wire has bends or has intersections.  This effect should be able to be achieved  by first filling a small area from the origin side, then expanding outward in all three directions after the fill has moved passed the halfway point.  This should be similar to how I expand the overlay on the piece cooldown, except it will expand in three directions after it reaches the halfway point.

I did go back and add the “coming from” variable to determine the flow direction.  Also, I had to use the draw method which takes two Rectangle parameters, the source Rectangle and the destination Rectangle.  Using only one Rectangle will make the sprite stretch, but with two Rectangles I was able to achieve the clipping effect.  This clipping effect is what I needed to display the gradually filling wire in the cell.  Using the default tile was a good way to test the clipping, since it fills the entire cell.  This way I was able to determine exactly which regions are being clipped.  After I got it working correctly, I replaced it with the real wire image.  I’ll admit, I did hardcode the wire offset constant value and the halfway point constant.  Technically, those values probably could have been derived from the cell size, but that would have made things way too complicated, with nothing to show for it.  Additionally, I removed the dark yellow color of the filling wire, since it now has the visual animation of it filling.  The wires now truly look like they are continually filling, but unfortunately I can’t capture that in a screenshot, so this development image and these handwritten notes (click to enlarge) will have to do for now.


Scrolling Background

Looked at some other puzzle games, and I noticed that most had scrolling for animated backgrounds.  I thought this would be distracting at first, but I guess if the scrolling is slow enough it isn’t so bad.  Plus, it makes the screen seem more “alive”.

However when I implemented this, the background jumped from the game level screen to the game win screen, since the game win screen didn’t have the scroll offset value.  I made a few methods to allow the background scroll offset to be passed to the game win screen, and then back to the game level screen.  I didn’t have the offset value changing in the update method in game win screen, which made the scrolling stop on the game win screen.  I thought that this was okay, because there is already a lot going on with the rank values displaying.  The offset is passed back to the game level screen, which is a new instance of the object.  That is another issue that I may need to address later, if memory or performance becomes a factor.  When the game transitions from the game win screen back to the game level screen, it picks up at the same scroll value, so there doesn’t appear to be any jumping in the background scroll animation.

Overall, this gives a feeling of continuity between all of the stages in a level.  Then there is a visible shift (scrolling in the opposite direction) once the user moves on to the next level (completes stage N-10).

Face Lift

Updating Graphics

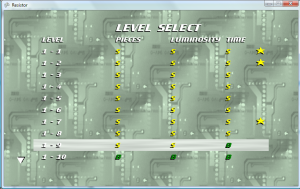
Made two arrow sprites for the level select screen to replace the “V” and “^” character strings that I had before.  A new arrow delay value was added to the LevelSelectScreen class, which allows me to move the arrows up and down slightly to draw attention to the arrows.  At first the arrows were moving too quickly, because I moved them one pixel for each update.  Therefore, I set the max counter value to 60, and then moved the arrow by the counter value / 10 (one pixel for each ten updates).  Created another image for the highlighted row, to get rid of the default tile sprite that I had.

Created a static method to draw shadowed text.  I did a quick search on the web to see if there was an API call or parameter that could be used to draw shadowed or outlined text, but all the solutions that I found were custom written ones.  Therefore, I just created a static method to draw the raised text, which takes the text string, color, position, and font as parameters.  I didn’t have a good place to put this, so I added it to the main game game class for now.   All of the fonts on the level select screen, game win screen, and game level screen were updated to use the new raised font method that I wrote.  Plus, it makes everything stand out much better.


The headers on the level select screen need to be tweaked slightly, so that the header text centers over the rank values.  I will need to see if there is a method to get the width of the text for a specified font.

The layout of the game win screen was also reworked to better place the values.  One issue I noticed was that the “NEW BEST” text was next to the category (piece, lum, time) value.  This may lead players to believe that it is a new best value instead of a new best rank.  The values are not recorded in the game, and only the player ranks are stored.  Therefore, the “NEW BEST” text was moved lower next to the rank value.  The game win screen still felt plain, so I added a variable and added logic to make the “NEW BEST” text blink from white to light green, which gives it a more arcade type feel.

Created a static method in the LevelDefintion class to return the color of a rank, which takes the rank integer value as a parameter.  This simplified some of the draw code, and I removed redundant code which calculated the color value in other places.

This definitely feels like I’m rolling downhill now.  Before, I could spend a week or two making logical fixes to the game, with little to show for it.  Now that I’m working on the graphics, I have a lot more to show in a relatively short period of time.

Pause Screen Needed

One functional change I will need to make is add a pause screen, because currently pressing back during the game will take the player back to the main menu.  I really need to disable that, and add a pause screen with just two options: resume and return to main menu.  I can probably use much of the same code from the “clear records” display, maybe even write that simple dialogue screen that I was thinking about a few days ago.

Star Rank

One problem I noticed in the game was that there is no distinction for a player if they acquired all three S ranks in one play of a level or from multiple plays of the level.  I went back and added a star marker on the game win and level select screens, showing if the player got S ranks in all three categories at once in one play of a stage.  That way the player has a way of showing that they got all three S values at once, instead of having to play through the stage multiple times to get the S rank in each category.  I just had to add another array in the player records class, which is parallel to the level complete array.  As far as saving and loading goes, I just replaced the “Y” value in the save file with an “S” if the player achieved the star rank (all three S ranks at once).

Take level 1-9 in the screenshots below for example.  The player currently has ranks S,S,B for the level.  The player completes the stage getting an S-rank in time, but a B-rank in luminosity.  The player now has S-ranks in all three categories.  However, Since the player got the time S-rank on a separate play of the stage (without getting all three S-ranks at once), the player did not get a star for that level.


Backgrounds

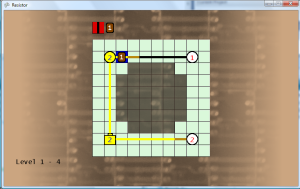
Added a transparent tile in the cells not filled with a title, to show the player which cells the cursor can occupy.  Without these transparent tiles as a guide, it is confusing to tell where the cursor can and can not be moved.

Created background images for levels 1 through 9.  The background image will change after completing every 10 stages.  The background color will also use a shade of the color of the highest level resistor for that level, re-enforcing the color value for that number.  In a way, this adds to the educational factor of the game.  Aside from having brown for level 1, this also teaches the standard ROYGBIV color spectrum model.  Created a background image cover, which is white on the sides, and gradually becomes transparent in the center.  This didn’t look right, so I used the color parameter of the draw method to change the color of this cover image as well.


Went ahead and added this background image style to the game win screen as well.  I may have to make some tweaks to make the lettering stand out better.

On the title screen, I went ahead and used the color parameter of the background image to set the shade of the scrolling image to the light green color.  Before, the background image looked faded and dull.