Tex Oneman – Developer log

Tex Oneman is my third official Ludum Dare entry, and it was my eleventh game developed for this site (including mini-LDs and warm-ups) since I registered in April 2013. I feel like I’ve learned a lot during that time, and these projects have definitely made me a better Unity developer. For this Ludum Dare, I knew I wanted to do something different.

After hearing the theme announced at our local Knoxville Game Design meetup, I knew I wanted to make the number “one” a central part of the game. Going with that approach, I decided to make the number “one” humanoid, since I knew how to quickly make meshes from text in Blender. I added eyes, arms, and legs, but the character was still sort of boring. I thought about some of the characters in my latest XBox Live Indie game TTY GFX ADVNTR, and remembered the character “Needles”, which is a humanoid cactus wearing a cowboy hat. Then I remembered playing the classic game GunSmoke at one of those 20-in-1 arcade machines not too long ago. There really haven’t been too many western themed games lately. Therefore, I gave my humanoid one a cowboy hat, boots, and a gun to shoot. I also went ahead and modeled a cactus in Blender as well as a background prop.

Tex Oneman gameplay

Another classic western game was Wild Gunman. I liked the Gunman name, so I decided to call this game “Tex Oneman”. The original name (One Gunman) was also sort of a play on the term “Lone Gunman”, which differs my game’s title name by just the leading “L”.

After creating the models, I got the main character imported into Blender and moving around. I also created some enemy boxes that moved around. Next, I implemented shooting projectiles. However, I quickly found that trying to aim on the X-Z plane with no lock-on could be quite difficult. Therefore, I limited the character to just being able to move left and right, and he is only able to shoot forward. This makes the game similar to other classic arcade shooters, except this game uses a third person view instead of a top-down birds eye view. Shooting enemies was fine, but it still seemed really boring.

Then I had the idea that Tex Oneman would shoot number sequences as the targets. For each enemy, I assigned a random digit value in the range of 2 through 9. First I decided to use evens and odds as the requirements. Once I got those working, I added a countdown so that the requirement would change periodically. I was really inspired by a game called Pig and Bullet, which makes the player switch between collecting red and blue bullets every few seconds. The problem with that game was that you never knew when the objective would change, so I added a visible countdown in my game. New objectives were added, such as Fibonaccis (2 3 5 8), Squares (4 9), and Perfects (6). I didn’t include 1 in the sequences, because that would mean that Tex Oneman would be wanted as well causing unneeded confusion. Each sequence also has a set reward associated with it, where the more complex sequences have higher reward values. For the lose condition, I made it so that the player lost a life if they run into a number or shoot an incorrect number. Finally, I rendered 3D numbers in Blender, which replaced the box enemy meshes in my game. I included statistics such as number of shots and accuracy percentage on the game over screen, which was inspired by other classic arcade shooters.

Since I had the core engine finished on the first day, I worked on polishing the game on the second day. A “WANTED” poster was added which displays the current objective in the lower right portion of the screen. The objective change countdown was converted into to a bar which shrinks as it nears zero. Like my previous entries, I used Garage Band on my laptop to make the music for the game. The piano and guitar sounds were primarily used to give the game a more western feel. Bxfr was used again for making the gunshot and other sound effects. Using my computer microphone, I recorded myself saying “Shoot X”, where X is the current objective. Then, the vocal recordings were modified a bit in Audacity to give it a better sound. The voice seems to really enhance gameplay, since it keeps the user’s attention on shooting the numbers, instead of looking at the Wanted poster. Finally, particle effects were added using a star texture that I made in Gimp. I tried changing the particle system color over time, but for some reason it just wasn’t working for me.

https://soundcloud.com/gatechgrad/sets/one-gunman

I learned a few lessons from this game. The first lesson is that people don’t like shooting at a perspective. I thought the controls were intuitive, but some people definitely found it difficult to shoot. The best I can explain the shooting controls is that it is similar to rolling a bowling ball on a bowling lane. The game could have included some additional visual cues to help line up the shots down range. I could have also used a top-down view, but then the player would not be able to see the details of the model that I had created. Using an orthographic projection may have helped as well, which would have kept the numbers and bullets traveling vertically on the monitor screen. Another option would be to highlight the number that the player is currently targeting, but I thought that may make the game too easy.

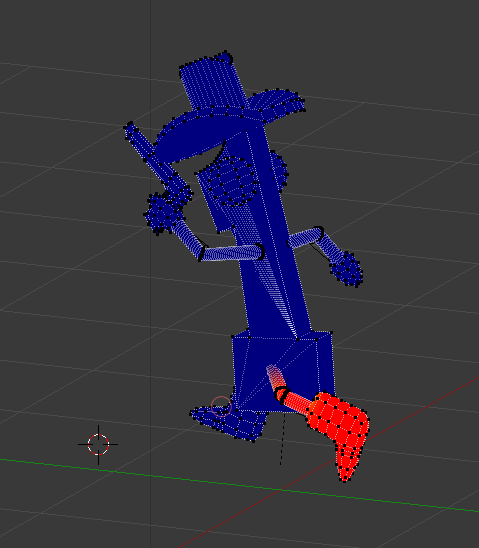
There was also some difficulty with getting the model moving correctly. When I assigned the armature, I used the default “with automatic weights” that I always use in Blender. However, since the arms and legs were so skinny, it didn’t properly weight paint all of the vertices. I’ve done manual weight painting before, but this model had some difficult to reach vertices. After some trail and error, I discovered that it is possible to pose the model while weight painting it. This made reaching some of the difficult to reach vertices much easier, and you can see the vertices snap into place while weight painting it.

Overall, I am satisfied with the game that I have created. I would have liked to made the other numbers humanoid as well, and I really needed to add more props to the environment. Things like buildings, dust, and tumbleweed could have really added to the environment. If I get the time to work on this game some more, I definitely think it could be turned into a great game.

ANSI_GFX_ADVNTR – It’s a Small World

For this mini-LD, I decided to create a game in the style of the BBS door games that I played when I was a teenager in the mid-90’s. We had a 64 line BBS in Atlanta called INDEX (Information, News, and Data Exchange), which was huge at the time, since most BBSes only had one or two lines. This meant that when all of the telephone lines were tied, you had to wait for someone to hang-up before you could dial-in with your modem to play any games. However, these were the first games that I had ever played online, which had a persistent world and where you could interact and compete against other players online. These online DOOR games were really the precursor to current day MMOs.

Two of my favorites were L.O.R.D. (Legend of the Red Dragon) and Trade Wars 2002. I did a few web searches on these old games for inspiration, and I came across the Wikipedia page for Seth Able, the original creator of L.O.R.D. and in-game bard character. I looked through the list of his projects, and noticed a recent game called Growtopia. I knew I had heard about that game before somewhere. Then I realized that it was on the Ludum Dare website, and Seth Able (now Seth Robinson) is actually a Ludum Dare administrator. I guess the game development community is really a small world after all.

I wanted to use ANSI style graphics, but I knew I didn’t have time to implement a full networked game running through a VT100 terminal, so I decided to go with C and SDL and export my ANSI graphics into PNG images. To get the BBS DOOR game aesthetics, I created all of the artwork in AcidDraw using DOSBox running under Ubuntu Linux. Then I took a screenshot of that image using Gimp, cropped, resized, and then exported to PNG. It was much simpler to do it this way, rather than trying to write a complete VT100 terminal emulator in a weekend. However, I do have all of the original .ANS art files, so those could be used to port my game into a real BBS DOOR game.

Creating ANSI graphics using AcidDraw.

I started out by making the title screen and then the village, which is the hub for the game world. From the village, you can access the Inn, Blacksmith, explore regions, or view stats. I tried structuring my code like my other games, with a game loop that calls an Update event handler and Draw method for each screen. However, since C is not object oriented, I had to make sure that the names for the Draw and Update methods on each screen were unique, so I prepended the screen name before each method. Then in my main game file, I keep a state variable which determines which screen is active, and then calls the appropriate Draw and Update method based on a switch statement using the state variable.

I had two files that contained data structures, which are the Player and Enemy. To keep things simple, I avoided pointers and just had one instance for each. The characteristics for the enemy is loaded when the battle event is activated. It is important to declare the data structure variables as “extern” in any other files which use them, which is something that I had forgotten over the years. All of the structure definitions and function prototypes are defined in corresponding .h header files, which makes includes much simpler when everything is laid out correctly. The only headache is keeping the method prototypes in the header files and the method definitions in the game code in sync. If you add a method parameter or change the method name, you’ve got to change it in both places. I’m thankful that we no longer have to do that in languages like Java and C Sharp.

The game plays much like classic BBS DOOR games. You can rest at the Inn to regain your health, for a small price. The blacksmith will “upgrade your weapon”, but for now it just raises your attack power. I would like to add unique weapons and armor in a future release. On the stats screen you can view your health, gold, level, experience, and points required to level up.

The player starts out with two areas to explore, the meadows and forest. As the player progresses through the game, they will open up new areas to explore with more difficult monsters to defeat. Aside from the monster battle, there are three unique events while exploring: 1) The player can find money. 2) The player can encounter the old woman, who will either heal you or steal some of your money. 3) The player can interact with the merchant. Buying items from the merchant will open up new areas to explore from the village. Some merchants may refuse to talk to you unless you have a special item to show them. I had much bigger plans for the items acquired from the merchant, but I had to scrap those ideas for the sake of time.

I did learn (or re-learn) a few lessons while making this game, which is my first SDL game since I wrote Legend of Tux back in 2009. First of all I met my old friend the Core Dump, after trying to use an attribute that was set to NULL. Then after I thought I was done with the game, I noticed that the menu would sometimes go blank. After viewing the system processes, I noticed that I had a memory leak. Obviously, a simple game like this one shouldn’t take 2 Gigabytes of memory. I determined that the probable culprit is the method call which creates a texture from a character string, TTF_RenderText_Solid. I’m assuming that the menu went blank because the program ran out of memory to allocate new SDL_Surfaces for the menu text, so it wasn’t able to blit the text surface to the screen. This problem was fixed by calling SDL_FreeSurface on the SDL_Surface containing the text, after it has been blitted to the screen.

Finding memory leaks in Linux and Windows.

After I had the game completed, I wanted to make a Windows version so more people could play it. The most straightforward way of doing this would be to install Cygwin on Windows, and then compiling with SDL on Windows. That’s the way I’ve created Windows exectuables in the past, but it is a hassle to have to switch operating systems to do a secondary build. Therefore, I thought I would try my hand at using a cross-compiler to create the Windows binary under Linux. I found a good tutorial on Ryan “icculus” Gordon’s website, which explains how to build an SDL cross-compiler on Linux. First, I installed mingw32 for Linux from the Ubuntu Software Center. Then I used the install script from the tutorial. It was helpful since it automatically installs almost everything you need, however it does mess up some of the directory structures. For instance, the “i586-mingw32msvc-sdl-config –cflags” command puts “SDL” in the -I (include) parameter. In my code files, I include “SDL/SDL.h”, so having “SDL” in the include parameter will generate numerous compiler errors because it will be looking for the headers in “include/SDL/SDL”. I could have fixed this by changing the includes in my code files to just “SDL.h”, but that would have broken the compile for the Linux build. Therefore, I just explicitly put the output of “i586-mingw32msvc-sdl-config –cflags” as the compiler parameter, removing the extra “SDL”. The other problem with the installer script is that it put all of the optional SDL library headers (like SDL_ttf.h and SDL_image.h) in the “include” directory, so I had to move all of those up to “include/SDL”. See the Makefile included with the source code if you want to see the final compile command for Windows.

I really enjoyed this project, since it brought back memories of the games that I played back in high school. It also made me thankful that programming technologies have evolved over the years.

Play ANSI_GFX_ADVNTR now or watch the gameplay video with my commentary below.


Bomb Squad – Developer log

This is my second time participating in the official Ludum Dare competition. Overall, I feel like my skills with Unity have significantly increased since the last competition, when I submitted Amish Brothers. Since the last competition, I have submitted a game to each mini-LD, and each game developed taught me something new about Unity.

This time around, the theme was “10 seconds”. My idea was a game where you play as a bomb squad technician, where you have 10 seconds to disable each bomb. If the bomb explodes, the objects around it will be propelled away and add to the property damage value. The objective is to keep the property damage as low as possible, while avoiding bomb blasts which damage your suit. If your suit reaches zero percent, then the game is over. Additionally, you must “cut the wire” that matches the color of the bomb, otherwise the bomb will explode and you will take damage. For more details on my design decisions, see my Bomb Squad Day One entry.

Bomb exploding next to a wall

For this game, I knew I wanted to use Unity’s physics engine for handling the explosions. I first started learning about Unity’s physics engine when I developed Earthball for the mini-LD42. When the bomb explodes, it applies an explosive force to all of the objects in the game, including the player. I found that this starting causing problems when there were over about 600 objects in the scene. When the objects were exploded and scattered everywhere, the slowdown didn’t occur. It was only when the objects were stacked, which I believe is because when the objects are stacked, they are continually colliding with each other, which requires a significant amount of processing power. The player is also affected by bomb blasts, but I feel that if I learned how to use the “ragdoll” physics in Unity, the effect would have been much more impressive. Currently, the player just has a cube bounding box, so the player looks very stiff when thrown by an explosion.

The ground is just a terrain object (like I used in the test Giga Guy game that I developed), but I always have issues with my models falling over when going up the terrain, therefore I just left the game area flat. However, I was able to use the blended terrain textures to make the ground look much more pleasing.

I used Blender again for rendering my models. There were really only two models that are in this game, which are the player and the bombs. From my LD27-warmup game North Avenue Adventure, I learned how to properly project my mesh to a 2D layout, and how to modify the unwrapped vertex “islands” properly to generate an image layout to be textured in Gimp. I am happy with the model that I created, but I would like to go back and add more details later. However, I found that it can be difficult to modify a model in Blender once all the modifiers (mirror, subdivision surface) have been applied and the armature added. I also think I could have done a much better job on the bomb model, since it is just a stack of cylinders. A spark particle system on the bomb would also be a nice touch.

My mini-LD43 game, Marching Band Simulator 2013 taught me more about composing music in games. However, for Bomb Squad I decided to go with Garage Band on my Mac laptop for composing the music. In my previous entries, I have used PxTone Collage which is a great tool, but the blips and bloops it uses cannot compare to the music that can be created with Garage Band. For the complete soundtrack, please visit my Sound Cloud page. The only problem with Garage Band is that I had to export my songs to iTunes to get the audio file, and then copy it over to my development system. It is a bit of a hassle, but I think it is worth the extra effort.

Another game I created in Unity for #1GAM was called Genetic Disorder, which is where I learned how to make the text meshes for the title screen using Blender. It’s a fairly simplistic process, but the number of vertices must be reduced otherwise the model file size will end up being huge.

Text mesh zooming in on title screen

For the 7dRTS challenge, I created a game called Ninja Squad Commander, where I learned many more Unity tricks. First of all, it taught me how to center a text object over a model, and how to make the 3D text sharp (by default the 3D text will be blurry). This was used in Bomb Squad to display the number of seconds until explosion over each bomb. In that game, I also learned how to make detailed particle systems, like the fire effects, using Gimp to create the fire texture using a gradient and IWarp filters. The game also taught me how to attach lights to particle systems at runtime, to give the fire a glowing effect which can be seen on objects around it. Both of these effects were used in Bomb Squad at the location of an exploded bomb. When I was developing the RTS, I also learned how to determine the distance between two objects in 3D space, since using multiple physics colliders for different events can cause problems. The 3D distance calculation was essential to determine how much damage the player would take from a blast, and how much property damage is received by an object. The distance calculation is also used to determine if a bomb is selected to be disabled. My 7dRTS game also taught me how to make a shadowed font from a text object, which made the static text in the game look much better.

The one new feature that I added that I hadn’t implemented in a previous game is the mini-map. I felt that it was needed, since the player can’t always see the entire game area, so there would be bombs hidden to the player. That problem could be helped by adding code to fix the camera behind the player, so that is something I will look into for a future release. I think the mini-map would still be beneficial, but some players noted that it makes the game a little too easy, so I may eventually take away the bomb color on the mini-map.

Honestly, I can say Bomb Squad wouldn’t have turned out as good as it did if I hadn’t created all of those other smaller games after LD26. One important factor in being successful in Ludum Dare is knowing your tools and all the tricks before the competition starts. Trying to learn new technologies during the competition is a recipe for failure.

Follow me on Twitter at @GaTechGrad and visit my website at www.levidsmith.com

Videos