Ludum Dare 37 was the twelfth time that I competed in the 48 hour game development competition. I wanted to create something with gameplay similar to the classic arcade game Frogger.
The trick with this game was getting the movement controls right. I wanted to make it so that you could press the gamepad in a direction, and the frog would immediately move to the next “square”. Therefore, the movements were discrete, so I could not use my typical methods for doing continuous movement. The area where the player can move can be thought of as a big chess board. When a direction is pressed, the frog’s location (a row and column stored as integers) is updated. Then, the frog is pulled to that new location. I had to add a boolean variable to track if the frog is moving, so that no new input is accepted until he reaches his destination. This type of movement is great for a game like this, because the player can clearly see if they will avoid an obstacle, which eliminates any case for bad collision detection.
I wanted to have a lot of mechanics in this game, which have been lacking in my previous game jam games. I wanted each level to introduce something new. I got this idea from watching Super Mario Bros 3 videos a few days earlier, where each level had some new mechanic or concept added.
- The first level just introduces the player to the game, so the player just has to maneuver around the board to reach the exit.
- The second level introduces the guns, which is the first time that the player can actually lose a life. The guns only shoot one bullet at a time and can be easily dodged.
- The next level reuses the gun that I created, but this time it shoots three bullets in a row. It’s a nice way to create a new obstacle with minimal development effort. Using Playmaker makes altering the standard gun relatively simple.
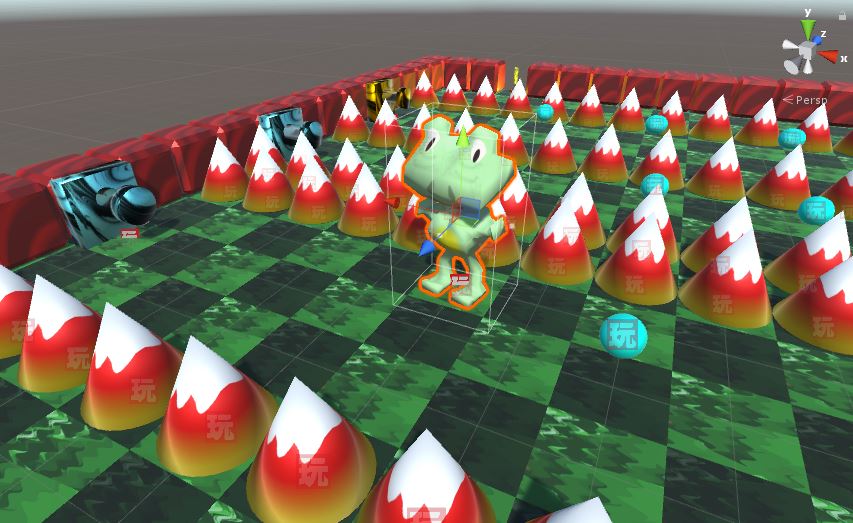
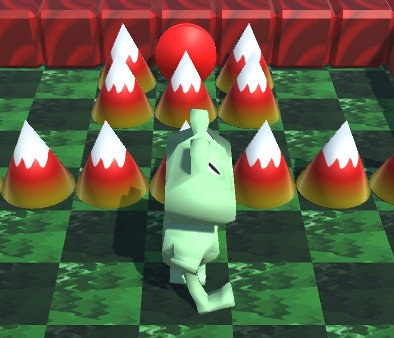
- The next obstacle introduced is the spikes. I think the first spikes may be a little unfair, because they start hidden and pop up right as the player is moving through the game level. If the player looks closely, they can see the tip of the spike when it is down, but maybe there should be some other visual cue. I used a simple Blender cylinder and moved the vertices at one end together to create a cone. I used Playmaker to move the spike up and down, waiting for a few seconds after each position transition. The frog is killed when it collides with the collision box around the spike.
Moving spikes surrounding a warp area - There is one beneficial power-up in the game. I think one of the flaws of the game is that there are too many negative obstacles at the beginning, and not enough things to benefit the player. The speed booster power-up decreases the amount of time that it takes to move to the next square. I put a long row of spikes, which makes it necessary to use the speed booster to pass. I used trail and error to determine how many spikes would be required in order to have to use the speed booster. Unfortunately, only one level uses the speed booster power-up, so I would have also liked to use the speed booster in another level.
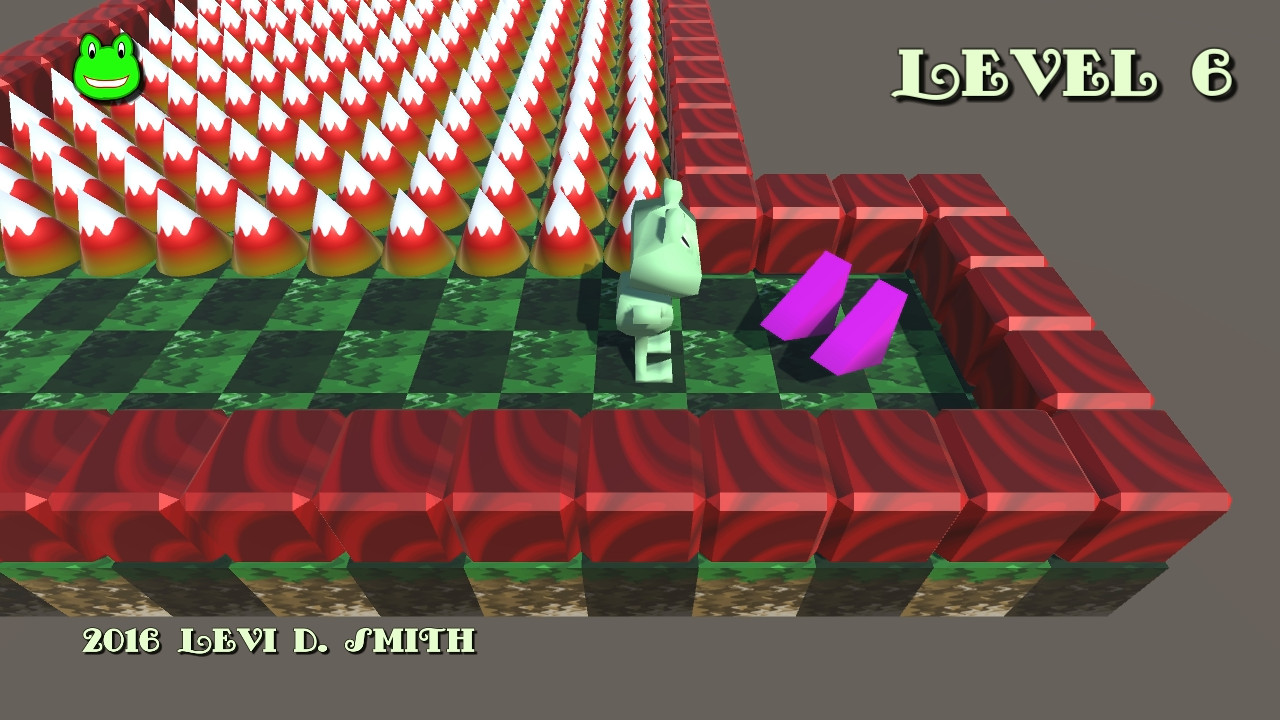
- Another object that the player can interact with is the warp object. I made it so that there are two varieties of warp points, one red and one blue. The red warps to the other red point, and the blue warps to the other blue point. On the first level with warps, I made it so that red warp is easily accessible and the blue warp is surrounded by spikes. If the player takes the blue warp, then the exit is easily reachable. If the player takes the red warp, then the exit is blocked by spikes. It seems to be good game design to reward the player later if they choose the more difficult path first.
- The remaining levels don’t introduce any new obstacles or powerups, but I tried to make them unique by using different obstacles together to make a unique challenge to reach the exit. The seventh stage is probably the most difficult, where the player must move at the exact time to avoid the combination of gun bullets and spikes, which move at different rates. However, I had to ensure that there was a small period when the path was passable, to ensure that the level could be completed.
For the graphics, I used Blender as usual to model, texture map, and animate the frog. However, when the frog dies, I used the cell fracture plugin for Blender to make an animation of the frog falling apart into pieces. This effect is probably more suitable for non-organic objects, but I liked the effect so much that I had to include it in this game.
As for the music, I used GarageBand on my Mac Book Pro again for composing the music. I didn’t do anything really out of the ordinary. I used the drummer track to lay down a unique beat. I made a couple of melodies, which I alternated and swapped instruments. Sometimes I would slightly modify and mix the melodies to keep the music interesting. The music for the game level is one minute and twenty eight seconds, which I think is the right length for it not to be too repetitive. I did a few quick searches for classic game level songs, and most songs seem to be around 90 seconds to two minutes before they loop.
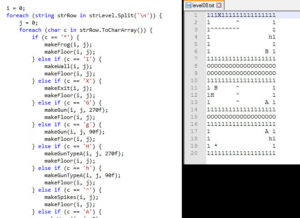
As I did for my last Ludum Dare game, I used text files for storing the level layouts. Each character in the file represents either an object, obstacle, powerup, warp area, exit, or starting position. The text files are assigned to TextAsset objects in Unity, and then parsed in my game code using the Split and ToCharArray methods. The text files are stored in the Resources folder in the Unity project, which makes them accessible to the C# script. One issue was that I had to also encode the direction the guns were facing, because they could face either left or right. Having a gun facing right on the right side of the room would be pointless. Therefore, I used a capital letter if the gun is facing right and a lowercase letter if the gun is facing left. Ideally, the game would have a level editor, which would store the level data more efficiently. However, levels can be created and modified much more quickly by using a text editor, which is a big plus for a two day game jam.
There were some things that could have went more smoothly while developing the game. I forgot that when you call Destroy on an object, it doesn’t actually get destroyed until the next frame. So trying to do a while loop to delete all children objects while the number of children is greater than zero will result in an infinite loop and crash Unity. You would think by now Unity would give the option to break out of an infinite loop without crashing and losing all of your work since your last save. There was actually a way to attach the process to the debugger in the IDE and set a breakpoint and mess around with the variables to get it unstuck, but that method is very convoluted and probably wastes more time than just restarting Unity and losing whatever progress you’ve made. There is an editor script that automatically saves when you press play button that goes in the Editor folder, so I should remember to always add that script when creating a new project.
I didn’t care much for the Ludum Dare 37 theme “One Room”, so I made the story explain that the frog is stuck in one room. When the frog reaches the quantum accelerator artifact, then he is warped to the same room in a different time and dimension, which is why the room changes every time. I actually based the story on the opener from the 90’s television show Quantum Leap. The idea of the room changing each time probably came from my years of playing Castlevania, where it’s the same castle in every game but configured differently for every game.
I have a few ideas on future additions to the game. The bland gray background should be replaced, and it would be nice to have water filling in the empty areas around the blocks. The individual squares could be replaced with lillypads that the frog can walk across. The game could also benefit from more levels. The models and texture maps for some of the obstacles, such as the guns and spikes, could be improved as well.