Joe the Box

Dual Platform

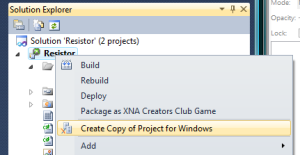
Found an article which provides an example of how to create a project that will run on both XBox and Windows.  It’s fairly simple, because all you need to do is right click the project in the Solution Explorer (the one with the XBox logo icon) and select Create Copy of Project for Windows.  The trick is that if you run Debug (F5) while an XBox is not connected, you will get an error about not being able to connect to the XBox.  Therefore, you just have to use Build Solution (F6) with x86 selected as the platform.  Then using Windows Explorer, dig down to the project > bin > x86 > Debug folder, and the Windows executable should be there.  A shortcut to this folder on the desktop will be helpful.  Of course, a wired USB Microsoft controller is required as the input device for the Windows build.  I’m not sure at this time if there is a simple way to get the project to run in debug mode for Windows.  Using the Windows build should dramatically speed up the development cycle time, because the XBox system does not have to be running and connected.


Moving Joe the Box

After about an hour of programming, I was able to get a simple cursor moving on the game board.  In the game level, I keep track of the current selected cell’s coordinates.  I have eight methods which can be called for the four directions (up, down, left, right) for pressed and released.  I determine if a direction is pressed or released (just on the D-pad for now) by comparing the current Game Pad state with the Game Pad state from the previous call to the update function.  If one of the button states have changed, then I call the appropriate method in the game level class.  Basically, I keep an x velocity and y velocity for the cursor, and those velocities are set when a directional button is pressed.  The actual selected cell value is updated by the velocity value, if the pause value I have defined is zero, then the pause value is set to a constant number of frames before the cursor is moved again.  Without the pause, the cursor will zip across the screen (move one cell for each frame).  If the pause value  is positive, then it will be decremented by one for each frame until it reaches zero again.

I have set a constant (32) for the cell size in pixels, and I set an x-y coordinate for the offset of the game board.  The cursor is just another tile for now, using a blue value for the third parameter when blitting the sprite.   The cursor is offset by the selected row times the cell size and the selected column times the cell size.

The update function also checks to ensure that applying the velocity value to the cursor doesn’t make the new cell value less than zero or greater than the number of rows or columns.  If that happens, then the cursor just retains the old position.  This keeps the selected cell from going off the game board.

[youtube=http://www.youtube.com/watch?v=Mb1B_GImIrs]

Lines aren’t easy

Displaying the Board

The weekend is over, which means I don’t have much time to develop at night due to work.  I tried making a simple grid board using lines, however drawing lines in XNA is much more difficult than in graphic libraries I’ve used before, like OpenGL, AWT, Allegro, and ClanLib.  I was able to find some documentation on how to draw lines in XNA, but I was just really looking for something to draw a simple line from one x,y coordinate to another x,y coordinate.  To avoid this complication, I went ahead and created a simple 32×32 pixel tile, with dark lines on the left and bottom edges.  I repeated this tile for each cell in the grid, which will be used for the game board.  I also created a simple transition from the title screen to the game board screen when the “A” button is pressed on the controller.

Additionally, I need to find a way to easily translate my code from an XBox target build to a Windows target build.  I would much rather do my simple tests under Windows, and just use the XBox for testing major releases and milestones.  Currently, I have two separate projects for building on XBox and on Windows, but it will quickly become a pain to copy source files and resources between the two projects.

Sprite Creation

The sprite images for the resistors and wires have now been created in Gimp.  I will try to convert these to a sprite sheet later for efficiency, but for now I’m just going to leave them a separate images.  Each is a 32×32 pixel image, which should fit perfectly into the board cells.  The wires are 6 pixels in width, and centered horizontally so that it will align correctly when rotated.  I created resistor sprites for 0 through 9, an “I” wire, an “L” wire, and a light (just a circle for now).  Currently, I’m going to make it so that the light can be wired from any side, along with the light output from any side.


Level Design

Finally, I did a little more conceptual level design, which can be seen in the scanned image below.  Each level will be composed of multiple stages.  Once all stages are complete, the player will move to the next level, which will introduce new pieces or gameplay mechanics.

Since this is intended to be a simple game, I won’t actually use the terms “amp”, “electrical current”, or “volt” in the game, but instead just use an lightning bolt icon to represent the units.  For simplicity, voltage, current, and resistance units will all be the same.  This may upset electronics purists, but I don’t want players to be constantly calculating Ohm’s Law in their head while playing  a puzzle game.  If the emitter outputs 5 units and it runs through a 2-resistor, then the output from that resistor will be 3 units.  For now, I will call this nonsensical unit “Elex” and add a warning about the game not being completely scientifically accurate.

Level 1 will start out easy using the lowest resistors, 1 through 3, and only I and L wires.   Later Level 1 stages will have the Elex increased from the power source, and the maximum values for the lights will be increased.  Again, if the player connects the wire to the light with the Elex value higher than this value, then the light will bust and the game is over.  If Elex is lower, then the light will be dimmer based on the current Elex value.  Having greater  luminosity will result in a higher score at the end of the stage.  A perfect bonus will be awarded if all lights are running with the maximum luminosity value.  Additionally, in later Level 1 stages the player will be required to connect two lights instead of one.

Level 2 will continue to increase the types of resistors used, by including one through nine.  Some of the cells may be blocked out to make the player construct more complex paths.

Level 3 will introduce the T wire, which is used for splitting.  The player will be required to manage two active wires concurrently.  Hopefully, I will be able to display the Elex value next to the wire as it fills.  Splitting will cause the unit value to split in half for each path.  Block cells may be used to force the player to use the T wire.

Level 4 will add resistors with two color bands, expanding the resistor values all the way up to 100.  An “expert” or “hard” mode could hide the display of the resistor value on the sprite, requiring the player to calculate the resistor value in their head based on the colors.  Since this is a game just to teach the color values, the third multiplier band and fourth tolerance band will not be used like on actual resistors.

Level 5, if implemented, will include capacitors, but I haven’t thought much about how those will be used in the game.  Somehow they will be used to store electrical units.

I’m on the Big screen

Setting up the Code Repository

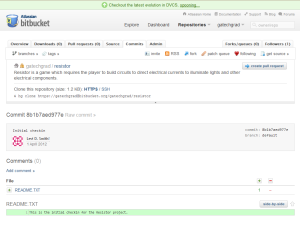
First update made to the Resistor code repository.  We are on our way.  Used Git Bash along with the command given on the BitBucket project page to instantiate the repository clone on my system.  Git Bash provides an interface similar to bash on a UNIX-like system or cygwin, and the local file system can be found in “/C”.

Created a simple README file in my project folder, and added it to the repository by right clicking the file, selecting TortosieHg, and then selecting Add.  Then I selected the main project folder, right clicked, and selected Hg Commit.  This brings up another window where release comments can be entered, then Commit is pressed to update the repository.  Unlike Subversion, the code is not uploaded to the main repository server just yet.  To move the code to the master repository on BitBucket, the folder must be right clicked again, Tortoise Hg selected, then Synchronize.  This will display the TortoiseHg Sync window.  Pressing the Push Outgoing changesets button will cause the changes to be added to the master repository, after entering the BitBucket password of course.

Creating the Project

Created a default XBox 360 (4.0) game project in Visual C# 2010 Express, using the folder I created after cloning the repository as the location.  However, errors were returned when trying to run the project because no device was capable of displaying the executable.  This was not a problem before when developing a Windows game, but I’m assuming that it is an issue now since this project specifically targets the XBox 360 platform.


Used the XNA Game Studio Device Center to add my XBox 360 as an output device.  Gave my XBox 360 the name “Gyromite”.  Unfortunately, it prompted for a connection key, which I didn’t have yet.

Joining XNA Creator’s Club

Went to the XNA Creator’s Club online site to create an account.  Get your credit card ready (ugh!).  Somewhere, RMS is shedding a tear.


For whatever reason, it wants a gamertag to create an account.  I really don’t want to mix my developer profile with my regular gaming profile, so I created the new gamertag GaTechGradDev.  After shelling out a Benjamin to Microsoft, my developer profile was activated.  Next, I downloaded XNA Game Studio Connect to my XBox 360, after downloading and signing in as my new developer profile.  I’m hoping that this will work on my older XBox as well, so I can use it for development and my newer one just for gaming.

Using the XNA Game Studio Connect app, I was able to get the connect key required for  the XNA Game Studio Device Center on my PC to add a new device.  My PC was able to connect to the XBox with no problems after entering the code.


Restarted by development IDE, but the project would still not run.  Figured out that you have to right click on your XBox in the  XNA Game Studio Device Center, then select Set as default XBox 360.  Unsurprisingly, this was not documented as a part of the developer setup on Microsoft’s site.  After that was fixed, I got the Cornflower blue screen (not “of Death”) on my television, which is a good thing.


On the Big Screen

After some aggravation with trying to get transparency to copy from Inkscape to Gimp (I just made the background white and forgot about it), I was able to get the Resistor title screen to display on my television.  Apparently the default resolution for an XBox360 game is 640×480, which I haven’t used since I was programming QBasic on my 386.  I will look into changing that later, but for now here is the title screen in all its glory.