


Developer commentary
(The video distortion clears up around 0:14)
Pause Problem
Noticed a problem that when the direction pad was pressed, sometimes the cursor would not move until the pad was pressed multiple times. Increased the PAUSE_FRAMES to 360 (6 seconds at 60 fps) to make this obvious to help with debugging the problem. The PAUSE_FRAMES constant is the number of frames to wait before moving the cursor again, if the directional button his held down. The pause value should be set back to zero after a direction button is released, because the cursor should be moved immediately when the button is first pressed down. As I mentioned in my previous post, the pause value is necessary to keep the cursor from zipping across the screen (moving one cell for each frame).
Used this article to add text to the game, which allowed me to print out the pause value. Found that I needed to check if the velocity was non-zero before doing the bounds checking for moving the cursor. The velocity should be non-zero if the cursor is moving. An x velocity of -1 means the cursor is moving left and 1 means the cursor is moving right. A y velocity of -1 means the cursor is moving up and -1 means the cursor is moving down. When the pause value hits zero, then the velocities are added to the cursor’s row and column values. The problem was that it was doing the bounds checking even if the velocity was zero, then moving the cursor using a zero velocity value, and then setting the pause value back to the PAUSE_FRAMES value. Therefore, the pause value was continually being set back to the maximum value. Fixing that problem, along with setting the pause value to zero on direction button released got the cursor working properly. Set PAUSE_FRAMES value back to 10, so that it doesn’t wait 6 seconds to move the cursor when a direction button is held down.
Filling the Wires
Added a variable in the GameLevel class to track how many frames to wait until filling the first piece on the board. Also added variables to define the start cell (where the flow begins) and end cell (must be connected to win).
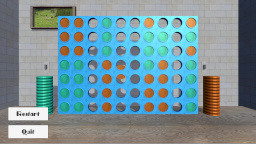
Created new images for filled wires and resistors, which will be overlayed on top of the objects on the game board. Hopefully, I can specify just a portion of the sprite to blit on top of the existing piece, so I can give the appearance of the piece filling, using the piece’s fill value. I made these overlays white, so that I can programmatically change the color using the color parameter of the SpriteBatch draw method. For now, I am just displaying the I-wire as the default piece, and I overlay the I-wire fill using the yellow parameter to designate a filled wire. The starting piece is currently set to row 0 column 5. I could change the starting location for each level, or make the starting location random.

I changed the SpriteFont variable to an array of SpriteFonts, so that multiple fonts can be easily defined and used. Currently, I’m passing the SpriteBatch object, textures (sprite) array, and font array to each object that needs to draw itself. It may have been simpler to just have those defined as public variables (or use getter methods) so that any object that needs to draw can obtain it from the main ResistorGame object. However, then every object that needs to draw would need a reference to the ResistorGame object, so it may be more efficient to just create a GameContent object which holds all of the textures and fonts, which could be passed to each drawable object.
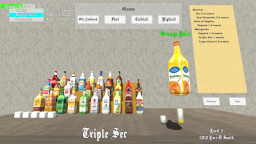
After I got the filling to work for the first piece, I had another decision to make. Once a piece has been filled, should the piece call beginFill on its neighbors? In order to do that, then the current piece would need a reference to all of the adjacent (neighbor) pieces. Alternatively, the GameLevel could check for all pieces that have been filled, and then start filling the neighbors of those pieces. In that case, the GameLevel would need to keep track of the filled/unfilled status of each piece before calling update. That sounded like the simplest solution, so that is the approach that I took. For testing purposes now, a piece will fill all of its neighbors (north, south, east, west). I will start checking for the actual output side variables soon. I created a fillAdjacentPieces method in the GameLevel class, which takes the current piece’s row and column as paramters, and begins filling the adjacent pieces. Each piece now displays its fill value in green and Elex value in blue in the cell. A check has also been added to ensure that a piece is not being added to a cell that is already occupied (not null).

After doing testing with the current setup, the game seemed really fun (to me at least) just laying the wires and seeing them fill. The queue of pieces and rotating may be too complex, since this is supposed to be an educational game. I’m now thinking that the player should just have a generic wire, and the wire will shape and split ifself as needed, based upon its neighbors (adjacent cells). Think of how the roads in SimCity would “fix” their shape based on the layout of the road peices, so that the player didn’t have to worry about using curve or intersection pieces of road. Just giving the player the ability to cycle through a wire and the available resistors may be the best way to implement this. If it seems too simple in the end, then I can always add a piece queue or rotation after. The action button or shoulder button can be used for selecting the component to place.
http://www.youtube.com/watch?v=l-ajnAkYNBo
Changing Wire Images
Decided that the GameLevel class should determine the wire image to use for each piece, since it can find the adjacent cells for a specified cell. Created wire images for each case. I can rotate the I, T, and L wire images later for efficiency if needed, but for now each rotation is a separate image. Created methods for accessing the piece to the north, south, east, and west of a specified cell, which handles all of the array bounds checking. Using those methods, I created a method for returning the image ID that should be used for the piece at a specified cell based on the adjacent pieces. This image ID is passed to the draw method of the piece. Therefore, a piece never knows its image ID value because it is derived each time the board is drawn. I did this because there are too many cases to handle to keep track of the adjacent cells in the GamePiece objects themselves. I changed the color of the wire sprites to white, that way I could make them any color (including black) eliminating the need for separate filled and unfilled sprites.

Go With the Flow
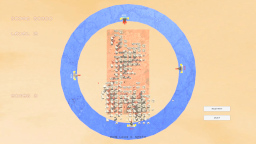
Below are flowcharts illustrating the main state transitions in the game.

The following flow chart shows the transitions in the main game loop.

Mobile Version
Due to the simplicity of the game, it may make a good mobile game. I know I have more than enough screen real estate just at 640×480. I’m not sure how difficult it would be to port the code to Andriod or iOS. I know there is the capability to build a Windows Phone 7 app from the Visual C# Express IDE.
More GamePad Tweaks
Added code to handle the Start button press on the title screen, which currently just transitions to the game loop, just as the confirm button does. I created a simple test on the title screen to display the X value of the left thumbstick. This told me that it registers a float value between -1.0 and 0 when pressing the stick left, and between 0 and 1.0 when pressing the stick right. I pressed the stick about half way left, and it displayed a value close to -0.5. Therefore, I’m going to use 0.5 as a threshold for registering a directional press. I know some of my older controllers will register a move when the stick is not moved, just because the controller is old. When that happens, the controller is probably reporting a very small value (like 0.00001), but the game sees that as a non-zero value and will move whatever object is being controlled. That’s why I believe there needs to be some threshold value defined, and not create an action until that threshold is passed. Noticed that the Y axis is inverted from the standard screen coordinate system, so that pressing up on the stick actually returns a positive value and pressing down returns a negative value.


