
The latest updates and documentation can be found on the Unity Build Tool wiki page.
One of the biggest problems with having 59 Unity projects is keeping them all up to date. I knew many of my Unity projects were out of date and needed to be updated to the latest version of Unity, but I didn’t have a good method for detecting which ones. I had previously developed build and upload scripts in Ruby to create Windows BAT files to compile a project for Windows, MacOS and Linux and upload those builds to Itchio using Butler. However, those BAT files could not make Unity WebGL builds.
The Unity Version Tool that I developed solves these problems. It was developed in Ruby using the GTK+3 graphical libraries.
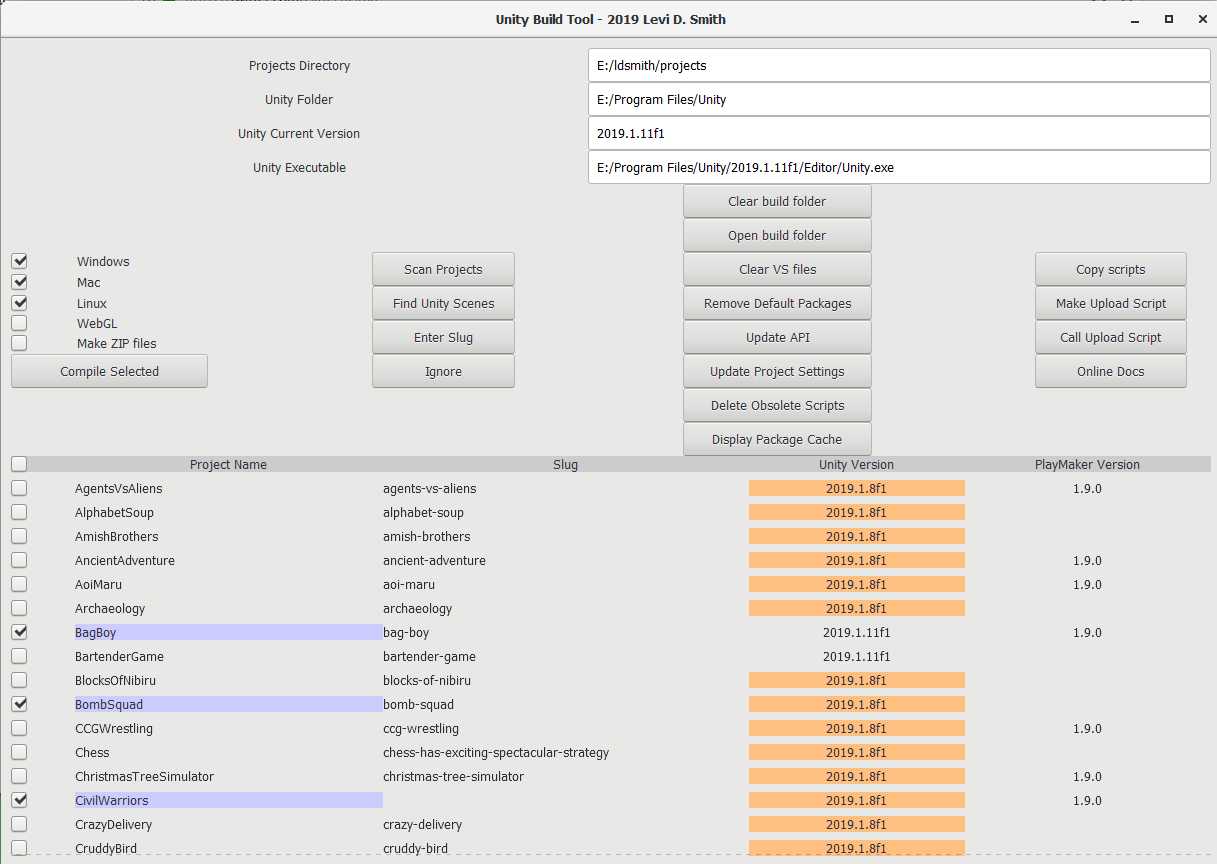
- Pressing Scan Projects will check all subfolders in the specified project directory for Unity projects.
- If a project does not match the current version of Unity or PlayMaker, then the project will be highlighted in red. Default version values can be set in the unity_version.config file. The version number of the project is checked from ProjectSettings/ProjectVersion.txt and files ending with the .csproj extension.
- Pressing Update Version will attempt to read the current version of Unity installed on the system (<User Profile>/AppData/Local/Unity/Editor/Editor.log) and store it in the unity_version.config file. The PlayMaker version information is read from Assets/PlayMaker/Editor/PlayMakerWelcomeWindow.cs.
- Individual projects can be selected by checking the boxes next to the project names, or all projects can be selected or deselected using the checkbox in the header row.
- Builds for the selected projects can be compiled for Windows, MacOS, Linux, or WebGL.
- WebGL builds require a script to be generated from the included template, which is embedded into the project for compilation, since there is not a Unity command line option for making WebGL builds. It uses the “-executeMethod” command line parameter to execute project script.
- All builds for a project can be deleted by pressing Clear build folder.
- By default, the Unity editor will start on compilation. I may add “-batchmode” as an option in the future to compile without starting the Unity editor, but I’ve noticed issues lately with using the “-batchmode” Unity parameter. If a project is compiled and it is not using the latest version, then Unity will prompt to update the project. Therefore, it is advisable to update the projects (which are highlighted in red) by opening them before selecting the compile option.
- Note that while updating the Unity project to the latest version, there may be multiple .csproj files that still return an old version of Unity. I’ve found that the .csproj files (such as Assembly-CSharp.csproj, Assembly-CSharp-Editor.csproj, and <project>.csproj) can be safely deleted in most cases, and Unity should create new versions of those files the next time a script is accessed in the Unity editor. Hopefully, I will add an option to remove old .csproj files.
- After updating a Unity project, it may be necessary to make a change (such as moving a GameObject in the Hierarchy and moving it back) in order for the ProjectSettings/ProjectVersion.txt to be updated. I don’t know if there are any drawbacks to manually updating the version number in that file, so I wouldn’t advise doing it.
Using this tool, it is possible to compile multiple project for a selected platform at once. This is a process that had previously taken me hours or days for WebGL projects, since each project would need to be opened, updated, platform setting changed, and then compiled. It still takes a long time, but at least now I can kick it off before going to bed and just let it run.
Download the Unity Version Tool (Ruby and GTK+3 required to be installed on system, which is not included)