Home Stretch

Small Glitch

Fixed an issue that actually only occurs on one frame of the fill animation.  This happens when a wire goes to the “filled” state, but the neighbor wires have not yet begun filling.  Since the wire is filled, it doesn’t make any connections to neighbors that don’t have the same flow value.  Since the neighbor doesn’t have a flow value initialized yet (assuming it is defaulted to zero), it’s flow value doesn’t not match the flow value of the wire that just completed filling, therefore it will not be connected.  However, on the next frame the empty wire will begin filling, using  the flow value of the filled wire which will make it connected again.  This flicker was quick, but it was noticeable.  Therefore, I added special checks for this case, and made the wires connected in this one frame case.

The Night the Music Died

Used the Pause method on the MediaPlayer to pause the music when the pause screen is active.  Unfortunately, there is no MediaPlayer property to determine if the music is paused, so I had to create a new variable to track if the music was paused.  I simply want to resume if the GameLevelScreen is coming from the pause state, but I want it to start playing anew if it is coming from the title screen or level select.  Also had to set this pause variable to false if the user quit from the pause menu to the main menu, otherwise it would still think that the music just needs to be resumed.  When that happened, it would try to Resume the title screen music when the level started.  The title screen music would just continue to play during the level, and the level music would never start.

Centering Text

Overloaded the drawRaisedString method, so that it now takes six arguments with the last being a boolean signifying if the text should be horizontally centered at the point passed as a parameter.  The drawing code is now in the six parameter method, and the five parameter method of the same name just calls the six parameter method with the boolean set to false.  This will keep me from having to change every line of code in the game that uses the drawRaisedString method.  Plus, I just add “true” as an extra parameter for the text that does need to be centered.

Background Colors

Fixed the background colors for level 4 (yellow) and 5 (green) so those aren’t so bright.  Also created a standard method in the LevelDefinition class that returns the background color, since that color was previously being determined in two different locations.  Updated those locations to use this new standard method.

Added columns of stars in the background which scroll if the player achieves the star rank (S Rank in all three categories at once).  Stars in the even number columns scroll in the opposite direction of the stars in the odd number columns.  I used Inkscape to make the stars since there was no easy way to make a star shape in Gimp.  Then, I just took a screenshot (PrintScreen button) and pasted into Gimp, because copy-and-paste from InkScape to Gimp doesn’t work.  I then used the fuzzy select tool to select the star, set the selected star region to white, inverted the select and set the remaining to transparent (after adding transparency to the layer).


One thing that I do like about C Sharp is that after some research, I found that structures (such as Vector2) can be passed by either value or reference.  At first I found it passed by value, when I tried to pass my star position to the getStarPosition method, but it left the position at the original value after the method completed.  Then I found that just using the ref keyword in the method parameter list and in the method call will make it pass the Vector2 by reference, which allows the method to modify the original Vector2 passed to the method.  This was necessary for me to make a trailing star effect, for the blinking stars that circle the results.  After trying a few different things, I thought the best look was two groups of three stars that circled the result screen.  Also, the yellow alternates between the three stars in each group.

More Effects

I also added a glow effect, so that the wire transitioned from yellow to white (four different shades) every 15 frames.  I didn’t like how it looked, so I just set it back to solid yellow.

Using the sprite scale parameter, I was able to make a light layover expand inside of the LED circle.  This gives the appearance that the LED is filling up.  The default color for an LED was set to light gray (previously white) to give a better contrast between the expanding yellow inner circle sprite and the rest of the LED sprite.

More Visual Effects

Crown Jewel

The one effect that I’ve neglected which I envisioned from the beginning was the actual filling animation of an individual wire in a cell.  I should be able to do this now, since I now know how to use a Rectangle object to determine which portion of the sprite to draw.  Filling just straight wires is not a problem, but it becomes more complex if a wire has bends or has intersections.  This effect should be able to be achieved  by first filling a small area from the origin side, then expanding outward in all three directions after the fill has moved passed the halfway point.  This should be similar to how I expand the overlay on the piece cooldown, except it will expand in three directions after it reaches the halfway point.

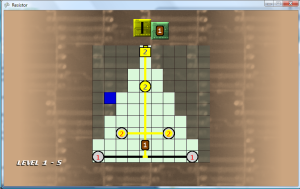
I did go back and add the “coming from” variable to determine the flow direction.  Also, I had to use the draw method which takes two Rectangle parameters, the source Rectangle and the destination Rectangle.  Using only one Rectangle will make the sprite stretch, but with two Rectangles I was able to achieve the clipping effect.  This clipping effect is what I needed to display the gradually filling wire in the cell.  Using the default tile was a good way to test the clipping, since it fills the entire cell.  This way I was able to determine exactly which regions are being clipped.  After I got it working correctly, I replaced it with the real wire image.  I’ll admit, I did hardcode the wire offset constant value and the halfway point constant.  Technically, those values probably could have been derived from the cell size, but that would have made things way too complicated, with nothing to show for it.  Additionally, I removed the dark yellow color of the filling wire, since it now has the visual animation of it filling.  The wires now truly look like they are continually filling, but unfortunately I can’t capture that in a screenshot, so this development image and these handwritten notes (click to enlarge) will have to do for now.


Scrolling Background

Looked at some other puzzle games, and I noticed that most had scrolling for animated backgrounds.  I thought this would be distracting at first, but I guess if the scrolling is slow enough it isn’t so bad.  Plus, it makes the screen seem more “alive”.

However when I implemented this, the background jumped from the game level screen to the game win screen, since the game win screen didn’t have the scroll offset value.  I made a few methods to allow the background scroll offset to be passed to the game win screen, and then back to the game level screen.  I didn’t have the offset value changing in the update method in game win screen, which made the scrolling stop on the game win screen.  I thought that this was okay, because there is already a lot going on with the rank values displaying.  The offset is passed back to the game level screen, which is a new instance of the object.  That is another issue that I may need to address later, if memory or performance becomes a factor.  When the game transitions from the game win screen back to the game level screen, it picks up at the same scroll value, so there doesn’t appear to be any jumping in the background scroll animation.

Overall, this gives a feeling of continuity between all of the stages in a level.  Then there is a visible shift (scrolling in the opposite direction) once the user moves on to the next level (completes stage N-10).

Simple Change Casues Larger Problem

 Pause Problem

Added a pause screen to the game, which I thought was going to be a simple change.  I created a new class that extended the Screen class, implemented the draw and confirm button methods, so that it just returns back to the game when the confirm button is pressed.  However, when the level ends it uses the time that the level was finished minus the time that the level was started to get the value for the time rank category.  With the pause screen implemented, the time calculation for rank does not exclude the time while the game was paused.  Therefore, I will have to come up with some method of tracking the time when the game was paused, and subtracting that off the game time.  Alternatively, I could re-write all the time based code and just keep a variable that tracks the number of updates in the game level screen since the level was started (since the updates on the level screen won’t be called while the pause screen is active).  I think it is too late for that, plus it depends that each update is really 1/60th of a second which may not be the case, so I’ll just have to keep track of the amount of time that the game was paused, and pass that value to the game level screen class after the pause is complete so it can be subtracted off the total time.  What a pain.

I also had to create a new variable in the main update loop to track the previous screen, because coming from every other state (title screen, level select, game win, game over), going to the GAMELOOP state just required the game level screen to be loaded and set to active.  However, I do not want the level to be loaded if the user is just continuing from a pause.

I created a new method in the PauseScreen class which returns the total time (in milliseconds) spent on the pause screen.  This value is then passed to the addPauseTime method that I created in the GameLevelScreen.  One positive thing from doing this is that I found that the total time was being derived in multiple locations in the GameLevelScreen class.  Therefore, I removed that extra code and then used my getTime method in its place.  I just had to subtract off the pause time, which is now stored in an instance variable.

Added two options “Resume” and “Quit” to the pause screen.  Resume goes back to the level screen and quit goes back to the main menu.  This may be a little misleading, if the player expects quit to completely close the game.  I may have to think about rewording that later.  I was able to reuse much of the display and logic code from my delete records screen.  Also, I was finally able to remove the Back button control from the level select screen, since the player can now exit to the title screen from the pause menu.

Added Effects

Made minor tweaks to the delete records subscreen, to correctly place the selector image.

Also updated the drawPieceSelection method in the GameLevelScreen to give more spacing between the selectable pieces.  Created a new background image for the selectable pieces, using another portion of one of my computer card photos.  By default, the background image uses green as the color parameter, but if it is the selected piece, then it uses yellow and is vertically offset by 8 pixels.  This gives the player a color based and location based change to signify the currently selected piece.

Other Updates

Removed the ability to select Quit on the main menu by pressing the Back button, and changed it to the Cancel button.  Now, the only function that the Back button serves is to delete the records.  I think having this rarely used button only assigned to a critical function is good.  This way, the user won’t get confused between the roles of the Back button and the Cancel button.  This also re-enforces the concept that the Cancel button (and only that button) backs out of a menu.

Added spoon sound effect when moving between levels on the level select screen.  Added the plop sound effect when the user select a level on the level select screen.

I tried putting the star graphic for the star rank in multiple places on the game win screen.  First I placed it at the bottom of the ranks, but it looked like it could have been just for the time rank.  Then I put it under the “Complete” text, but it looked odd there as well.  It also didn’t look very good to the right of the “Complete” text.  Since I didn’t like how it looked in any of those places, I decided to put two stars on the screen which circle around the text in a rectangular pattern.  It also gives more liveliness to a pretty much “dead” screen.

The Game Over screen has also be updated to use the improved graphics, basically by copying most of the code from the pause screen.  It’s easy to forget about updating the Game Over screen, since I actually rarely ever see it.

Found that I could use the Rectangle object in place of the Vector2 object to place a sprite on the  screen as well as size it.  This is perfect for my cooldown overlay, which makes the cooldown overlay size proportional to the cooldown duration left.  That means that overlay shrinks (from bottom to top) as the cooldown period continues.  I’m not sure if the Rectangle scales or crops the sprite, since I’m just using a white block with a black transparent color as the overlay.  This may be sometime I look into if I try to get the animated flow working.

Added 10 more levels to the game, bringing the current total to 60 levels.

Week 6 update video.