Comes Full Circle

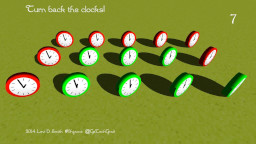
Back Where We Started

After almost two months of development, I’m back to doing what I started on the first days of development which is updating the sprite graphics.  Updated all of the wire graphics, so now those are filled with light gray (#e0e0e0) with white (#ffffff) and black (#000000) around the edges.  It seems to make the wires stand out a lot better.  Unfortunately, since the shading is on specific sides of the sprites, I can’t do the quick flip/rotate trick that I used when first creating these sprites.  However, Gimp provides the ability to zoom to make the pixels really large, which makes adding the outlines rather easy.  Just tedious.  It should just display as a slightly darker shade of yellow, since Yellow is used as the color parameter of the draw method.  Thought about adding an option to allow the player to select their flow color, but it’s too late to add that now.  Maybe a new flow color will be the reward for completing all of the stages.


While I was making graphics, I went ahead and replaced the GameThumbnail.png and Game.ico graphics.  I modified the resistor image with four connections, and replaced the number with just the letter R.  The size for the GameThumbnail was 64×64 pixels, which I believe is used for the dashboard.  The graphic I created is simple, but it does the job.  The Game.ico I believe is only used for when it is running under Windows, and maybe under the XBox system menu.


You’re on Trial

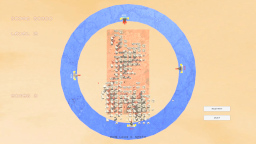
Made a trail screen in the game, which subclasses the basic Screen class.  It was a little frustrating to test this, since the game is not in trial mode as I am developing it.  There is a Guide.SimulateTrialMode value that can be set to make the game run in trial mode for testing.  Or I can run the game as trial mode from My Game list, but the game has to be deployed from Xbox Studio Connect first.

Copied a lot of code from the Pause screen to implement two selections, “Buy” and “Back to Title”.  Choosing “Buy” will call the Guide.ShowMarketplace method.  This doesn’t actually purchase the game, but instead takes the player to a standard XBox screen where they can purchase the game.

Added a check in the update method of the trial screen to see if the game has been purchased.  If it has been purchased, then it displays the “Thank you” message and removes the buy option from the screen (leaving only the “Return to Title” option).  From there, the player will have to use level select to pick up at the last level they were playing, because it’s too late now to rework the code for an event that will just happen once for each player.  Ideally, I would have a “Continue” option from the main menu, but I wanted to keep the main menu simple.  Having to find the last level played in the level select screen is the “price” the user has to pay in time for having the simple menu.

Added my cheesy Indie game “song” into the trial screen.  I had to work it in somewhere.


Other Fixes

Had to add a special case to fix the level 10 LED (piece ID 30), just as I had to do with the level 10 battery.  Made comments in the code that these should be optimized later.

Added code to center the numeric text of the batteries and LEDs, since the “10” value was displaying near the edge  of the battery and LED.

Maybe it’s just me, but the scrolling background for the game level screen on the XBox seems choppy.  It doesn’t do this for the PC version.  Not sure if that is fixable, or if it’s just my eyes playing tricks on me from looking at monitors too long.  The scrolling background for the title screen doesn’t look this way either.  I may have to re-evaluate some of the code that I used for the slow scroll method.  Alternatively, I could just set the level select background to scroll one pixel per update, just like the title screen does.

Noticed a problem when the level ends and tries to save.  If the Guide is already open, then the game will crash, because the file save operation uses the BeginShowSelector method which conflicts with the Gudie.  To fix this rare scenario, I think I can just pause the game when Game.IsActive is false which is suggested by this article.  This only happens if the player draws the connections to complete the level, and then presses the Guide button before the level is complete, which will cause the level to complete while the Guide is open.

Week 7 Video Update

Level Editing Done

Finished the last ten stages of the game, which use the 10 battery with a maximum resistor of 9.  Went back and fixed the level design issues that I found during playtesting yesterday.  I still need to set the rank values for the last 30 stages.

The level 10 battery caused an issue, because it used block ID “20” in the array.  However, I had defined everything between 20 and 29 as LEDs.  I modified the battery range to use IDs 10 through 20, but the battery showed up as 0, because I was using modulo (%) 10 to get the battery value.  I went ahead and just wrote a special case for this to fix it for now.

Trailer Video Remake

I wasn’t happy with the audio in the trailer video, so I recaptured and re-edited the audio tonight.  However, I kept most of the video clips and edits made last night.  I don’t want to spoil my cheesy indie game song, so I’m keeping it under wraps until the contest is over.

Short Update video

Play it Again Sam

Wrapping Up Level Design

Created 20 new levels, which use the 7 and 8 resistors.  Now I have a total of 80 levels.  If each level takes 30 seconds to play, then it would make the total time to play through all the levels 40 minutes.  This is not counting the replay time, which I’m sure some people will want to do to get the best ranks in all the levels.

While playtesting, I noticed a few issues with some of the levels that I have noted:

Level 7-5:  The 6 LEDs block the 8 LEDs, so the maximum luminosity can never be achieved.  Either remove the 6 LEDs, lower the 8  LEDs to 6 or below, or add tiles to make the 8 LEDs accessible without connecting to the 6 LEDs.

Level 7-8:  There is no way to activate the 1 LEDs without first lowering the 6 LEDs and 4 LEDs to one.  Again, this makes it impossible to get the maximum luminosity.

Level 7-9:  There is no way to activate the 5 LED without lowering it to four.

Level 8-2:  Accidentally added 8 and 1 batteries, when I intended for those to be LEDs.


Scales of Difficulty

I still feel like there needs to be something extra in the game.  I did have the idea to add capacitors, encoders, and logic gates, but it is too late now to make major changes in the game engine.  Those will have to wait for Resistor 2.  If I make any changes to the engine (even just moving the starting location of the cursor), then I will have to recalculate the time ranks for all of the stages, which is something I don’t want to do.  I think this is the right level of difficulty to reach the largest player base.  Most players probably make up their mind in about 10 seconds of first starting a game on whether or not the game is too difficult to play.  If the game isn’t easy to pick up, people will put the game in the “too hard” pile in their minds and give up on it.  On the other hand, I don’t want a game that is so easy that players will get bored with it.  This is definitely a delicate scale to balance, and that scale is different for each person.  I would rather error on the side of being too easy, because players may go ahead and play through the boring parts to see if there is something better coming.  If the game is too hard, then people will drop it and never play again.  However, there is a niche out there for very difficult games (Super Meat Boy, I Want to be the Guy), but that is only a very limited number of players compared to the overall pool of game players in the world.

Replay Option Added

One of the things that frustrated me while I was playtesting the game, was that if I did not get the best ranks on a stage then it would automatically send me to the next stage.  I really wanted to play the same stage again, so I could get the best ranks.  This made me have to quit, go back to the level select screen, and then scroll all the way back down to the level I was playing.  This was very aggravating, so on the GameWinScreen I added two options, “Replay” and “Next”.  Next is default, so the player still only has to press the confirm button to move to the next stage.  Pressing left will select “Replay”, which will just load the current stage again, so that the player can try to get better ranks.  These options don’t appear until the game win pause has expired (after all of the ranks have displayed).

This also sheds light on another problem, that on the Level Select screen it can take quite a while to scroll down to the later levels.  In a way, this is a good thing that there are so many levels to display, it takes some time to get to the bottom.  This reminds me of the game “You Don’t Know Jack” for the XBox 360, which had over 70 total episodes, so it took forever to select one of the later levels.  What I really need to do is have the trigger or bumper buttons jump up or down 10 levels on the level select screen.  The benefit of this is minimal, so I probably won’t take the time to implement that feature now.

Menu Backgrounds

Spent some time touching up the menu selector graphics.  This can really be a time drain, because I can spend hours on the graphics and it still not look perfect to me.   One reason I really don’t like doing graphics is because there is no right or wrong answer.  There’s just people’s preferences, which will be different for each person.  Added the bevel effect for all selectors.  I changed the main menu selector to a box, but I wasn’t happy with the color of the selector.  If it’s too light, then you can’t read the menu text.  If it’s too dark, then it contrasts too much with the rest of the screen, drawing attention away from the title graphics.  Fortunately, I can change the color programmatically, so I don’t have to change the graphic each time in Gimp.  Just as I was about to give up, I used a less saturated shade of green (selected from the scrolling background image), which looks fairly good as the selector color.


I went ahead and changed the font color for the 5 resistor to black, because white was a little hard to see.  Currently, only the 4, 5, and 9 resistors have black text.

Trailer Video

In order to submit this game to the contest, I have to submit a trailer video.  Therefore, I took a shot at making my first trailer video with its own cheesy indie game song.


Blog Cleanup

Went through all the posts in this blog and added categories, so that all of the posts related to Graphics, Engine, Game Saves, Level Design, and Audio can be quickly displayed and accessed.  A Video Update category was also added, to easily display all posts with video content.  Casual and Technical categories were added, so that the casual audience can view  posts targeted towards them.