
Civil Warriors Developer Commentary
Civil Warriors Screenshots
Civil Warriors Developer Log
 This is a step by step listing of my thought process when creating the Civil Warriors game for the Mini LD #61 event. Civil Warriors is a turned based strategy game based on a popular world conquest board game. Before starting in Unity, I created a text based game written in Ruby to work out the basic flow of the game and define the basic data structures. The text based game also gives me a really good blueprint for coding the flow of the game, which can get confusing when dealing with game objects in the 3D world.
First I created the new Unity project for my new Civil Warriors game. Under Assets in the Project window, a new folder called Models was created.
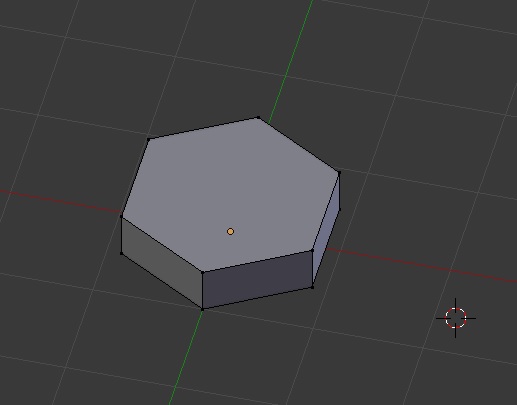 Then I created the object that will represent a cell in Blender. For my game, I chose a hexagon, which was created by adding a circle mesh, setting the number of vertices to six using the mesh properties (F6 key). Then I extruded upward about a fourth of a unit upward on the Z axis. Then I selected the top and bottom vertices, and filled the faces (f key). I saved my new mesh to the Assets/Models folder in the Unity project.
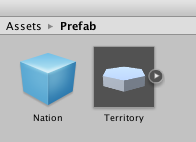 Next, I created new empty GameObjects for Territory and Nation and set their transform position to (0, 0, 0). A nation is basically contains all of the information about a player and their resources. A Territory is one of the divisions that the players try to acquire by attacking the other player. In my game, Territories are historic Civil War battlefields and not actual states in the country. I created a new folder in the Project window called Prefab. I dragged the new Territory and Nation objects one at a time to the Prefab folder.
I dragged the cell model from the Project window over to the Territory GameObject in the Hierarchy window so that it is parented to the Territory. The cell now appeared the the Game view. I selected the Territory parent game object and press the Apply button in the inspector.
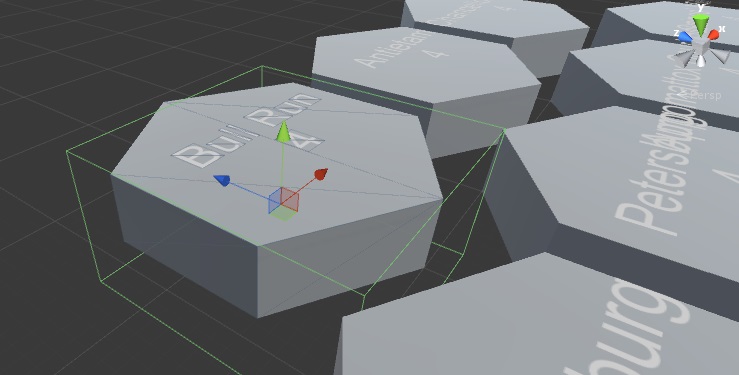
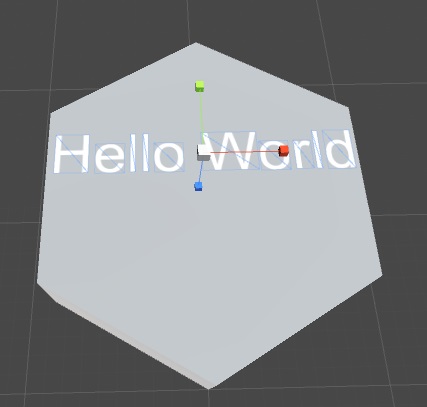 I selected the Territory GameObject in the Hierarchy window, and right clicked and selected 3D object and createed a 3D Text. I renamed the New Text object to NameText. Under the Text Mesh properties in the Inspector, I set the Anchor to Lower Center and set the font size to 64. I used the scale tool to scale the NameText object to around 0.05 on all three axes. Clicking the white cube where the axis arrows intersect will allow scaling on all three axes at the same time. I used the translate tool to position the text over the cell model and rotate the text 90 degrees on the X axis. I selected the parent Territory GameObject in the Hierarchy window and press the Apply button.
I created a new folder under Assets in the Project window called Resources. I created four text files called borders.txt, nations.txt, setup.txt, and territories.txt. The borders.txt files contains a listing of the border indexes of each of the cells. The nations.txt contains the names of the player countries along with an abbreviation. The setup.txt contains a 0 or 1 for each index signifying the initial controlling nation of each cell. The territories.txt file has a listing of all of the names of each of cells. For my game, I am using Civil War battlefields. I dragged these four text files (ensuring that each had a “txt” extension) from Windows Explorer to the Resources folder in Unity.
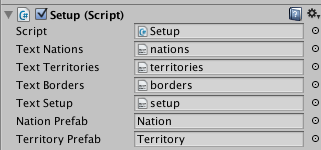 In the Project window, I created a new folder called Scripts. In the Scripts folder, I selected Create and C# script and entered “Setup” as the name. Double clicking the Setup script brings up the MonoDevelop interface. In the script, I defined four TextAsset GameObjects, one for each text file in the Resources folder. A new empty GameObject called Scripts was created and added to the Heirarchy. Then, another empty GameObject called SetupScript was created as a child, which the Setup script is assigned as a component. Now, each of the text files in the Resources are dragged over to each of the fields in the Setup script properties.
In the Setup script two instance variables were also added for the Nation and Territory prefabs. Those two objects were assigned to the script as well by dragging them from the prefab folder to the script fields in the Inspector. It is important to remember that the script must be saved in the MonoDevelop editor before the new fields will display in the Inspector.
The text property contains all of the text in the file that is linked to the TextAsset. The nation text data is parsed by using the Split operator with the newline parameter (‘n’) and assigning to a string array. Each element of that array is iterated over and those lines are Split using a comma parameter. A new Nation GameObject is instantiated and assigned to a GameObject. A new Nation script is created and assigned to the Nation GameObject in the Hierarchy window (remembering to press the Apply button in the Inspector to insure that the script is also applied to the Prefab version).
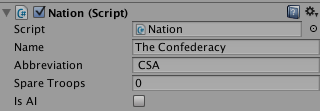 The Nation class has for public instance variables, which hold the nation’s name, abbreviation, the number of spare troops, and whether is nation is controlled by artificial intelligence (AI). When the Nation prefab is instantiated, the Nation class is accessed by calling the GetComponent method on the returned object from Instantiate (casted as a GameObject) and then assigned to a new Nation local variable. Using that local variable, the instance variables can be assigned. The name and abbreviation are pulled from the nations.txt file, spare troops are set to zero, and the AI flag is set to true for the first nation and false for the second nation.
A similar approach is taken for a Territory. A Territory class is defined in a Territory script, which is assigned to the Territory GameObject and applied to the prefab. The Territory class has instance variables for the name, the border territories, the number of troops, and the controlled nation. I created a method on the Territory class called setName, which set the string on the name instance variable and updates the 3DText associated with that instance to display the name. To get the child NameText object of the Territory, I used transform.Find(“NameText”).gameObject which can be casted as a GameObject and stored in a variable. Then the TextMesh can be obtained using the GetComponent method and passing “TextMesh” as a parameter. Then the text can be easily changed by assigning the associated territory name to the text property of the TextMesh.
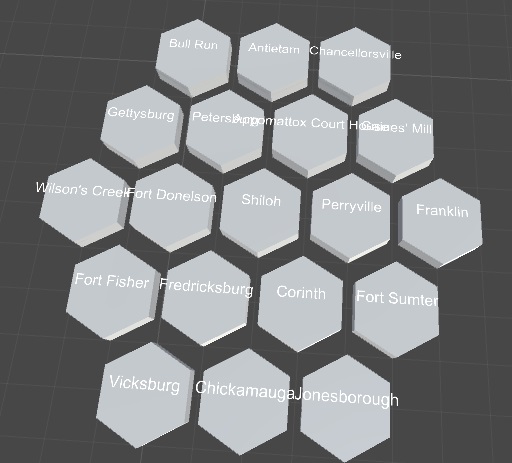 Since I am using a hexagon layout for now, I keep a counter when displaying the Territory cells. A Vector3 is set containing the cell’s position and assigned to the transform.position property. I keep x and z float values and adjust accordingly based on the counter and row. There’s probably some magical mathematical formula that could position my tiles in a one liner, but I didn’t feel like wasting the time and brain cells trying to figure it out. Therefore I just set the x and z positions manually for each index which starts a new row of cells.
While the game was running in the Unity editor, I moved in the Scene view to a position where I could view all of the tiles. Then I selected the Main Camera and chose Move to View and Align with View in the GameObject menu. This will move the camera to the same position and view as the Scene window. Before stopping the game, I selected Copy Component in the camera’s Inspector in the Transform box. This is done to retain the settings after stopping the debugger. When the player is stopped, the camera will return to the original position. However, you can press the gear icon again in the Transform box and Paste Component Values to move the camera back to where it was previously set.
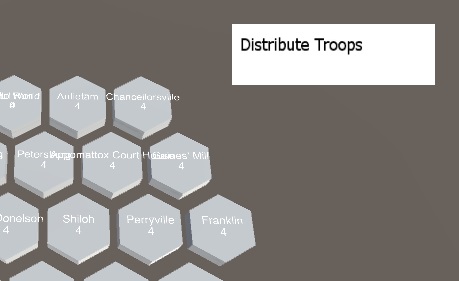
Next I focused on the changeable territory properties. On my Territory GameObject, I duplicated the NameText child and renamed the duplicate to TroopText. Using the green translate arrow, I moved it slightly below the name. Again, pressing Apply in the Inspector is necessary to apply the new text to the prefab. In the Update method in the Territory class, I used the same method as previously done for getting a reference to the TroopText object, and I set the text using string.Format and passing the troop number as a parameter. It is important to note that any values set when the Territory object is instantiated will be overwritten by any values set in the Start method of the Territory class.
Now buttons need to be added so that the player can actually do something. I added a new empty GameObject called Buttons. It is very important to ensure that the position is set to (0, 0, 0), otherwise it will affect all of the child buttons that are created. Then I added an empty child GameObject called DistributeTroopsButton. On that Object, I added a GUITexture Component which can be found under the Rendering category. I used Gimp to create a simple 256×64 box that displays “Distribute Troops” and then exported to PNG format and saved in a new folder that I created called “Textures” in under the Assets folder. Then I selected that texture as the Texture property in the Inspector for the button, and scaled the positioned the button appropriately. Moving my mouse over the “X / Y / Z” labels and dragging left and right is the easiest way to fine tune the size and position of the button.
 Next, I created a new Script to handle clicks on the button. Usually, I would use Playmaker addon to handle stuff like this. However, I wanted to write this guide without using Playmaker. I went ahead and created a folder within Scripts specifically for Buttons, and added the new DistributeTroopsButton script there. In the Update method, the Input.GetMouseButtonDown(0) method is used to detect if the mouse (or touch on mobile devices) has clicked on the button. Note that the GetMouseButton (without “Down”) will continually return true while the mouse button is held down. Of course, I assigned the new script to the button GameObject for it to work. Unfortunately, this returns true if the player clicks anywhere. Therefore, I had to add the OnMouseDown method to the class, which is invoked whenever the player just clicks that object.
 The next part is where Playmaker becomes really helpful. After clicking the Distribute Troops button, the game moves to a state where it is expecting the user to select one of the cells. I created a LevelManager game object with an associated LevelManager script. It will handle between moving all of the various states in the game. I am basically taking the same approach as my text based console game when moving between the various states. The default state is MAINMENU. When the Distribute Troops button is pressed, it transitions to the DISTRIBUTETROOPS state. I added an OnMouseDown method to the Territory GameObject. In order to get the clicks to register, I had to add a Box Collider component to the Territory and size it appropriately, and again pressing Apply in the Inspector to update the Territory prefab.
In the OnMouseDown method in the Territory class, it checks to see if the LevelManager is in the DISTRIBUTETROOPS state. I get a reference to the LevelManager using the GameObject.Find(“LevelManager”) method. If it is in the correct state, then the troop value is increased by one. However, this allows the player to assign an infinite number of troops to any territory. To fix this, I added a current player instance variable to the LevelManager. Then I added a check to verify that the controlledNation instance variable matches the same value as the current player.
In the Setup script, I had to go back and add the code to assign the initial controlled nation to each of the territories. I tagged my Territory GameObject with the “territory” tag, and then return all of the Territories using FindGameObjectsWithTag(“territory”). It appears that the Territories are always returned in the same order that I instantiated them. I need to verify if that is always true, and if it is not, then I would probably need to assign an ID instance variable to the Territory class, and then loop through until I matched the correct ID. It is also important to ensure that there are no blank lines at the end of the data file, otherwise it will appear as a null valued nation that is out of bounds of the array of Territory GameObjects.
It is also very important to remember to periodically save the Scene, which is basically the game level and everything it contains. I created a new folder in the project called Scenes and saved my single scene as “game” which gets automatically assigned a “.unity” extension. Usually in my games, I have three scenes. One scene for the title screen, one scene for the game, and one scene for the game over screen. The levels of my games are usually just different configurations within the game scene. If a unique scene was used for each level, then all of the game objects would need to be added and placed specifically for that level, however I usually find it easier to programmatically place game objects especially for procedurally generated levels or levels that are defined by an external configuration file.
 In the LevelManager class, I create a constant for each state in the game. A Global class was also create which has the current player number defined as a static integer variable. I also added two GUI Text objects to the game screen which display the value for the current player and current state. To make things simpler, I moved the current state variable to the Globals class as a static variable and move the state constants to the Global class as well. This way, any class is able to access the current state and current player directly from the Global class.
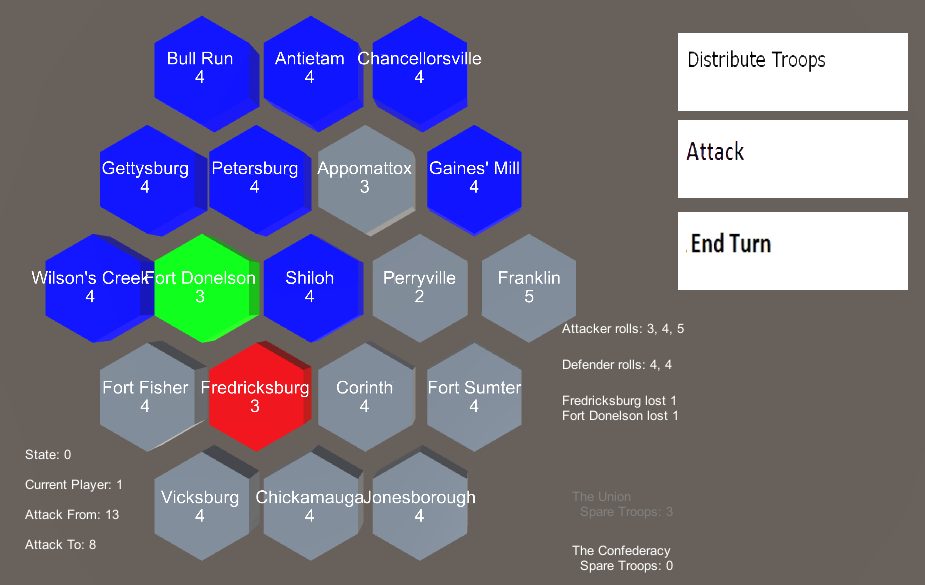
I created two new images to be the buttons for Attack and End Turn. I made these simplistic for now, but I plan to go back and improve the look of the buttons later. I also create a GUI Text which displays the statistics such as spare troops for each nation. In the Global class, I added a method called getCurrentNation, which handles all of the searching and casting of the instance of the Nation class that represents the current player.
 To change the color of the cell models, I got a reference to the Renderer using GetComponent<Renderer>(). Then I assigned the material property to either Color.blue or Color.gray depending on the current value of the controlled nation for that territory. Similarly, I set the color of the DistributeTroops button to red if the current state is distribute troops. However, I was able to access the color property directly from the GUIText returned from GetComponent<GUITexture>(). It is important to set it to white in the “else” clause, otherwise the button will forever remain red. I also went ahead and added code to set the color of the text of the active nation name to white, by doing a simple comparison against the current player global variable and setting the color property of the GUIText of the nation text objects. Otherwise, the nation text is displayed in gray.
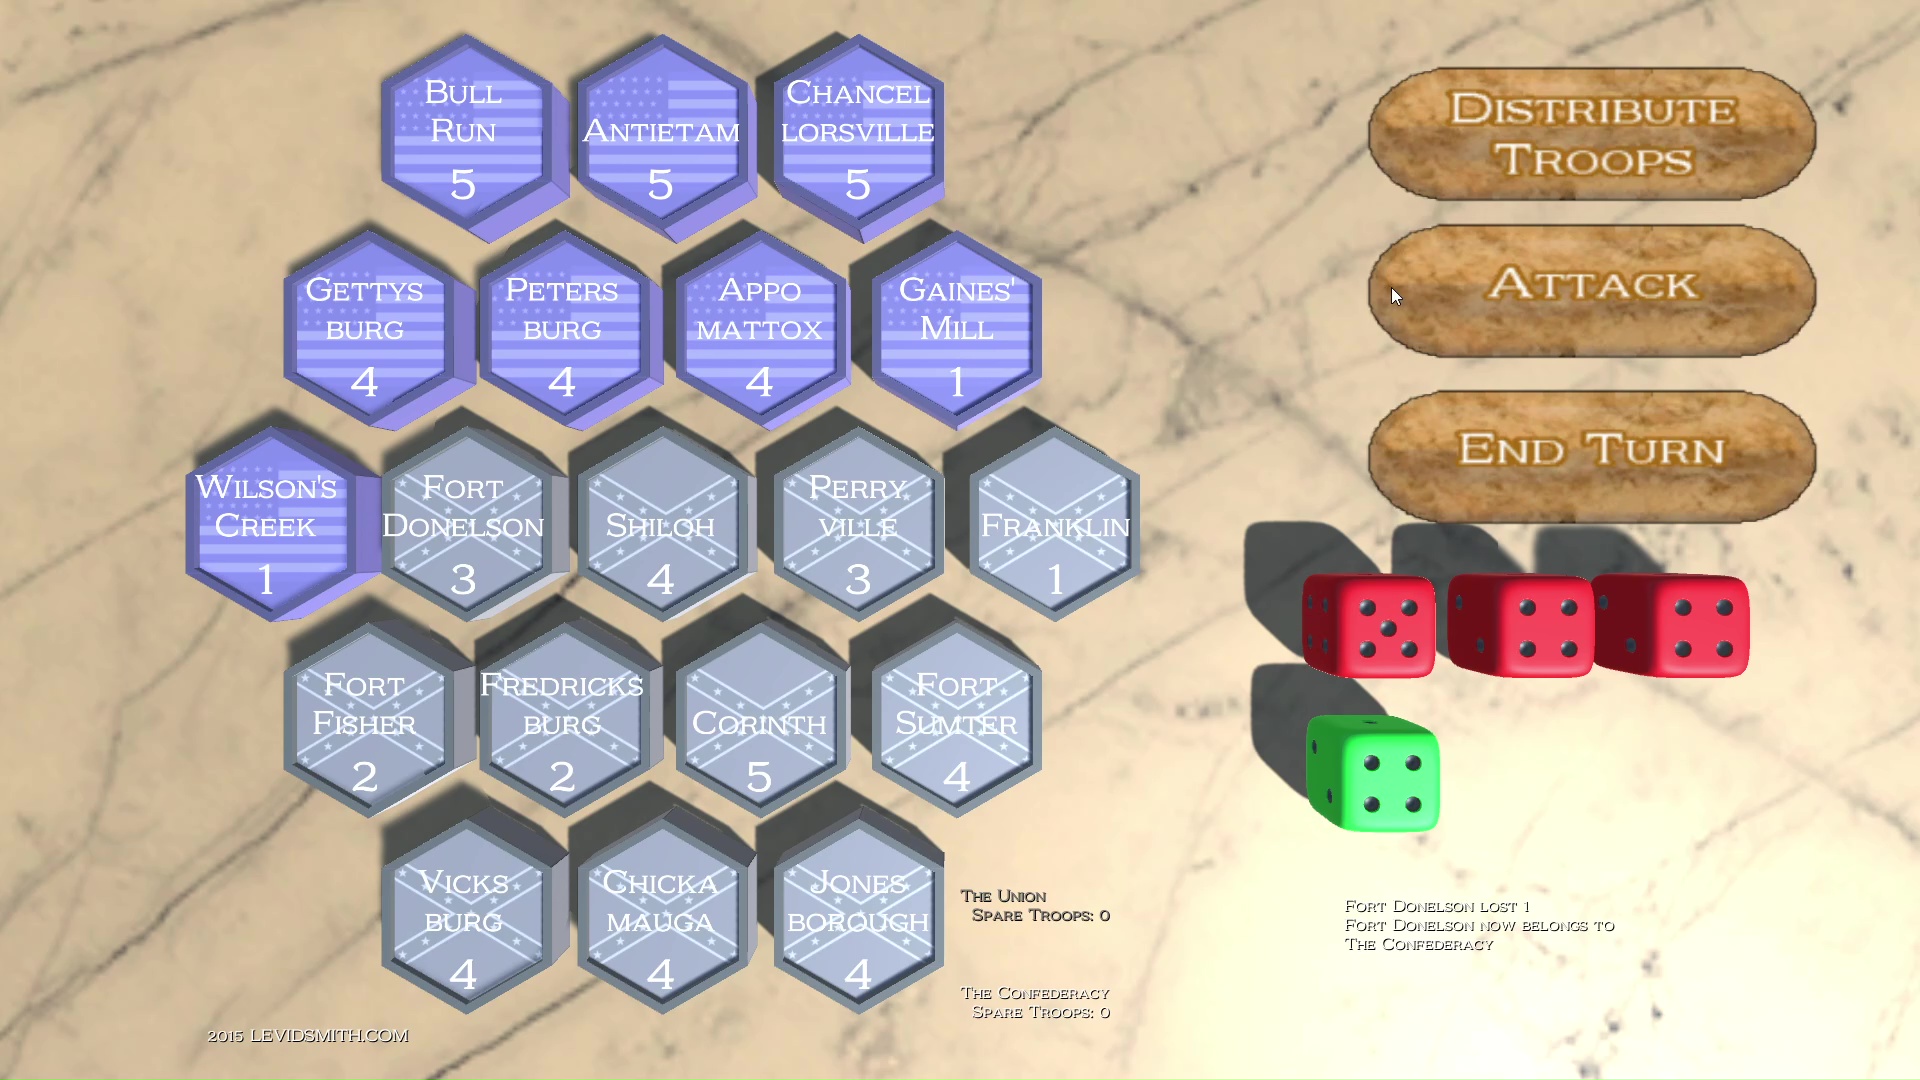
In order to simplify things during the attack, I added an id instance variable to the Territory class. This is a unique identifier assigned when the Territory is created. This will allow me to assign the Territory’s id to the two new global variables that I created for holding the attacker and defender territories. The attack transitions between three states, which are ATTACK_GETFROM, ATTACK_GETTO, and ATTACK_RESOLVE. To make things simpler for now, I am assuming that the attack and defender will use the maximum number of troops.
After the attacking and defending territories are chosen, die rolls are generated by using Random.Range(1,6). Three rolls are added to an attacker roll list and two rolls are added to the defender roll list. I used the Sort method to sort the two roll lists. Then I compare the last value in each list, until one of the two lists is empty. Each time if the attacker value is greater than the defender value, then one will be added to the defender troop loss. Otherwise, one is added to the attacker troop loss. Then the losses are assigned to the two Territories. I had to add a method to return a Territories based on the id passed in as a parameter.
 During the attack phase, I set the color of the territory to red if its id matches the id of the Global variable of the attacking territory. Similarly, if the territory id matches the id of the defending territory, then I set the color of the model’s renderer material to green. When the user presses the attack button, I set the Global variables back to -1 so that no territories are highlighted. The attack from and attack to Global variables are also reset when the player presses the End Turn or Distribute Troops buttons. To make things simpler, I created a static method called resetAttack in the Global class which sets these two values to -1.
At the bottom of the screen, a battle log text was added to display the results of the combat. It displays how many troops were lost from each attack and if the territory was captured resulting from the attack.
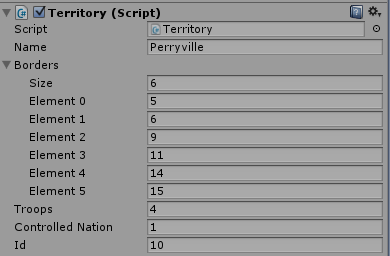 The game was working really well, but it still allowed any controlled territory to attack any of the opponents territories. I wanted only territories to be able to attack bordering territories. I had to go back and add the code to load in the border information in my Setup script. Again, it is important to remember to not initialize a new list in the Start method of the Territory, otherwise it will overwrite the data loaded in the Setup script. It is possible to verify if the border information is loaded correctly by looking at a territory in the inspector while running the game in the Unity editor and viewing the contents of border, which should have multiple numbers. It is also important to remember to import System.Collections.Generic in any script that uses the List object, since that package is not imported by default.
 After building a List of valid choices, I set the color to a lighter shade of red if the Territory is in the select attack state and it is a territory that can attack (has more than one troop and borders a territory controlled by the opponent). I did the same process of creating a valid choice list for the defender territories, but I made them a light green color instead. It is a little bit of a headache trying to figure out the valid choices for the attacker and defender territories. However, having the logic already written in the console game made the process a little less painful. It is also important to remember to put the loop iterator increment statement in the correct spot, otherwise Unity will lock up. There is a way to attach MonoDevelop to the Unity process and muck with trying to change your variable to break out of the loop, however that can sometimes take more time than just killing Unity and restarting. It’s hard to believe that Unity still hasn’t fixed that problem. The only solutions I’ve been able to find are killing Unity or, of course, not writing infinite loops which really isn’t helpful. I know Playmaker has built-in detection for loops and it will exit gracefully if it detects that condition (after 1000 loops I believe), which is one more reason while I like using that addon.
There was a slight problem due to the attacker always rolling three dice and the defender rolling two dice. This resulted in the possible case where the attacker could end up with zero troops in a controlled territory. Therefore, I used the logic in my console game to make it so that the attacker can only roll one less dice than the number of troops in the attacking territory. Similarly, the defender can only roll as many dice as there are troops in the defending territory.
 The final state is the game over state. I added a getTerritoryCount method which calculates how many territories a nation has. After each attack, that method is called, and if the number of territories controlled by either nation is equal to the total number territories, then that nations wins. At first I had the end game method check to see if either nation had zero controlled territories which would be the player that lost. However, that would not work if there were more than two players. If I was to develop this game further to include more than two players, then any player with zero controlled territories would be eliminated but the game would continue until only one player has control of all of the territories (all other players have zero territories).
The final step is to add the opponent AI. I wanted to keep this separated from the regular player input, so I created a new GameObject and AIInput script specifically handling the AI. The AI does not do mouse input and has minimal delay time, so I had to artificially add some delay. This is maintained through an delay instance variable. After some action is taken (programmatically), then the delay variable is set to a constant. On each update, the delay is decreased by Time.deltaTime until it is equal to or less than zero. At that time, the AI processing can resume. I currently have the delay constant set to half a second. It is important to not make the delay too low, or else things will flash by the player to quickly. It is also important to not make the delay value too high, otherwise the player will get tired of waiting. For now, I used a simple greedy algorithm, which always assigns all troops and attacks all territories. I have an isAI instance variable on the Nation which determines if the nation should be controlled by AI. I had to add checks around all of the mouse down methods on the territory so that those are only activated when the current player is not controlled by AI.
On each turn, the AI will check to see if there are any spare troops. If so then it will assign it to the first territory with the lowest troop value. Then it waits the delay period and repeats the process until there are no spare troops remaining. Then it moves to the Attack phase. It uses the same method to display the territories that can attack. It selects a random territory out of those that are able to attack. If there are no territories that can attack, then it moves to the end turn state. After it selects an attacking territory, then it calls the method for displaying the possible defending territories. The AI selects a random defending territory. Obviously, there is room for improvement when selecting attacking and defending territories. For example, the AI should attack from a territory with a higher troop count and select a defending territory that has a low troop count. To resolve the attack, the same attack method is called which rolls the appropriate number of dice and calculates how many troops are lost. After no more territories can attack, then the AI moves to the end trun state and control passes back to the player.
Now I have completed a fully functional turn based strategy game. The next steps to improve the Civil Warriors game would be to add better graphics, music, and sound effects. Please see my article on polishing a game for ideas on how to take a plain game and make it much more visually appealing.
![]()
![]()
Released